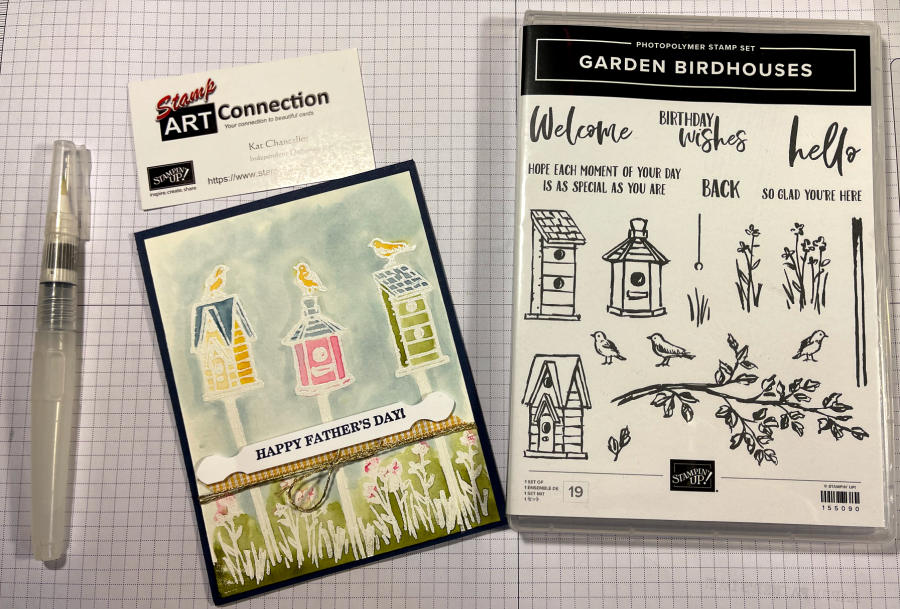
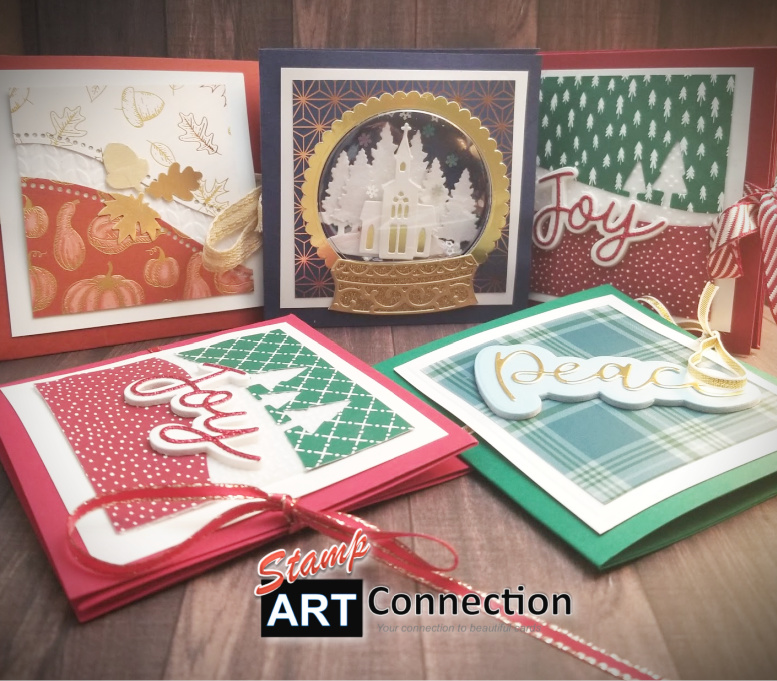
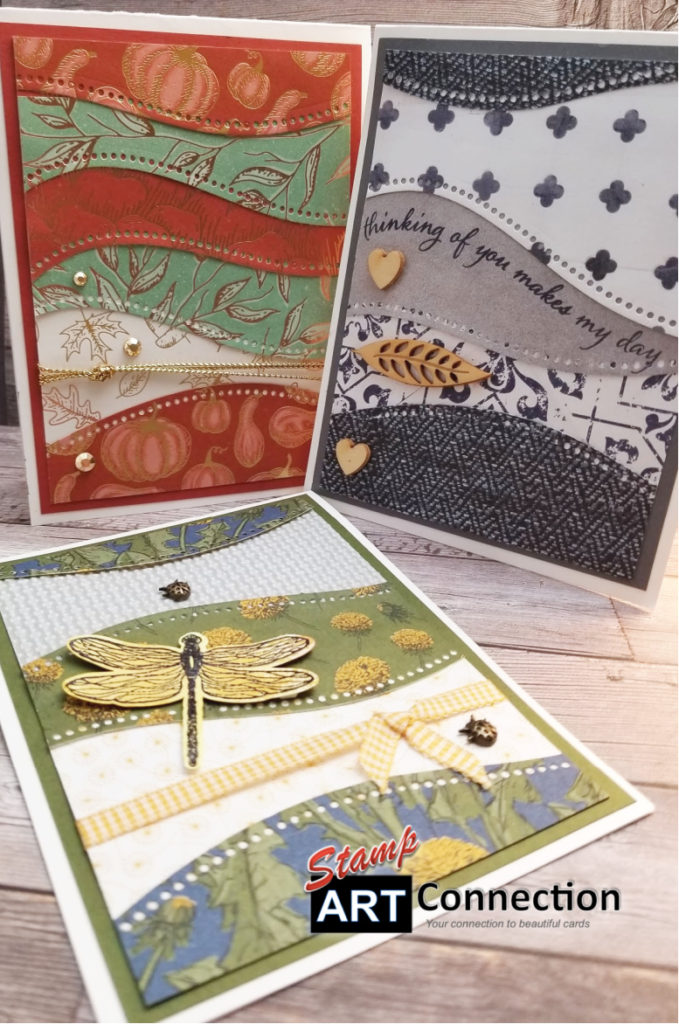
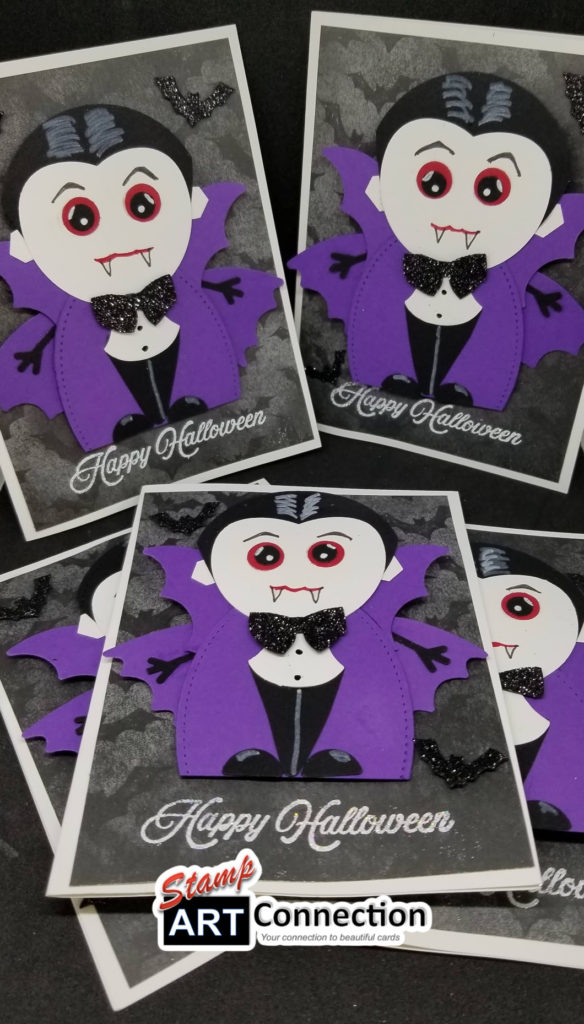
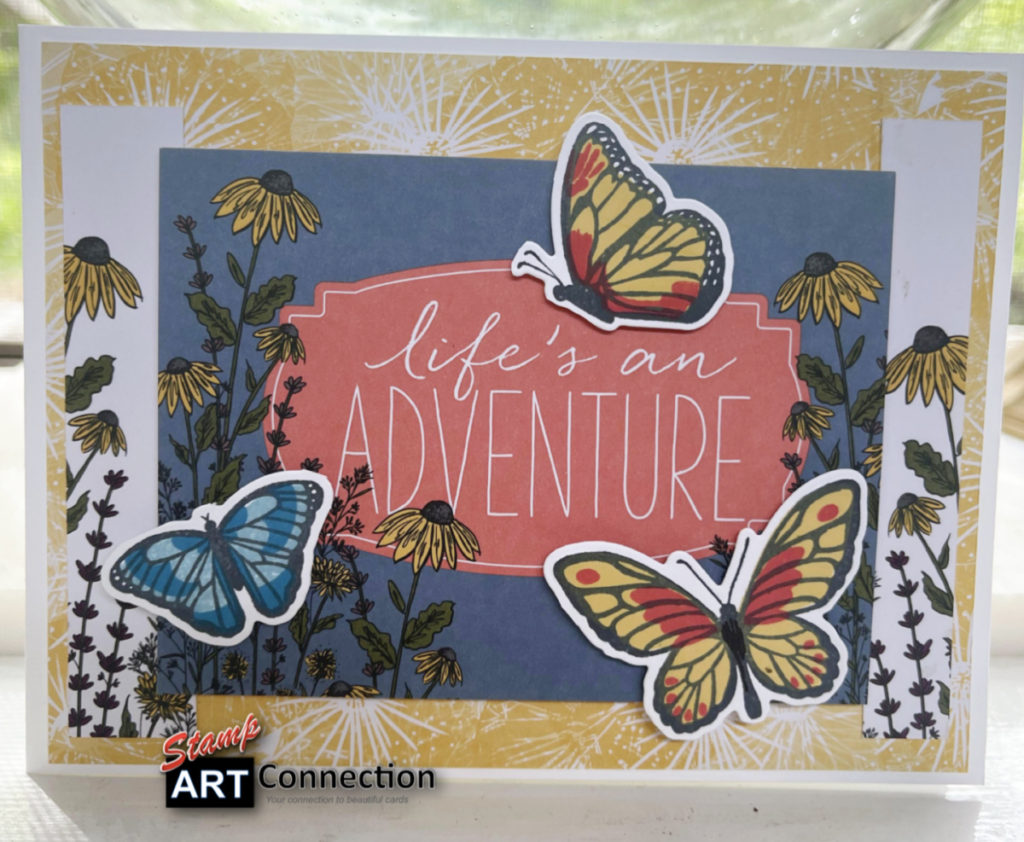
Sometimes you need to embrace the magic of acetate! From last week’s post, where I featured the Mercury Glass Acetate; I wanted to present another project using plain acetate or WINDOW SHEETS.
Again I feature the NATURE’S BEAUTY and SNOW FRONT stamps to demonstrate the versatility these sets provide.
Follow the Video Tutorial where I provide some tips and tricks after several failed attempts…I turned on the camera, hit record… and just “went for it” to film the process of putting this project together. Hope this provides some inspiration…please leave a comment and thank you for stopping by!!!
INKS: NIGHT OF NAVY, BLUEBERRY BUSHEL, MEMENTO BLACK and StazON ink (for stamping on acetate).
SIZES: Base card in NIGHT OF NAVY (5.5″x4.25″ longways), inside is WHISPER WHITE (10″x4″) to brayer with BLUEBERRY BUSHEL.
After the color is applied with SPONGE BRAYER…cut in half.
FRAMELITS: Use the LARGEST of Layering Ovals to cut the Night of Navy. Use the next size of Layering Oval to cut the INSIDE. Use WASHI tape to hold in place when you run the piece through your cutting machine.
COLOR: Color the Fox with Stamping Blends Alcohol Markers after the image is stamped with MEMENTO BLACK ink.
Use WHITE GLIMMER paper to cut the pieces from the PEACEFUL BOUGHS set.
The sentiment “enjoy the stillness of the season” is from the MERRY MOOSE stamp set.
Use the SNOWFALL ACCENTS PUFF PAINT for the snow around the fox’s feet.
Do you love creating unique backgrounds? Well, here are a couple of techniques featuring the gorgeous Mercury Glass Designer Acetate.
This is another project challenge from the “25 Products from Under $25 List Gift Ideas”. I loved the tranquil scenes from the SNOW FRONT stamp set and the trees from BASIC PATTERN Mask. I wanted to create a project using these backgrounds as settings for the realistic animal images from NATURE’S BEAUTY stamp set. Tell me what you think!
The serene illusion of a snow-covered background was created by using the tree pattern from the Basic Pattern Mask using Embossing Paste on acetate. The contrast between the shiny glimmer of the silver acetate and the matt white tree shapes is stunning. The pattern on the silver acetate looks like a blizzard!
I stamped the realistic animal images with Memento Black Ink and colored them with Stampin’Blends. I stamped a page of images, colored them and then cut them out using my SCAN-N-CUT machine for a great result.
Watch my video tutorial for more tips and directions to create these stunning cards! Please leave and comment and Thank you for visiting my blog!!!
Featured Products:
Softly Falling Snow Scene
The secret to stamping perfectly on acetate is the STAMPARATUS. Use a STAMPARATUS to stamp the tree backgrounds with STAZON ink on the Mercury Glass Acetate. The silver pattern from the acetate evokes snow softly falling.
I love all the possibilities for creating fun projects especially when Stampin’ Up! provides some great inspiration with the pre-cut coffin boxes. Just by themselves, they are cute! I experimented with techniques when I made several to give away to my customers during my last workshop (more details below) and then decided to create a spooky glam wreath for Halloween! I used the BAT Punch which is retired from last year as an homage to my customers who ask that I incorporate old and new SU products to inspire and demonstrate how versatile your crafting investments really are! So don’t tarry….load up on these great products now for this year…or be ready for next year!
Please check out the Video Tutorial taped while I was putting this project together. I had an idea in my “mind’s eye” but wasn’t totally sure how I was going to pull it together. I didn’t want to create a wreath of entire coffins because I wanted the wreath to have more visual interest. I was also limited to use the products I had at hand.
I wanted a glam look and choose to use BLACK card stock and the MERCURY GLASS DESIGNER ACETATE for a black and silver look. I added GOOGLY EYES as whimsy and used my bat punch from last season to cut silver foil and silver glimmer pieces. Lastly, the 3/8″ GLITTERED ORGANDY RIBBON adds sparkle and sophistication!
Decorating Techniques
Before assembling the coffin boxes; I used a different embossing medium to stencil the filigree pattern mask from the BASIC PATTERN DECORATIVE MASKS on the lid with:
Gold DELICATA Ink applied with a sponge dauber
Silver Embossing paste applied with a palette knife
White Embossing Paste applied with a palette knife then distressed with a sponge dauber using Memento Black Ink
My video tutorial provides all the details from decorating, assembly, and embellishment.
Featured Products
Utilize embellishments and stamps from the Monster Bash Suite!
Purchase the suite with great embellishments when you order the complete SUITE!
I love winter shaker cards…because they truly evoke the feeling of “it’s beginning to look a lot like Christmas” especially using the SNOW FRONT and the sentiment from the MERRY MOOSE stamps set to say, “enjoy the stillness of the season”.
This is another “25 Products Under $25” Challenge card! Follow the Video Tutorial featured below. I have also added more project ideas using this suite of products for more inspiration!
Thank you for stopping by…please leave a comment!
CARD RECIPE
CARD STOCK: Night of Navy (base card 5.25″x4.25″), Window Layer (5″x3.75″), Whisper White (Layer 5.25″x4″), layer for scene (4.74″x 3.5″) and inside sentiment (5.25″x4.25″), Window Sheet (4″x 3.5″)
I have often gotten requests from my customers, “Kat, give us ideas on how we can use the products we have to create new projects!” This week’s post is all about:
What’s old is new again!
I love taking something familiar and by using new products create a take from a different point of view on an old favorite! For my seasonal take on Fall, I used my favorites: PAINTED HARVEST stamp set and thin-lits from the SEASONAL LAYERS DIES to create these quick and easy cards using a fresh pop of color and bold composition inspired by the new COME TO GATHER Designer Series Paper.
What makes the difference for me is the change-up of color and the lovely leave pattern from the DSP! The combination of the colors and textures of Merry Merlot, Cajun Craze, Copper Foil and Burlap — make all the difference when working to refresh an old favorite! Check out the new ideas and then peruse the Video Tutorials from Painted Harvest to inspire another generation. Please don’t miss the PRICELESS keepsake from a grandaughter told below! Thanks for stopping by and leave a comment!
COME TO GATHER DSP (3.75″ x 2″) on Whisper White Card stock (5.25″ x 4″) embossed with the 3D SUBTLE Embossing Folder. Leaves cut using the SEASONAL LAYERS THIN-LITS in Merry Merlot and Cajun Craze card stock embellished with a whisp of GOLD Thread and Burlap Ribbon.
COME TO GATHER DSP (5″ x 3.75″) on Whisper White Card stock (5.25″ x 4″) Leaves cut using the leaves SEASONAL LAYERS THIN-LITS in Copper Foil and Vellum card stock embellished with Burlap Ribbon.
Sunflower Harvest
Wow, what a difference color can make on this favorite. Here I used MERRY MERLOT and CAJUN CRAZE to creat the sunflower. The center is stamped with SOFT SUEDE ink. THe leaves with Daffodil Delight. However, what makes this card pop is that I stamped the top layer and centers with the Delicata CELESTIAL COPPER ink to add glimmer and depth!
Take a look at the ideas and projects from last year that are still fresh and relevant with just a color change!
Customer Favorite
Besides being one of my top YOUTUBE video viewed by over 1K of subscribers…this is one of my Customer FAVORITES! Recently a friend shared that she made the gift box and cards at one of my workshops last year. She gifted to her 90-year young grandmother. During a recent visit this summer to her grandmother’s she remarked that the box was sitting on her Grans dresser filled with trinkets…all the cards had been given to friends…but the box remained a treasured keepsake….THAT IS PRICELESS.
Here are the second group of projects featuring the products from the 25 PRODUCTS UNDER $25 list using the Wrapped in Plaid suite!
I was inspired by the products featured on page 12 of the Holiday Catalog!
This suite speaks to a happy “O’ Christmas Tree” feeling. I love the traditional colors (Cherry Cobbler, Night of Navy, Shaded Spruce and Gold Foil accents) and patterns (plaid, holly berries, pine cones, and Christmas stocking) on the Specialty Designer Series Paper. The sentiments are great for either card or tags greetings.
Explore further and you find great versatility using the Perfectly Plaid stamp set and Pine Tree punch. Below I feature cards with Christmas Trees fronts stamped with ink using both classic and mock watercolor techniques. The stamps are perfect for tags on GOLD FOIL pizza boxes! These are great for treats since they are food safe. Look at all the perfect holiday projects you can get from this ONE suite! Happy Holidays!
Card Recipe
STAMP SETS: Perfectly Plaid CARD STOCK/DSP: Wrapped in Plaid Specialty DSP stack (3″x4″ piece and 4″ x 2″ piece for card front using standard 5.5″ x 4.25″ card in Whisper White), Gold Foil is cut using the Layered Stitched Rectangles (using the size that will fit the sentiment stamped in Cherry Cobbler) INK/COLORING TOOLS: Night of Navy & Shaded Spruce Classic Stampin’ pads, Versamark ink, White Stampin’ Emboss Powder. Stamp the tree images using Night of Navy ink on Shaded Spruce card stock and stamp with Shaded Spruce ink on WW card stock, lastly emboss the Shaded Spruce cardstock with White and cut all the trees with a punch. ACCESSORIES: Embellish the tree with Gold Metallic Pearls, 3/8” Shaded Spruce & Gold Ribbon is used to hide the seam between both DSP pieces on the front. ADHESIVES: Snail, Dimensionals & Multipurpose Liquid glue. Pop the tree (embellished with the Gold Pearls) on dimensionals and arrange the other trees behind – staggering their heights. TOOLS: Stitched Rectangles, Pine Tree Punch, Heat Tool for the white embossing. TECHNIQUE: I used the small pinecone stamp piece to create a tree pattern on Whisper White Card Stock that I then cut out with the Tree Punch (see the far right tree)
Card Recipe:
STAMP SET: Perfectly Plaid CARD STOCK/DSP: Shaded Spruce Card Stock (cut standard size 5.5″ x 4/25″), Wrapped in Plaid Specialty DSP stack (cut 1″ x 4″) for accent, & Cherry Cobbler CS (cut .75″ x 4″ with pennant end), Watercolor Paper (5″ x 3.75″) INK/COLORING TOOLS: Pool Party, Shaded Spruce, Night of Navy Classic Stampin’ pads, Versamark ink, White Stampin’ Emboss Powder ACCESSORIES: Iridescent Sequin Assortment, Twine, Wink of Stella ADHESIVES: Snail, Dimensionals & Multipurpose Liquid glue TOOLS: Aqua Painter, Pine Tree Punch, Stampin’ Spritzer and scissors to rough edges on watercolor paper. Technique: (1) First prepare the background by wetting WC paper with water and using the Aqua Painter to mix SMALL AMOUNTS both Pool Party and Night Of Navy ink as a faint wash. Let dry. (2) the Faux Watercolor technique – mist the inked stamp surface prior to stamping the Shaded Spruce image on the watercolor paper. (3) Let dry before punching the shapes so the paper doesn’t tear. (4) Assemble with dimensionals and staggering the heights. Use dimensionals to add the sentiment which is embossed in White on Cherry Cobbler Card Stock. Wrap with twine and tie a bow. (5) Added a wash of Wink of Stella around the edges of the trees for a touch of glimmer.
Gold Pizza Gift or Treat Box
Gift Box Recipe:
STAMP SET: Perfectly Plaid CARD STOCK/DSP: Wrapped in Plaid Specialty DSP stack, Whisper White, Cherry Cobbler card stock INK/COLORING TOOLS: Night of Navy and Shaded Spruce Classic Stampin’ pads ACCESSORIES: Gold Twine, Gold Pizza Box, Red Rhinestones ADHESIVES: Snail, Dimensionals & Multipurpose Liquid glue TOOLS: Stitched Shapes Circle Dies, Pine tree Punch, Layering Circles Dies (scalloped edge for first circle layer). (1) Cut both a scalloped and stitched circle in Cherry Cobbler (size should be dictated by the size of box or your choice). (2) Stamp tree images with both Shaded Spruce (on WW) and Night of Navy inks (on Shaded Spruce) card stock and cut with tree punch. Embellish the WW tree with RED Rhinestones and layer on Cherry Cobbler circles. (3) Cut 2.75″ x 1″ (approx) to stamp the sentiment in Night of Navy ink. (4) Cut Wrapped in Plaid DSP by 3.25″ x 1″ and cut into a pennant. (5) Layer pieces with Multipurpose Glue and wrap the WW sentiment with gold twine for glimmer.
North Pole Delivery Tags
STAMP SET: Perfectly Plaid CARD STOCK/DSP: Wrapped in Plaid Specialty DSP stack, Cherry Cobbler, Shaded Spruce, and Whisper White Card Stock INK COLORING TOOLS: Night of Navy Classic Stampin’ Pad ACCESSORIES: Nature Twine, Jingle Bells, Gold Star ADHESIVES: Snail, Dimensionals TOOLS: Pine Tree Punch, Stitched Shapes Dies
(1) Punch two tree shapes and score both in the middle to create a crease . Use the crease to FOLD one tree. (2) Use FINE TIP GLUE and place a bead along the crease of the flat tree. Place the FOLDED edge of the other tree into the crease along with the glue. Hold until glue sets. and then glue tree in the center of the Stitched Circle in either Cherry Cobbler or Shaded Spruce. (3) For the TAG: Cut a piece of Whisper White 2″ x 4.5″ and use the TAG TOPPER to punch top. (4) Stamp sentiment in Night of Navy ink on the bottom and affix the tree medallion. Use your choice of twine and bell to embellish your tag!
HO HO HO Tag
Using the same product list; fussy cut stockings from DSP, Cut DSP 3″x 2.75″ and use the TAG TOPPER punch and punch both ends. Cut Shaded Spruce with small SQUARE stitched shapes framelits, using WHITE embossing powder stamp HO HO HO on Cherry Cobbler. Layer, add embellishment and tie with twine.
Paper Bow
(1) Using any DSP cut each in the following lengths: eight 1″x6″ (need eight total for the outer ring), 1″x5″ for the inner ring and one 1″x4″ for the center loop.
(2) Take FOUR of the 1×6 strips of paper and place the pattern you want OUTSIDE face down; put adhesive on one end of each strip. (3) Take the FOUR other of the 1×6 pieces and do the same. (4) Take the FOUR 1×5 pieces and do the same. (5) Twist each strip and adhere the ends to where you have POINTED ends. Wrap the 1×4 strip and create a circle.
(6) Take a BRAD and attached four of the petals together until you have THREE separate “bows” and the center circle. Then place GLUE DOTS into the center and begin to layer the bows by stacking each layer and then putting the circle in the center to complete the bow.
Here are samples of all the different trees that are possible with this set!
If you subscribe to my newsletter you know that I featured the “25 Products Under $25” and have made it a personal challenge to create projects from that list! So….the first item on that list is the PRESSED PETALS Journal! Let the challenge commence!
I fully admit. I went “ga-ga” for this project. I mean; the length of this post should be an indication! It kind of happened in steps…FIRST: I was intrigued by the JOURNAL and inspired to create some projects from the “25 Products…” page. I ordered the JOURNAL as part of my pre-order; while I waited — I created a series of cards (posted at the bottom) to play with the idea of how to create the journal cover. I wanted to add a ribbon tie because I thought as a memory keeper…you need a ribbon tie to hold all your pieces and parts in place! Must-Have Ribbon! I had so much fun with the “To a Wild Rose” set and then just drooled over the Scripty embossing folder on vellum! It is featured in every project. What fun!
SECOND: I received my Holiday Pre-Order and fell in love with the journal once I had the chance to look closely at the softly “de-bossed” cover and twenty-five memory keeping pages perfect for journaling, photos or even pressed flowers (think as a gift for a bride or wedding party!).
THIRD: I went crazy one rainy afternoon and just filled the pages with all my favorite stamps, images, sentiments and snips of ribbon to further embellish the pages. Now, I admit I got carried away and you really don’t need to stamp E-V-E-R-Y page! But have fun trying!!! I had my nieces in mind and wanted to add little sentiments of thanks, gratitude, love, and blessings. What a way to make a really personal gift!
Please take a moment to view my Video Tutorial for creating a lovely cover design. Let your imagination inspire you for the holidays to create this perfect stocking stuffer for friends and family. And then check out the cards that are further inspired by the project at the bottom!
Here’s a TIP: Don’t use Stampin’ Blends to color any images on the journal pages. The pens BLEED and will ruin the reverse page. What I did was stamp (the magnolia blossom) on separate card-stock, cut it out and then pasted in on the page with a dimensional after coloring with PETAL PINK and MOSSY MEADOW.
To A Wild Rose Journal Cover
RECIPE:
Vellum (cut 3.5″ x 4.75″) & embossed with the Scripty 3D Embossing folder.
Mossy Meadow Card Stock (cut at 3″ x 6″ and scored at 3″)
Whisper White (cut at 2.75″ square)
Crumb Cake (cut at 2.25″ square)
Very Versailles Stamp Set (inside journal pages stamped with Crumb Cake and Mossy Meadow Inks)
Mossy Meadow Ink (use the stamp-stamp-off technique to create a background pattern with the leaves stamp on the Crumb Cake CS. from the Very Versailles set)
To A Wild Rose Bundle (stamp TWO Roses on WW cardstock with Memento Black and Rocco Rose Inks using the stamp-stamp-off technique for the background stamp and full ink strength for the second stamp (this is a TWO STEP stamp image). Use same for LEAVES using Mossy Meadow ink.
Cut out TWO Flowers and TWO leaves
Sponge Daubers – Daub ink around the edges of both the flowers and leaves after cutting them out to soften edges.
Refer to VIDEO: Carefully snip petals apart and then use BONE FOLDER to c-a-r-e-f-u-l-l-y curl the petals.
Snip 22″ of Ribbon and refer to VIDEO on assembly.
PRODUCTS FEATURED:
MUST HAVE — Click and add to your SHOPPING CART NOW — the Scripty 3D Embossing Folder makes gorgeous backgrounds on cardstock or vellum.
Inspire — Add messages and images to personalize your Journal featuring these products:
Pressed Petals Inspiration
Another Journal Cover using the Pressed Floral Suite.
Whisper White and So Saffron Card Stock
Pressed Petals DSP
Stitched Label Dies (WW), Petal Label (So Saffron)
TIP: One way to seal your DSP to your cover is to use CLEAR embossing powder and your Heat Tool. Just spread the powder over the DSP and HEAT. Then add the other layers.
There are so many ways to express yourself through art. Look around you…rugs and tile for textile design, wall color, yard topiaries, garden sculptures, and architecture are just the beginning of the art we live with.
Step out and take a visit to a local fair or art gallery to envelop yourself with a whole other grouping of visual arts…from fine art paintings to modern art installations! I can get lost in a Fine Arts Museum as fast as I can lose myself at an Art Festival or church crafts fair. You can find art everywhere!
Recently, my husband and I were traveling the famous “Route 66” through Amarillo, Texas and came upon a famous art installation called “Cadillac Row”! Once we reached our destination we visited the world-renowned J. Paul Getty Museum in Los Angeles where I just soaked in the color and beauty of a favorite Van Gogh. Finally, a walk along Santa Monica Beach to the famous Venice Beach; where a “boho” explosion of self-expression and self-discovery awaits. Your eye never tires when you look for the ART in everything around you! The art of self-expression is everywhere and for everyone!
My love of self-expression was one of the reasons I joined as a Stampin’ Up! Independent Demonstrator — I love the DISCOUNT!!!, I love sharing what I do!!! and I love the versatility of products and projects that serve all forms of self-expression…from Christmas ornaments, Easter baskets, Magnolia or Butterfly wreaths, pick up trucks, and cuckoo clocks! More importantly, the ability to put personal touches and a message of love to family and friends…small works of love that become a work of art!
This week I really enjoyed playing with the Follow Your Art Suite: made just for your inner artist. The stamps, dies, embellishments (with felt accents!), and super fun designer series paper all pay tribute to the ways to create a masterpiece; you won’t want to stop crafting!
The suite even comes with Mini Shipping Boxes so you can decorate them with the embossed buttons pattern that you can use for gift boxes. Take a look at the projects featured this week….a pop-up card Tutorial using the Mini-Shipping Box! Something to share with every artist you know!
Thanks for stopping by! Please leave a comment!!!
Easy Box Card “Got Art”
Here are all the measurements and av video tutorial to make this easy fold-up box card using the Mini Shipping Boxes. Just stamp, color with your favorite colors from either Stampin’ Blends or Stampin’ Write markers in colors to coordinate with the Follow Your Art Designer Series Paper! Die-cut or fussy cut pieces and place on two dividers (Crumb Cake card stock). These fold and fit in an
Video Tutorial (Please LIKE and Subscribe!)
Bundle all the products from this Suite with one EASY purchase!
The ANIMAL OUTING stamps and ANIMAL FRIENDS dies are perfect for all ages and all occasions (birthday, welcome baby, friendship, love). Sometimes when I’ve had enough petals, stems and leaves…I have to shift gears and enjoy the refreshing simplicity and FUN from working with a stamp set that features critters! They never fail to make me smile!
I think we’re all young at heart when it comes to animal cards….everyone loves them. No matter if you love shabby chic, classic elegance, modern motifs or Victorian fancy….a card with an endearing sentiment and a funny face says it all…..
I’ve included the products used and (most) everything is available on my online store!
I sat down last Saturday (during a lazy afternoon of thunder storms) and made over a dozen magnolia flowers using the Magnolia Memory Dies from the Magnolia Lane Suite. I had in my mind’s eye a wreath using a grapevine as the foundation.
Since the Grapevine Wreath was about 10″ in diameter (much larger than anything I have worked with), I used the Balloon Punch to create larger blooms. The secret is to use a bone folder to curl the petals. I also”pinched” the tips to hold the shape and once each bloom was assembled I curled each bloom in my hand — cupping my hand over them to form a loose ball to give them more shape. Once the flowers were assembled and formed, I spritzed lightly with water and let dry on a window sill for a couple days.
I found a great tip for making the leaves. Thank you to WOW NOLA Creations, a SU Demonstrator — Susan L. (who shared a cab with me to the airport while in Atlanta for On Stage last year!) for the steps to create leaves using the Corrugated Embossing Folder (fold cardstock in half and run through your machine at a 45 degree angle) — check out her “how to create a rose using the balloon punch video”! Very simple and it allows you to cut the leaves to any size. Since I had a wreath in mind; I wanted bolder, bigger leaves. This technique suited the project perfectly.
TIP: If you are seriously considering a project like this…I recommend putting 2 Framelits sets in your cart. It sped up the production line and saved me time making over a dozen flowers.
To refer to my earlier posts on assembling the flowers use this LINK.
Living here in the south, where Spanish Moss festoons mature Oak and Magnolia Trees — I couldn’t resist picking up a bag of moss from my craft store to add to my wreath! I think it add the perfect touch!
My ON LINE store has all products featured to make the flowers and ribbon for embellishment. Please check out my Video Tutorial for how to assemble this gorgeous wreath! Leave a comment! I love to get your comments!
Products Featured:
CARD STOCK: Whisper White, So Saffron, Mossy Meadow or Pear Pizzaz INK/COLORING TOOLS: Mossy Meadow, So Saffron, Early Espresso, Sponge Dauber ACCESSORIES: Ribbon (hang and drape around wreath) Adhesives: Mini Glue Dots, All Purpose Glue & Hot Glue Gun Tools: Magnolia Memories Framelits, Hot Air Balloon Builder, Corrugated 3D Folder (151811) (page 199 of catalog) Punch, Bone Folder, Stampin’ Spritzer with water Non-SU products: Grapevine Wreath (10″ diameter)
I have been getting some questions about the different Embossing Folders that are in Stampin’ Up! current catalog inventory. You may have the OLD style and confused about the differences with the NEW style. Let me try to explain:
Old “dynamic” folders
There are the OLD — what was know as “DYNAMIC” folders. The sandwich for those remain — one of the CLEAR Plates
and the BOTTOM PLATFORM for the cutting machine. Because the dynamic folders were so THICK; you only needed ONE clear plate. If you try to push these folders using either: (1) both plates or (2) the “THIN DIE ADAPTER” plate…you will BREAK THE FOLDERS! Especially if you use an electric cutting machine. In that case, use the BOTTOM PLATFORM shown below and ONE of the clear plates.
3D EMBOSSING FOLDER PLATE
Now STAMPIN’ UP! is introducing a NEW 3D Embossing Folder Plate to work with their new-style 3D embossing folders (which are thinner than the old-style Dynamic folders). Below is a photo of the new product:
The new plate makes up the difference in measurement between the old-style Dynamic Folders (which are thicker) and new-style 3D Folders in 21 mm gap machines (similar to the machine SU used to offer).
The 3D Embossing Folder Platereplaces the Standard Cutting Pads in your 3D embossing folder sandwich for continued high-quality emboss results.
To create your emboss sandwich:
Use a die-cutting & embossing machine platform as a base; no matter which machine you’re using, use the standard platform which comes with your machine.
Use the 3D Embossing Folder with your paper in the middle.
Then use the 3D Embossing Folder Plate on top.
Given the differences in machines and platforms, you may still have to add a shim to get your desired embossing results. (You can also spritz your paper before embossing to maximize your embossed impressions.)
New Products Available!
These 3D embossing folders are now available to order in the new style.
BASKET WEAVE 3D EMBOSSING FOLDER (item 151797)
LACE 3D EMBOSSING FOLDER (item 151815)
SEASONAL WREATH 3D EMBOSSING FOLDER (item 151796)
SUBTLE 3D EMBOSSING FOLDER (item 151775)
TIN TILE 3D EMBOSSING FOLDER (item 151801)
COUNTRY FLORAL 3D EMBOSSING FOLDER (item 151823)
Hope this helps. Leave me a comment if you have any questions….cheers, Kat C.
Thank you Donna Gray Stampin’ Up! Demonstrator from NSW Australia for her inspiring tutorial! I love the combination of GREY GRANITE, CRUSHED CURRY and Memento Black for a simple creation.
Either the Medium and Daisy Punches make it so easy to build the lovely 3D flower and with just ink, paper and stamp! Viola! You can create a 3D flower and a beautiful background. Very simple for a beginner stamper with a little help from SU!
Casual Stamper
NEXT STEP: Layer Pear Pizzaz and Garden Green card stock with Ink on Whisper White card stock to create this base card and background. Stamp the daisy on Whisper White card stock with Highland Heather ink, color the center with Daffodil Delight and add the Perennial Essence Flower center to your 3D daisy to take it to the next level. Finally, a Stitched Nested Label die is the perfect foundation for the sentiment.
Avid Stamper
Okay, ready to up the game? If you are ready for a more layered version with just a few more steps; try these wonderful flowers. Not only ONE but TWO! A simple white and green background is perfect for the bright and colorful flowers. Color the stamped centers of the daisies with Early Espresso and it connects with larger 3D flowers. Not sure if they are poppies or zinnias? What do you think?
Look challenging? No worries because I provide a detailed product list and HOW TO Video for this and several more card versions below:
CARD DIMENSIONS: Whisper White (WW) Card Stock (5.5″ x 4.25″), layer with Pear Pizzaz (PP) (5.25″ x 4″), and WW (5″ x 3.75″) card front.
CARD STOCK: Calypso Coral, Daffodil Delight for Flowers
INK: Calypso Coral, Pear Pizazz and Early Espresso
RECOMMEND USING the : Early Expresso Alcohol Ink Stampin’ Blends Marker (Dark) to color PERENNIAL ESSENCE floral centers
EMBELLISHMENTS: Perennial Essence Floral Centers
TOOLS: Stampin’ Piercing Mat
Pretty Purple Posey
I love the combination of Highland Heather and the new Purple Posey color! All you really need to set off this mono-chromatic composition is add texture and interest (HINT: copy this down because this is a FORMULA you can apply to future card making!)
Accomplish this by simply using an embossing folder for the texture and add linen thread to add as a visual anchor for the flowers. Embellish the flowers with accents of Pear Pizazz leaves and Vellum sprigs to give it depth and a focus point. The Highland Heather oval, pulls the whole composition together.
– CARD STOCK: Highland Heather base card, Purple Posey (5.25″ x 4″) card stock for layer
– Whisper White (5.25″ x 4″) and card stock to stamp and punch flowers
– Pear Pizzaz and Vellum pieces for punching leaves
I take a weekly exercise class with a great instructor who also teaches ballet and is herself an accomplished ballerina having danced with several local dance companies here on the Gulf Coast (to include Pensacola’s own ballet company!). So, when I saw the “Born to Shine” stamp set…I had no one else but Kathleen the Ballerina in mind!
I spent the weekend making several cards that I wrapped carefully with a purple ribbon and gave her. She loved them!
It is so nice when a stamp is perfectly suited; and when you combine and layer color, texture, shine and sparkle….it becomes really a fun and satisfying creation! The sentiments are lovely.
I have a lot more ideas of what to do with this set I will likely share later; but I couldn’t resist the combination of Highland Heather and Purple Posy framing the Swirls and Curls embossed layer.
See below for products, technique and steps below:
Products and Steps:
STAMP SETS:
Born to Shine
Bokeh Dots
CARD STOCK:
Highland Heather or Rocco Rose (5.5″x 4.25″) Base Card
Purple Posy or Blushing Bride Layer (5.25″ x 4″)
Whisper White Card Stock
INK:
MEMENTO Black
FROST WHITE Shimmer Paint
COLORING:
Stampin’ Blends in L/D Highland Heather, Petal Pink, Mango Melody or Soft Suede (hair color), L Petal Pink for skin. Dark PP or RR for dress.
TOOLS:
Sponge brayer or dauber to spread shimmer paint ink on stamp.
1.75″ x 7/8″ Oval (Punch or Layering Ovals) for sentiment
EMBELLISHMENTS:
Woven Threads Sequin Assortment
Ribbon: Very Vanilla Scalloped Lace Trim
Highland Heather Ribbon (OC) Retired
INSTRUCTIONS:
Cut base cards and Layers in Hh/PP or RR/BB
Whisper White layer (5″x 3.75″) embossed with the Swirls and Curls Embossing Folder
Whisper White cut (4″ X 2.75″) and stamped with the BOKEH DOTS stamp using FROST WHITE SIMMER PAINT
Stamp dancer with Memento Black ink (careful that the shimmer paint has dried completely)
Color image with Stamping Blends when MB ink is dry to avoid smears.
Use STAR stamp with Shimmer paint to stamp around arms.
Color Very Vanilla with Stampin’ Blends (Light) to coordinate with card stock and wrap around embossed WW layer.
While a freshman at the University of New Mexico in Albuquerque nearly 30 years ago (boy, really dating myself)…I experienced my first “mass accession” during the balloon fiesta. Imagine a field of over 200 balloons slowly being filled and slowing filling with air, glowing from fire and they lifting above. Who would imagine that 30 years later the Albuquerque Balloon Fiesta has become an international event. So, is it any surprise that this bundle was a “must have”?
I have added several versions of how to create balloon cards and please peruse my Video Tutorial where I will provide the “how to’s” and tips for making your own soaring adventure!
Products and Sizes:
STAMP SET:
ABOVE THE CLOUD bundle with PUNCH
GRACEFUL GLASS DSP
Stamping Blends: Poppy Parade, Daffodil Delight, Night of Navy, Call Me Clover
Crumb Cake Marker
CARD STOCK: Blueberry Bushel (card base), Whisper White (5.25×4″), Watercolor Paper (5″ x 3.75″)
TOOLS: Spritzer, Aqua Painter, Heat Tool
INK: Balmy Blue and Blueberry Bushel, Memento Black, VersaMark and WHITE Embossing Powder
DIES: Layering Circle Dies
Products and Sizes:
STAMP SETS:
ABOVE THE CLOUDS with Punch
WATERFRONT stamp set
CARD STOCK: Blueberry Bushel (base card), Whisper White (5″x3.75″)
INK: Gorgeous Grape, Balmy Blue and Purple Posey, Memento Black
Stampin’ Blends: Stamping Blends: Poppy Parade, Daffodil Delight, Night of Navy, Call Me Clover Crumb Cake Marker