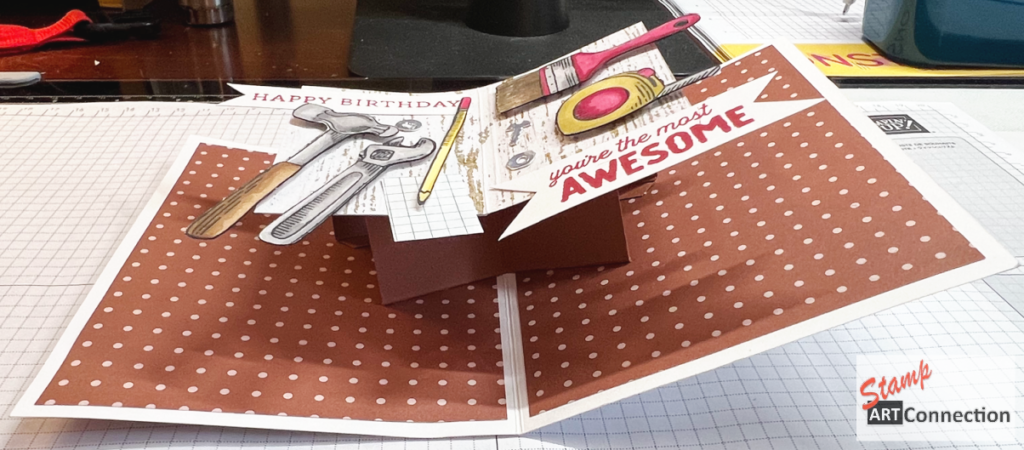
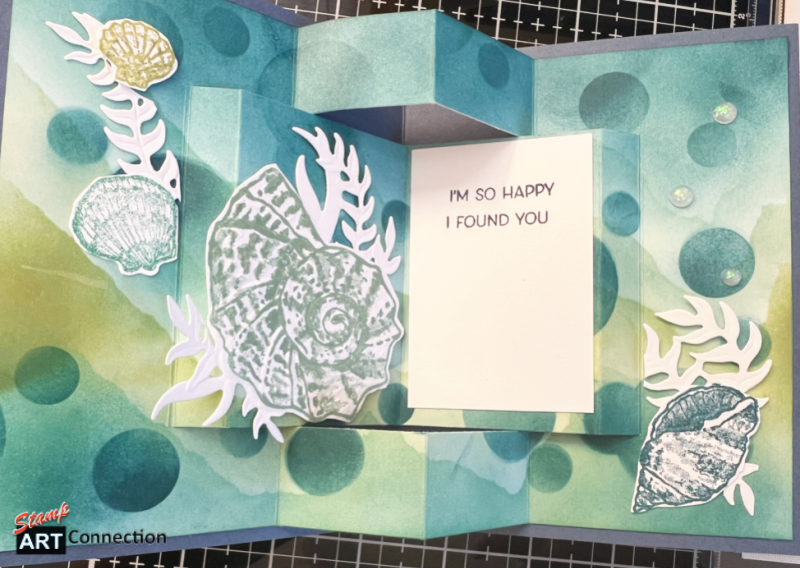
FANCY FOLDS: A Scary Cute Halloween Box Card

Spread the love!

Here is a fun 3D – fancy fold BOX CARD for Halloween! The project features the SCARY CUTE Bundle (stamp set and dies) and LAYERING DIORAMA dies. Product information, a Project PDF, and a video tutorial are featured below.

Now making holiday cards often means digging into my crafting collection to find classic VINTAGE (a.k.a. retired) products from Stampin’ Up! that deserve more play! So be creative and allow the project to inspire you to use other products you have in your craft room.

FEATURED TECHNIQUE: Background ink blending

BONUS: Envelope Box Project Tutorial


Featured Project

I used SCARY SILHOUETTES dies for the haunted house, and fussy-cut stamped shapes for the front. VINTAGE items include the BEAUTIFUL TREES and INSPIRING CANOPY dies for the spooky tree and haunted “hilltop”. You may also recognize the vintage COBWEBS 3D Embossing Folder and BAT Punch.
This version features the vintage CUTEST HALLOWEEN stamp set for the pumpkin & skull using Fresh Freesia and Orchid Oasis inks.

BOX CARD Video Tutorial


2022 Halloween Box Card + BONUS Content PDF

Bonus content includes dimensions for the BOX ENVELOPE project

First & Last Name
Email Address

PDF includes directions and product information for HOW TO:

  1. Create the Base
  2. Create the  Background 
  3. Create the Front
  4. Create Design Elements
  5. Assemble Inside Elements
  6. BONUS – Bewitching Bundle Inspiration
  7. BONUS  – Box Envelope for 6”x6” Box Card dimensions

BEWITCHING INSPIRATION

Here is another HALLOWEEN version using the BEWITCHING BUNDLE with a piece of METALLIC MESH RIBBON. Change it up by using layering and DSP for the front.

Envelope Box Tutorial

Create a box envelope to fit your Halloween BOX CARD for gifting. Add a Scary Cute Mini-Pocket Tag to pull together a spooky ensemble that is sure to please!


FEATURED PRODUCTS

CLICK ON THE IMAGES FOR FEATURED PRODUCTS

SCARY CUT STAMP SET
SCARY SILHOUETTES DIES
Bewitching PUNCH
Bewitched stamp set

My Favorite Products LINK


Spread the love!

Halloween Pocket Tags

Spread the love!

I love creating fun tags for the holidays…here is a tag project perfect for Halloween! Create fun pocket tags using the MINI POCKET ENVELOPE DIES, BLACK & WHITE DESIGNS, and GINGHAM COTTAGE Designer Series Paper (DSP). The project also features the SCARY CUTE Bundle (stamp set and dies). Product information and a video tutorial are featured below.

Featured TECHNIQUE: Use a LABEL Punch to create a “tag topper” for the tags.


Featured Tags

Gingham Cottage and the Black & White Designs Designer Series Paper (DSP) is used to create the pocket with DIE cut-outs from the SCARY SILHOUETTES dies embellished with GLITTER WASHI TAPE and Gingham Ribbon.
Flip the Pocket Tags over and decorate (using both Memento Black Ink and White Embossing Powder) using sentiments from the SCARY CUTE stamp set.
These are the tags that show through the CUT OUT embellished with GLITTER WASHI TAPE
Flip the tags over to show the sentiments and figures from the SCARY CUTE stamp set stamped with Memento Black ink using a STAMPARATUS.
Using the SCARY SILHOUETTES dies create a vellum window to showcase the Frankenstein trick-or-treater…
Orange & Black — classic Halloween pairing using Basic Black cardstock and the Gingham Cottage DSP. The haunted house and bat cutouts are perfect, with a little GLITTER WASHI Tape for added sparkle.

Video Tutorial


Project Information

  • You will need a STAMPARATUS for stamping and a STAMPIN’ CUT & EMBOSS MACHINE for die cutting
  • Basic Black cardstock/DSP — featured below (5″x6″) to cut POCKET ENVELOPES using the DIEs
  • STICKY GRID – refer to the video tutorial — makes arranging DIES to create “cut outs” easy work; especially for production cutting
  • VELLUM for “spooky tree” cut-out (3″x 2 1/4″) from the SCARY SILHOUETTES DIES
  • TAG INSERTS:
    • Basic White or Basic Black cardstock (cut 2 1/8″ x 4″ )
    • Memento Black Ink or White Embossing Powder for sentiments
    • Use a LABEL PUNCH to create a “tag topper”
    • Hole Punch for adding Ribbon
  • EMBELLISH: GLITTER WASHI TAPE

GALLERY

If you don’t want to die cut your tags…You can choose to just stamp and add to the front of the Pocket Tags with a piece of METALLIC MESH RIBBON.
Back of the Pocket Tags

FEATURED PRODUCTS

CLICK ON THE IMAGES FOR FEATURED PRODUCTS

SCARY CUT STAMP SET
SCARY SILHOUETTES DIES
MINI POCKET ENVELOP DIES
BLACK & WHITE DESIGNS DSP
GLITTER WASHI TAPE
GINGHAM COTTAGE DSP
GINGHAM RIBBON

My Favorite Products

Click on the IMAGE to find the LINK


Spread the love!

Fancy Fold: Inside Out Card

Spread the love!

This fancy fold technique is called the Inside Out Card. The card design was inspired by Barbara VanDenBoom at Paper Tree using the FRIENDS ARE LIKE SEASHELLS stamp, embossing folder and dies.

When coordinating DSP for Stampin’ Up! suites are retired and no-longer available — it can offer a challenge when trying to create a background. Select a harmonious color palette of ocean colors to create a striking under-the-sea background that is perfect for the seashell theme. For more inspiration, I provide another example for how I for used simple emboss and coloring techniques to create a stunning background for this deceptively easy “fancy fold” card.

View the Step-by-step video tutorial and shop at my ON-LINE store for all the products needed.


Video Tutorial


Project Details:

  • TOOLS:
    • Stampn’ Trimmer
    • Cut & Emboss Machine
    • Blending Brushes
    • Adhesives (glue/dots/tear tape)
    • Label Punch

INKS: (in the order of use)

  • Soft  Seafoam
  • Pear Pizzaz
  • Mint  Macaron
  • Just Jade  / substitute Bermuda Bay
  • Pretty  Peacock / substitute Shaded Spruce
  • Memento Black (stamping sentiment)

Card Stock:

  • Base Card: 5.5″x4.25″ Misty Moonlight cardstock
  • LAYERS: BASIC WHITE
    • Basic White (to color) – 3 13/16” x 5 3/16”
    • Basic White MAT layer – 4″ x 5 5/16″
    • 5.25″ x 8″ for inside cardstock coloring/cutting/scoring
  • Vellum for embossing (5.5″ x 4.25″)
  • Piece of Window Sheet or Acetate (4″x 3″) to create a stencil
    • Select several different size circles (using either dies or punches)
    • Use Pretty Peacock/Shaded Spruce to ink “bubbles”
  • Scrap Paper to tear to use as mask for coloring
  • Whisper White cut 2×3″ for the outside sentiment (use a LABEL PUNCH) and the inside greeting.

Cut:
1) align LEFT edge at 4.25”
2) cut from 1.5″ mark to the 6.75″ mark
3) re-align LEFT edge at 1″
4) cut from 1.5″ to the 6.75″ mark

Score between the two cut lines ( 1.5″ & 6.75″):
1) Score @ 1.5″ & 6.75″
2) Score @ 2″ & 6.25″

Score above & below the cut lines
@ 2 5/8″ & 5 5/8″

  • Crease the score lines, folding the top and bottom sections with a mountain fold.
  • Middle with a valley fold

Another Idea…

I used the CELEBRATE SUNFLOWERS stamp set on Crumb Cake (Very Vanilla Base Card & Early Espresso Mat) card stock to gold emboss and color with Watercolor Pencils and Whisper White ink.

Spread the love!

Tonal Stamping using the WAVE of INSPIRATION “wave” stamp

Spread the love!

I’m back with the “big wave” stamp from the Waves of Inspiration Collection. I love exploring all the ways you can use a stamp to create different techniques.

In this case, the Two-Tone technique uses two complementary colors to create some depth (Balmy Blue, and Misty Moonlight) when added directly to the stamp. When the ink is applied using an Aqua Painter, you get an even more ethereal effect. Both variations of the same technique are worthy of some creative exploration — especially with this collection. Please check out my short Video Tutorial.

I applied ink using a Water Painter to create an ethereal wave effect.

NOT ALWAYS PERFECTION: We may strive for perfection — but it is not always what we get. We all make those mistakes or “boo-boos” when stamping. Rather than get flustered during my tutorial — I worked through the problem to give you some ideas on possible solutions to a very common stamping problem — the ink “halo” created from too much ink on a rubber stamp.

The ink “halo” created from a seagull stamp is somewhat camouflaged– : )
Another color combination — Pacific Point and Pool Party.

VIDEO TUTORIAL


Project Details:

  • STAMP SETS:
    • WAVES OF INSPIRATION
    • AFTER THE STORM (clouds, large & small seagulls stamps) (pg. 50 AC)
  • BASE CARD: Misty Moonlight & Night of Navy (5.5″x4.25″)
  • Stamping Layer:
    • Begin with a piece cut at 5.5″ x 4.25″
      • Basic White Card Stock
      • Shimmery White Card Stock
    • Final layer will be cut down to 5.25″ x 4″ after the image is stamped
  • INKS:
    • Balmy Blue (light)
    • Misty Moonlight (medium)
    • Night of Navy (dark)
  • STAMPARATUS
  • WATER PAINTERS (pg. 129 / 151298)
  • STAMPIN’ SPRITZERS (pg. 129 / 126185)
  • RHINESTONE WAVES BASIC JEWELS (part of the Waves of Inspiration Collection)
  • Gelly ROLL Pens (go to my PRODUCT LINKS)

Thanks for stopping by! Leave a comment! Kat


Spread the love!

Every Chapter Stamp: Watercolor Pencil & Gilded Leafing Techniques

Spread the love!

This project was inspired by a professional challenge from my dear friend Amy Salib from “Make Something INC” — a fellow demonstrator. While perusing through the catalog…we both looked at the stamp and said, “I know what I want to do with this one…”. We laughed and didn’t want to share our ideas but rather wanted to challenge each other. What is possible?

We both agreed to buy the EVERY CHAPTER stamp set and challenged each other to create a card –not showing each other the final result– until we posted the card in the mail to each other.

I was really challenged to create a unique project. Here is the card I posted to Amy last week. It is a layered project using the EVERY CHAPTER stamp as the center image and layers of accents/embellishments using the Layering Designs Vellum, Gilded Leafing, and Watercolor Pencil coloring. Refer to my Video Tutorial for step-by-step instructions and then go to my ONLINE store for all the available products. Please seek Amy’s information (see photo) for her card information!


  • PRODUCTS NEEDED :
    • Basic Black card stock (5.5″ x 4.25″) as the base card
    • 5.25″ x 4″ size LAYERING DESIGNS VELLUM (page 33 Mini Catalog)
    • Watercolor Pencils: Bermuda Bay (tea cup) , Real Red, Cherry Cobbler (eyeglasses frames), Gorgeous Grape, Granny Apple Green (leaves), Flirty Flamingo (flowers), Daffodil Delight (flower center and book shading), Balmy Blue, Night of Navy
    • Memento Black Ink
    • Basic White Card stock for stamping image
    • STAMPARATUS for a perfectly stamped image
    • Tombow All Purpose Liquid Glue
    • Fine Tip Glue (for gilding and creating eyeglasses lenses)
    • GILDED LEAFING
    • Regular and Mini-Dimensionals

Video Tutorial


I used the ABSTRACT BEAUTY CARDS & ENVELOPS (15050) as a base card.
Amy’s EVERY CHAPTER SWAP…please contact Amy for information on her card.

Spread the love!

CACTUS CUTIES

Spread the love!

CACTUS CUTIES Bundle creates a “WOW” projects with some added embellishments like “googly eyes” make this card UNIQUE and come ALIVE!  And special backgrounds that I have created to take the card to the next level.

Download my exclusive FREE PDF for instructions & product information from my ONLINE Store and view the special Video Tutorials for various background techniques and assembling your card.

Subscribe to my NEWSLETTER and get all my FREE PDFs delivered right to your email!

Choose a happy sentiment like the one from the Sale-a-brations stamp set SPECIAL MOMENTS that says “just a card to say you’re amazing” to add the perfect message. 

You will want to make them for ALL your friends and family to brighten their day!  This project is a perfect “smile maker”!    


My Exclusive Video Tutorials

BACKGROUND TECHNIQUES


ASSEMBLING PRICKLY PEAR CACTUS


FEATURED PRODUCTS:


Here are the projects made with the featured backgrounds

Thank you….Kat Chancellor


Spread the love!

Clever Cats & Simple Stamping Techniques

Spread the love!

I LOVE these little cats! So clever! And only $17! Here are some ways to utilize the CLEVER CATS stamp set. CLEVER CATS is a photopolymer stamp set that is perfect for simple stamping. I list “simple stamping” tips and techniques that are easy using stamping tools.

The stamping tools I feature include the STAMPARATUS, DIE CUT MACHINE, embossing powders, SIMPLY SCORED SCOREBOARD, Stampin’ Pierce Mat, and Mini-Embossing Folders for these simple stamping tips and techniques.

Simple Stamping TIPS & TECHNIQUES

One of the simplest stamping techniques I know to create clear and crisp images is to use MOMENTO BLACK ink and THEN use clear embossing powder to add an extra layer of texture.

Best BLACK ink
For embossing…

STAMPARATUS

This is where the STAMPARATUS really pays off as a stamping tool. By using your Stamparatus you are guaranteed perfectly stamped images AND then you can use it to stamp VERSAMARK for perfectly embossed images.

Any simple stamping with PHOTOPOLYMER stamps for crisp, clean images isn’t possible without your STAMP & PIERCE mat!

Create Simple Backgrounds

Another simple stamping technique is to use MINI-embossing folders on either side of your card layer for added interest for a background. Something different that breaks up the monotony of just a plain embossed layer. Yeah…never be afraid to mix it up!

SU’s mini EMBOSSING FOLDERS are perfect for this technique. And the MINI-DIE-CUT machine was designed for little projects like this.

Elegant and Simple Edges

Keep it simple and elegant by scoring your layering edges using your SIMPLY SCORED SCORING TOOL. It’s very subtle…but makes a difference! And — it’s simple!

Simple FUN with WOBBLES

Keep it simple and add extra FUN by just adding a WOBBLE to an image. The WOBBLE really animates your card and it’s often unexpected. It’s easy and doesn’t add any extra bulk for mailing. Lastly, it’s the best embellishment for KID cards…but don’t rule out adults as well!

Check out my video tutorial, basic supplies, and dimensions below. LEAVE A COMMENT!


Video Tutorial


Basic Supplies & Dimensions

Here are the basic supplies needed:

  • CARD STOCK: Whisper White, Pumpkin Pie
  • EMBOSSING POWDERS : Black and Clear
  • HEAT GUN
  • SCORE BOARD
  • DIE CUT MACHINE
  • INKS: Momento Black, Versamark, Pumpkin Pie
  • STAMPING BLENDS: Pumpkin Pie

  1. Base card is Whisper White cut at 5.5″x 4.25″
  2. Layer is Pumpkin Pie cut at 5.5″ x 4″ (use your Scoreboard to finish the edge)
  3. DIES: Use the round die from the PAINTED LABELS dies
  4. Large Wobble

  1. Base card is PUMPKIN PIE cut at 5.5″ x 4.25″
  2. Layer is cut 3.75″ x 3″ and use your Scoreboard to finish edge
  3. BLACK & WHITE Ribbon – 7″

  • Base card is Whisper White cut at 5.5″x 4.25″
  • Layer with PUMPKIN PIE at 5.25″ x 4″
  • Layer with Whisper White cut at 5″ x 3.75″
  • MINI EMBOSSING FOLDER
  • DIE CUT MACHINE
  • Stampin’ Blends in PUMPKIN PIE
  • Mini-WOBBLE

PRODUCTS FEATURED


Spread the love!

Technique Stamping: Shadow Tile Coloring Technique

Spread the love!

Watch how adding ink to scored diagonal squares adds a dimension that mimics the look of tiles. All you need is Whisper White Card Stock, a Cut/Score Board, sponge dauber, and ink!

Supplies:

  • Whisper White Card Stock (base card at 5.5″x4.25″ and a layer piece for scoring at 5.25″x4″)
  • PAPER TRIMMER (152392)
  • Stamps: BEAUTY OF TOMORROW (156459), FOREVER FERN (152559) , DRAGONFLY GARDEN (154411)
  • Dies: BEAUTIFUL LEAVES (156468), STITCHED SO SWEETLY (151690)
  • INK: (use dark bold ink) BLACKBERRY BLISS
  • POST-IT NOTES
  • Sponge Dauber (133773)
  • Embellishments: Ribbons and METALLIC Pearls
  • BLACKBERRY BEAUTY EPHEMERA PACK (156469)
  • GOLD SHIMMER VELLUM (156471)
  • GOLD SHIMMER RIBBON (156470)

Basic Steps:

  1. Stamp image with dark bold ink on the 5.25″x4″ piece of cardstock FIRST
  2. Place the cardstock on the Paper Trimmer, using the gutter for the top LEFT and the 2″ mark for the bottom RIGHT to establish your first scored line that you will use as a guide.
  3. Score 1.25″ across
  4. Turn the card 90 degress and score
  5. Use that scored line as the guide for scoring 1.25″ across the rest of the cardstock
  6. Once the front is scored use POST-IT notes to mask the corners and carefully blend ink with the sponge dauber
  7. HINT: Use a HEAT TOOL to ensure the ink is DRY on your image before blending
  8. Once complete; embellish your card with ribbon and pearls
  9. REFER TO THE VIDEO TUTORIAL for more TIPS

Video Tutorial


Gallery

I used products from the new Blackberry Beauty Suite from the JULY-DEC 2021 Mini Catalog (ribbon, gold vellum, ephemera pack label)

Featured Products:

NOTE: The products from the BLACKBERRY BEAUTY Suite are not available until the Mini Catalog Launch but are featured during the Video. I have listed the ORDER # on the products listed above.


Spread the love!

Garden Birdhouses offers inspiration for watercolor, soft pastels and alcohol inks coloring

Spread the love!

COLORING TECHNIQUES: Reverse Embossing, Soft Pastels, Watercolor Pencils

There is a lot of versatility with this set. It can be very masculine and perfect for a Father’s Day or just a Birthday card or it can match any occasion. It can also just say, “HELLO” when combined with the BIGGEST WISH stamp set.

I used the SOFT PASTELS ASSORTMENT to color this card. I stamped with VERSAMARK on Whisper White cardstock and then used a sponge dauber to pick up the chalk dust and tapped it on the image. The dust “took” where there was VERSAMark and then I gently blended the color around the tree limb. Not my favorite…but if it inspires…then okay! n


Try the reverse embossing technique using White Embossing Powder on watercolor paper demonstrated here for a soft effect.


Video Tutorial


Here’s a lovely card using WATERCOLOR PENCILS over Stazon ink on watercolor paper. I used the second of the largest STITCHED RECTANGLES (151820) to give it a nice edge. I also used a LIGHT GREY Alcohol Ink Marker to outline the figures and give them a big of depth on the right side. Great technique that makes your images (when stamped on a white background) really “pop”!


This is an easy technique. Using watercolor paper, take your water-painter brush and apply color swatches to the areas you want to stamp the image. Let dry and then stamp with the same color — here I used Mossy Meadow and Misty Moonlight. The basecard background are the three BIRD stamps stamped on Daffodil Delight cardstock using Mango Melody ink.


Color the images with BLACKS and GREYS alcohol inks then use the BEAUTY OF THE EARTH DSP as a background! Fast and easy!

PRODUCTS FEATURED

GARDEN BIRDHOUSES
https://www.stampinup.com/products/garden-birdhouses-photopolymer-stamp-set
https://www.stampinup.com/products/beauty-of-the-earth-designer-series-paper

Spread the love!

Social Distancing Through Crafting: Coloring Techniques using the Ornate Garden Suite

Spread the love!

This week I feature some EASY coloring techniques using the Ornate Garden Suite. This is an “early release” item that will be featured in the new 2020-2021 Annual Catalog scheduled to go live on 3 June 2020. It is packed with floral designs and lots of sentiments and contains two bundles…making it a “mega-suite”.

The style of the lovely flowers in the Ornate Garden Suite Collection can be said to be a modern take on classic Victorian florals. Coupled with the gold foil accented Designer Series Paper, Gold Faceted Gems, and shimmery ribbon all combined to add sparkle and elegance to any projects.

I not only love what you can do with this versatile collection; but, due to current events….it’s a blessing to be “grateful”, and being able to share your gratitude with the included sentiments or pair with any sentiments for all-occasion projects is another plus.

Here is a list of all the products the Ornate Garden Suite Collection includes:
* Ornate Style Cling Stamp Set (10% off)
* Ornate Thanks Photopolymer Stamp Set (10% off)
* Ornate Borders Dies (10% off)
* Ornate Layers Dies (10% off)
* Ornate Floral 3D Embossing Folder
* Ornate Garden Ribbon Combo Pack
* Ornate Garden Specialty Designer Series Paper
* Gilded Gold Faceted Gems

Read on and allow me to share some techniques for coloring the floral image using watercolor pigments, inks, reverse embossing using Aqua Painters, Sponge Daubers, and Craft Foam using Flirty Flamingo, Blushing Bride, Terra cotta Tile, Mint Macaroon, Old Olive, Daffodil Delight and Crushed Curry inks.

ORNATE STYLE BUNDLE
ORNATE THANKS BUNDLE

Coloring with the Color Sprinkles

PIGMENT SPRINKLES

These are fun to use if you like just being loose and creative. I have predominantly used them for background coloring; but, wanted to come up with a more controlled technique for coloring a stamped image.

There are several coloring tools you can use: I recommend dampened Sponge Daubers (for each color), Aqua Painter, and Stampin’ Spritzer.

Using the various coloring tools there are several coloring techniques I demonstrate in my Video Tutorial.

Various Steps:

  1. Begin by stamping the image with either with Stazon Black ink or Clear embossing powder on Shimmery White Card stock
  2. Using the Sprinkles apply color on the image to the areas you want to color
  3. Using a coloring tool — a dampened sponge dauber (use one for each separate color) or aqua painter spread the pigment around the image to your liking
  4. You can also use the aqua painter and using the ink directly from the ink pads to color the embossed image (Mossy Meadow, Terracotta Tile and Flirty Flaming)
  5. Do the same as in #4 — but squeeze the ink pads and pick up the color from the back of the ink pad lid to create a soft muted image

Video Tutorial on Coloring Techniques


Coloring with Craft Foam

WHITE FUN FOAM 9″ X 12″ X 1/16″ THICK (12 PCS/PACK)
Color:White

Here’s a coloring technique that can be adapted for coloring ANY stamped image! It’s fun and fast when using a Stamparatus and several stamping plates. View the Video Tutorial for all the steps and some tips and tricks!

Video Tutorial for EASY Coloring with Craft Foam


Mosaic Background Pattern

A room full of paper scraps can still inspire! I used all my scraps from cardmaking and cut using the Tailored Tag punch, and then textured the plain color (Mint Macaroon and Terracotta Tile) card stock with the Embossing Folder to create a mosaic of color and texture. For a little sparkly filled in with both Gold Foil and Gimmer paper.

Begin with a piece of Whisper White (here I cut to 5.75″ x 4″) and arrange the paper pieces in a mosaic pattern and adhere with all purpose glue. Once dry, cut with one of the Layering Rectangles. I cut two — so that I could make two cards and then layered on the final card with cardstock cut from larger rectangles.


Gallery of Cards

Products Featured


Spread the love!