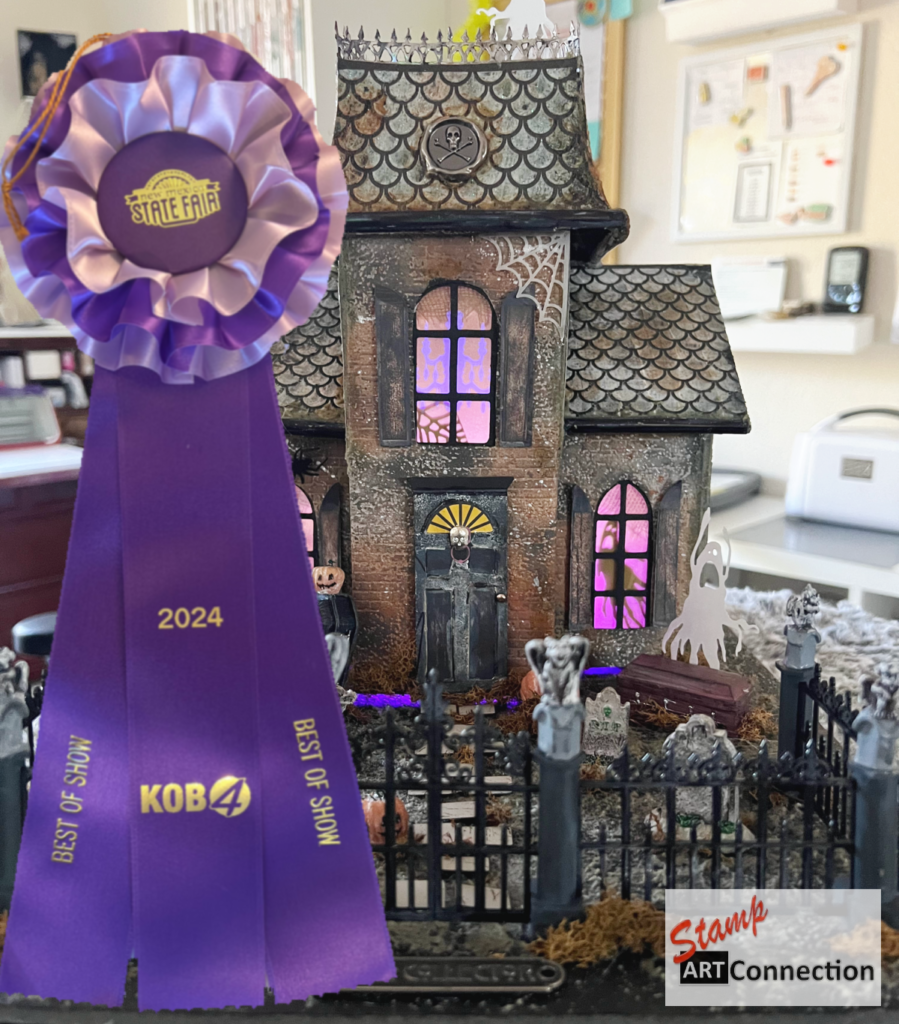
Fancy Folds Diagonal Fold Card featuring Poinsettia Place Suite

Spread the love!

I love demonstrating “fancy folds” using Stampin’ Up! products. SU makes it so easy since all their products are coordinated! Here is a really neat project that is looks harder than it really is! It is also known as the “Hip to be Square” card by Roni Johnson!

I created several projects using this fancy fold technique — Using the POINSETTIA PLACE Suite, SNOWMAN SEASON stamp and Snowman Builder Punch in the full 6″x6″ format with the matching box.

I also adapted the technique to 3″x3″ format to create fun smaller cards that fit perfectly in the 3″ Square Envelopes (145829) or Acetate Card Boxes (150428).

Follow my Video Tutorial below and I’ll show how to create a “WOW” card and custom box that you will love gift-ing for any occasion!

POINSETTIA PLACE SUITE Project

Supplies Needed:

  • CARD:
    • 2 pieces of 6″ x 12″ card stock in either the same (Whisper White) or coordinating colors (Real Red and Garden Green)
    • 3 pieces of 5 3/4″ square card stock for layers (Real Red)
      • Cut two in half to create 4 diagonal pieces.
      • The Third will be used for the center (with 5 1/2″ square piece for the sentiment)
    • 2 pieces of 5 1/2″ square card coordinating Designer Series Paper (DSP) (Plush Poinsettia and Poinsettia Place DSP)
      • Cut in half to create 4 diagonal pieces.
    • ADHESIVE SHEETS (152334) needed to back the Plush Poinsettia Specialty Paper
    • GOLD EMBOSSING POWDER
    • Versamark Ink
  • CARD FRONT:
    • FOREVER GOLD LASER-CUT SPECIALTY PAPER
    • 4″ x 4″ Whisper White Card stock
    • 3 3/4″ square Real Red CS (embossed with PARISIAN FLOURISH EMBOSSING FOLDER)
    • RED VELVET PAPER — create Poinsetta Flower (Click LINK Below)
    • BEADED PEARLS
  • BOX:
    • Bottom (Whisper White CS) 7 1/2″ square
    • Score 5/8″ all around
    • Lid (Real Red CS) 7 5/8″ square
    • Score 5/8″ all around
  • BOX FRONT:
    • 6″ x 6″ square in Whisper White CS
    • 5″ square Real Red CS
    • 4 3/4″ square Plush Poinsettia Paper
    • PEACE and JOY BUNDLE dies to cut “peace & joy”
    • FOAM ADHESIVE SHEETS with Whisper White CS
    • Gold Foil
    • Red GLimmer or Foil CS
    • WONDER OF THE SEASON Ribbon Combo Pack (Shaded Spruce Satin Ribbon)
  • TOOLS:
    • Simply Scored Scoring Tools (Score Board)
    • Paper Trimmer
    • Bone Folder
    • Take Your Pick Tool
    • Paper Snips
    • Tear & Tape Adhesive
    • Multipurpose Glue
    • Stampin’ Cut & Emboss Machine

Video Tutorial


MORE IDEAS — SNOWMAN Project

All the card stock and DSP dimensions are the same — just mix it up by choosing you own coordinating paper from the Holiday Catalog.


DOWNSIZE the Technique for Upsized WOW!

Downsize all dimensions to 3″ x 3″ square using DSP from the ‘TIS THE SEASON paper pack and the PEACE AND JOY BUNDLE!


PRODUCTS FEATURED:


Spread the love!

Depth of Field & Wreath Building Stamping Techniques

Spread the love!

Here are several techniques shared last week during my weekly LIVE. I created background patterns using the WHALE DONE stamp set and the “depth of field” stamping technique.

I also demonstrated how to use a Stamparatus to create wreaths using the GATHER TOGETHER, BEAUTIFUL AUTUMN and PEACEFUL BOUGHS stamps sets.

View the video tutorial for tips and tricks and check out the gallery of final cards. Don’t forget to leave a comment and thank you for stopping by!


Video Tutorial


TECHNIQUE I: DEPTH OF FIELD

  • INKS: Smokey Slate (grey), Mint Macaroon, Shaded Spruce, Pretty Peacock, Misty Moonlight, Granny Apple Green, Night of Navy
  • CARDSTOCK: Whisper White and Very Vanilla
  • STAMP SET: Whale Done

Gallery of Depth of Field Technique Cards

Smokey Slate, Shaded Spruce, and Granny Apple Green. I stamped with some SILVER metallic ink to add some glimmer to this card. But it’s a great pattern for a simple card! Base card is SHADED SPRUCE with BLACK.
Smokey Slate, Misty Moonlight and Shaded Spruce. Basecard is NIGHT OF NAVY and I used a Smokey Slate (retired) ribbon for accent.
Pretty Peacock, Shaded Spruce and Mint Macaroon. Base card is SHADED SPRUCE and I used the Seaside Textured (retired) embossing folder to add some depth to the pattern. You can barely see the WINK OF STELLA…but it adds some nice glimmer.
Night of Navy, Misty Moonlight, and Smokey Slate Inks. I love this background and it goes perfectly on POOL PARTY basecard with some SHEER RIBBON in POOL PARTY which is NOT retired!!! : )
Great layer of shapes on SHADED SPRUCE and mounted on Whisper White base card.
WHALE DONE

TECHNIQUE II: WREATH BUILDING WITH THE STAMPARATUS

  • INKS: Bubblebee, Cajun Craze, Early Espresso, Crumb Cake, Mint Macaroon, Gold Metallic Ink
  • STAMP SET: Beautiful Autumn, Gather Together and Peaceful Boughs
  • TOOLS: Stamparatus

Gallery of Wreaths using the Stamparatus

This is the first wreath I demonstrated on the video, I cut it down to create a regular card. I added so GOLD METALLIC ink accents and the base card is Early Espresso.
This is the second wreath I made in the video. I fussy cut around to create a wreath shape and mounted it on 6″x6″ Real Red card stock. I added some GOLD GEMS and GOLD trimmed ribbon as accents. I am very happy with this card.

Featured Products


Spread the love!