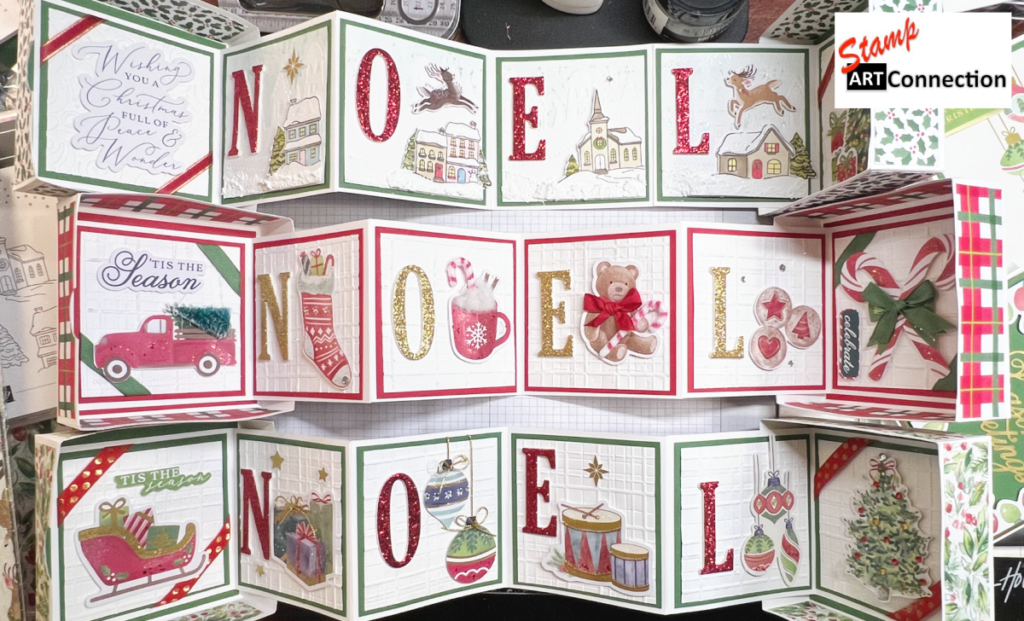
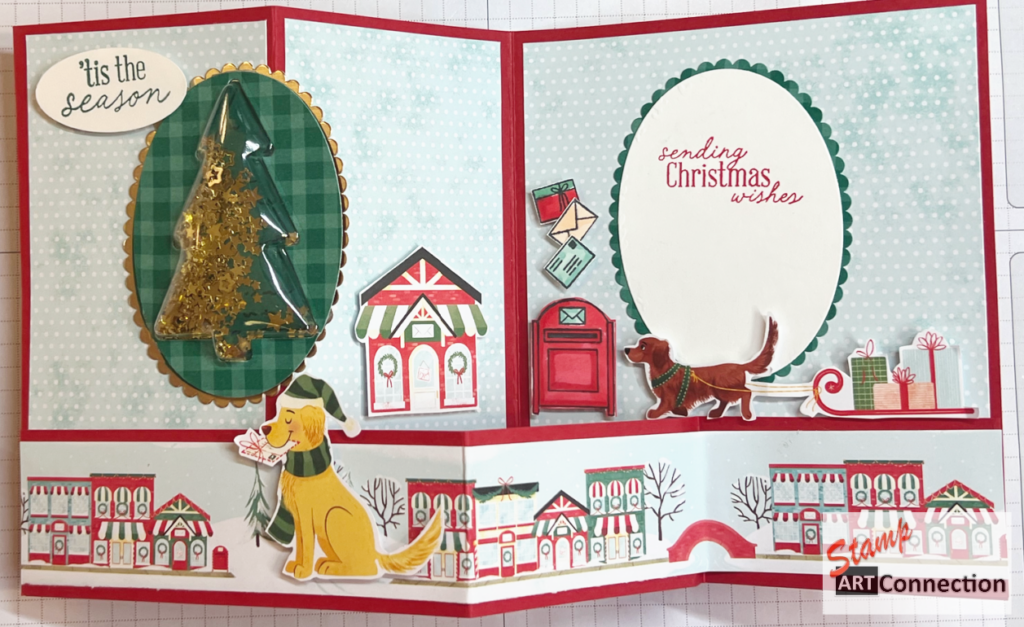
How to Assemble Sweet Gingerbread Treat Boxes

Spread the love!

Follow my video tutorial and make these gingerbread houses using the SWEET GINGERBREAD stamp set and GINGERBREAD HOUSE dies to make these delightful treat boxes.

Fresh Freesia, Highland Heather, and Blackberry Bliss Soft inks are the perfect colors for gingerbread whimsy with candied gum drops in Tahitian Tide, Pale Papaya, Pear Pizzaz, and snow drifts of fluffy icing with Snowfall Accents Puff Paint. The candy elements can be layered for a “sweet” impact. Add ice glitter for a “sugared” effect that will add sparkle.

My Project PDF not only includes details for this project; but includes instructions for making the Gingerbread House and the Shaker Card.

Refer to my PDF for project details and the link provided featured projects.

https://www.stampinup.com/products/sweet-gingerbread-bundle-english

Video Tutorial

Click LINK for Products:


2022 Sweet Gingerbread Cards & Treat Box PDF

This PDF ncludes supply list, dimensions, and inks needed to accompany the VIDEO tutorials for THREE PROJECTS — the Gingerbread HOUSE card, SHAKER CARD and TREAT BOX.

Purchase the BUNDLE from me and the PDF is FREE.

First & Last Name
Email Address

Gallery

Using Crumb Cake and DSP around the sides.

Fresh Freesia Card Stock and stamped Lolly Pops and added fencing using the FENCE die (with multi-purposed adhesive sheet).
Using my production “tips” — these are easy to create and make an impact!

Spread the love!

Assemble a Sweet Gingerbread Shaker Card

Spread the love!

Follow my previous POST with a video tutorial on how to make these gingerbread houses using the SWEET GINGERBREAD stamp set and GINGERBREAD HOUSE dies. Now let’s transform these gingerbread houses into a Shaker Card for the holidays!

Fresh Freesia, Highland Heather, So Saffron, and Tahitian Tide are the perfect gingerbread house with candied gum drops in So Saffron, Pale Papaya, Pear Pizzaz, Tahitian Tide, and snow drifts of fluffy icing with Snowfall Accents Puff Paint. The GLOSSY DOTS accents (page 142) are perfect candied embellishments. The added ice glitter is ICE GLITTER (retired). Recommend Ranger Distress ROCK CANDY for a “sugared” effect that will add sparkle and Ranger MICA Flakes for shaker fill.

The Penguin Playmates DSP (retired) from last year offers the perfect background as well as the opportunity to use items from your crafting stash.

My Project PDF not only includes details for the SHAKER CARD; but includes instructions for assembling the Gingerbread House card and treat box.


https://www.stampinup.com/products/sweet-gingerbread-bundle-english

Video Tutorial

Click LINK for Products:


2022 Sweet Gingerbread Cards & Treat Box PDF

Includes supply list, dimensions, and inks needed for making THREE projects — the Gingerbread House card, the SHAKER CARD, and the Treat Box.

Purchase the bundle from me and the PDF is FREE.

First & Last Name
Email Address

Gallery

Shaker card using Ranger ROCK CANDY & MICA FLAKES
Treat Box project details are included in the PDF. Video Tutorial posted on my Blog.


Spread the love!

How to Assemble Sweet Gingerbread Houses

Spread the love!

Follow my video tutorial and make these gingerbread houses using the SWEET GINGERBREAD stamp set and GINGERBREAD HOUSE dies. These gingerbread houses can easily be transformed to fit any holiday project–cards, treat boxes, or ornaments.

Crumb Cake, Soft Suede inks are the perfect traditional gingerbread with candied gum drops in So Saffron, Pear Pizzaz, Sweet Sorbet, and snow drifts of fluffy icing with Snowfall Accents Puff Paint. I especially love the candy elements that can be layered for a “sweet” impact. Add ice glitter for a “sugared” effect that will add sparkle.

The Penguin Playmates DSP (retired) from last year offers the perfect background as well as the opportunity to use items from your crafting stash.

My Project PDF not only includes details for this card; but includes instructions for the shaker cards and treat box. Stay tuned for MORE Videos.


https://www.stampinup.com/products/sweet-gingerbread-bundle-english

Video Tutorial

Click LINK for Products:


2022 Sweet Gingerbread Cards & Treat Box PDF

Includes supply list, dimensions, and inks needed to accompany the VIDEO tutorials for THREE PROJECTS — the card featured here as well as the SHAKER CARD and TREAT BOX — stay tuned for upcoming videos…

Purchase the BUNDLE from me and the PDF is FREE.

First & Last Name
Email Address

Gallery


Spread the love!

FANCY FOLDS: A Scary Cute Halloween Box Card

Spread the love!

Here is a fun 3D – fancy fold BOX CARD for Halloween! The project features the SCARY CUTE Bundle (stamp set and dies) and LAYERING DIORAMA dies. Product information, a Project PDF, and a video tutorial are featured below.

Now making holiday cards often means digging into my crafting collection to find classic VINTAGE (a.k.a. retired) products from Stampin’ Up! that deserve more play! So be creative and allow the project to inspire you to use other products you have in your craft room.

FEATURED TECHNIQUE: Background ink blending

BONUS: Envelope Box Project Tutorial


Featured Project

I used SCARY SILHOUETTES dies for the haunted house, and fussy-cut stamped shapes for the front. VINTAGE items include the BEAUTIFUL TREES and INSPIRING CANOPY dies for the spooky tree and haunted “hilltop”. You may also recognize the vintage COBWEBS 3D Embossing Folder and BAT Punch.
This version features the vintage CUTEST HALLOWEEN stamp set for the pumpkin & skull using Fresh Freesia and Orchid Oasis inks.

BOX CARD Video Tutorial


2022 Halloween Box Card + BONUS Content PDF

Bonus content includes dimensions for the BOX ENVELOPE project

First & Last Name
Email Address

PDF includes directions and product information for HOW TO:

  1. Create the Base
  2. Create the  Background 
  3. Create the Front
  4. Create Design Elements
  5. Assemble Inside Elements
  6. BONUS – Bewitching Bundle Inspiration
  7. BONUS  – Box Envelope for 6”x6” Box Card dimensions

BEWITCHING INSPIRATION

Here is another HALLOWEEN version using the BEWITCHING BUNDLE with a piece of METALLIC MESH RIBBON. Change it up by using layering and DSP for the front.

Envelope Box Tutorial

Create a box envelope to fit your Halloween BOX CARD for gifting. Add a Scary Cute Mini-Pocket Tag to pull together a spooky ensemble that is sure to please!


FEATURED PRODUCTS

CLICK ON THE IMAGES FOR FEATURED PRODUCTS

SCARY CUT STAMP SET
SCARY SILHOUETTES DIES
Bewitching PUNCH
Bewitched stamp set

My Favorite Products LINK


Spread the love!

Halloween Pocket Tags

Spread the love!

I love creating fun tags for the holidays…here is a tag project perfect for Halloween! Create fun pocket tags using the MINI POCKET ENVELOPE DIES, BLACK & WHITE DESIGNS, and GINGHAM COTTAGE Designer Series Paper (DSP). The project also features the SCARY CUTE Bundle (stamp set and dies). Product information and a video tutorial are featured below.

Featured TECHNIQUE: Use a LABEL Punch to create a “tag topper” for the tags.


Featured Tags

Gingham Cottage and the Black & White Designs Designer Series Paper (DSP) is used to create the pocket with DIE cut-outs from the SCARY SILHOUETTES dies embellished with GLITTER WASHI TAPE and Gingham Ribbon.
Flip the Pocket Tags over and decorate (using both Memento Black Ink and White Embossing Powder) using sentiments from the SCARY CUTE stamp set.
These are the tags that show through the CUT OUT embellished with GLITTER WASHI TAPE
Flip the tags over to show the sentiments and figures from the SCARY CUTE stamp set stamped with Memento Black ink using a STAMPARATUS.
Using the SCARY SILHOUETTES dies create a vellum window to showcase the Frankenstein trick-or-treater…
Orange & Black — classic Halloween pairing using Basic Black cardstock and the Gingham Cottage DSP. The haunted house and bat cutouts are perfect, with a little GLITTER WASHI Tape for added sparkle.

Video Tutorial


Project Information

  • You will need a STAMPARATUS for stamping and a STAMPIN’ CUT & EMBOSS MACHINE for die cutting
  • Basic Black cardstock/DSP — featured below (5″x6″) to cut POCKET ENVELOPES using the DIEs
  • STICKY GRID – refer to the video tutorial — makes arranging DIES to create “cut outs” easy work; especially for production cutting
  • VELLUM for “spooky tree” cut-out (3″x 2 1/4″) from the SCARY SILHOUETTES DIES
  • TAG INSERTS:
    • Basic White or Basic Black cardstock (cut 2 1/8″ x 4″ )
    • Memento Black Ink or White Embossing Powder for sentiments
    • Use a LABEL PUNCH to create a “tag topper”
    • Hole Punch for adding Ribbon
  • EMBELLISH: GLITTER WASHI TAPE

GALLERY

If you don’t want to die cut your tags…You can choose to just stamp and add to the front of the Pocket Tags with a piece of METALLIC MESH RIBBON.
Back of the Pocket Tags

FEATURED PRODUCTS

CLICK ON THE IMAGES FOR FEATURED PRODUCTS

SCARY CUT STAMP SET
SCARY SILHOUETTES DIES
MINI POCKET ENVELOP DIES
BLACK & WHITE DESIGNS DSP
GLITTER WASHI TAPE
GINGHAM COTTAGE DSP
GINGHAM RIBBON

My Favorite Products

Click on the IMAGE to find the LINK


Spread the love!

Fancy Folds: Pop-Up Tree Lot Card

Spread the love!

This POP-UP card features the TREE LOT DIES that were offered during SALE-A-BRATION and the TREES FOR SALE stamp set.

This card is all about the DETAILS….the camper dies to offer exactly that — great detail to create the centerpiece for this tree lot “diorama”. Die cut the sign and dog to add fun and whimsy.

This is very much a “fancy fold” technique card since it features “mountains” and “valleys” to create the pop-up insert. My Project PDF will provide the POP-UP template (that can be adapted for other projects) as well as all project and product details.

Lastly, blending, masking, and stamp-stamp-off techniques are featured for creating the background.


Featured Project

Card front featuring the TREES FOR SALE stamp set and embellished with Iridescent Rhinestones and SNOWFALL ACCENTS PUFF PAINT
TREES FOR SALE stamp set

TREE LOT DIES (sold out)

If you were lucky enough to add these as part of your FREE sale-a-bration products you will love this project.

Video Tutorial


Project PDF

If you are my SU customer — contact me for your FREE PDF.

Otherwise, click below for a copy of the Instructional Project PDF (9 pages) with diagrams, all the dimensions, and directions, and a full-size POP-UP template.

First & Last Name
Email Address

Gallery

Front with the trees using the stamp-stamp-off technique.
This card is perfect even without the added signage and dog.

Spread the love!

Treat Box & Easy-Make Tags using GINGERBREAD & PEPPERMINT products

Spread the love!

You never have enough treat boxes and easy-make tags for the holidays.

Here are two projects using Gingerbread & Peppermint Suite products that will be sure to inspire!

For the cute Treat BOX — check out my versions and then go to Brenda Quintana’s LINK for how step-by-step directions for how to make the boxes at: https://youtu.be/xozIYAWONaQ

For the EASY-MAKE Tags: Use the Gingerbread & Peppermint Memories and More Card Pack with the TAILOR-MADE TAG DIES.

These are RETIRING PRODUCTS…while supplies last….So….If you love these products…take advantage of the LAST CHANCE SALE and order these retiring products NOW! Check out all the details AND my FREE DSP offer here on my BLOG!


Filled with peppermint hard candy which coordinates with the whole theme! So cute!
I choose GOLD hard candies to fill this treat box because I love TOFFEE!
Here are the finished projects filled with real peppermint KISSES! I put about 12-14 kisses per box.

Stitched Triangle Dies


Gingerbread & Peppermint DSP

You will recognize these wonderful patterns used to cover the Treat Boxes. This is a retiring product so you want to stock up NOW. Consider putting in an order on my ONLINE store and get FREE DSP with a qualifying order!


Frosted Gingerbread Stamp Set

https://www.stampinup.com/products/frosted-gingerbread-photopolymer-stamp-set-(english)

Easy-Make Tags

I needed some quick tags for my personal gifting of my grandmother’s “bischochitos” and for my “Make a Card – give a smile” project for the Children’s Hospital using the Memory & More Card Pack and the Tailor Made Dies. Watch my Video Tutorial for tips and tricks!

Wrapped and ready for gifting!


Video Tutorial


Thanks for stopping by and LEAVE a message


Spread the love!

Holiday Scene using the Great Tidings Bundle

Spread the love!

Create the classic Star of Bethlehem Scene for Christmas

The Great Tidings Cling Stamp set has the sentiments, but it’s the dies from the WISE MEN TIDINGS BUNDLE and the Diorama Dies that have everything you need to create these stunning and classic cards!

Basic White base card with Night of Navy Card, Metallic Foils, and the Be Dazzling 6X6 Specialty Designer Series Paper from Sale-a-brations.
Layer Misty Moonlight, Night of Navy (Subtle Embossing Folder) and Basic Black using the Layering Diorama Dies on a Basic White card stock base.
Use BLACK GLIMMER paper from the Holiday Mini-Catalog to create a stunning background!

Video Tutorial


Products Featured


Spread the love!

How to create elegant WREATHs with the Sparkle of the Season stamp set

Spread the love!

Elegant Wreath Building

How to create seasonal wreaths using simple stamping techniques with ink and embossing powder using the SPARKLE OF THE SEASON Photopolymer Stamp Set from Stampin’ Up!.

LAYERING INK and CLEAR EMBOSSING Technique for Depth & Dimension

Laying colors from either a fall or winter palette creates depth. Begin with the lightest color and then layer each additional.

Add VERSAMARK and CLEAR embossing powder to the stamped image to give you two professional effects. It pulls out vibrant colors from the ink as well as adds dimension to your stamped image. You can even apply two layers of Versamark to your stamped image (Holly Wreath example)

Use the steps from the video tutorial and apply them for making any of the featured examples for Fall Leaves, Evergreen, and Winter Holly wreaths.


Fall Wreath

BUMBLEBEE, TERRACOTTA TILE & CHERRY COBBLER are the fall colors chosen for this autumn wreath. COPPER embossing adds metallic shine. Embellish with Metallic Pearls.

Evergreen Wreath

SOFT SEAFOAM, SOFT SUCCULENT & SHADED SPRUCE are the ink colors chosen to create this winter pine wreath using the same layering technique. Pine Cones are COPPER embossed. Embellished with Red Rhinestones and Red Ribbon. Sentiment from the GREAT TIDINGS set.

Winter Holly

SOFT SEAFOAM, SOFT SUCCULENT & SHADED SPRUCE are the ink colors chosen to create this winter holly wreath using the same layering technique. Double embossed by adding another layer with CLEAR for added dimension. Embellished with Red Rhinestones and Red Ribbon.

PRODUCT LIST:

  • INKS:
    • SOFT SEAFOAM
    • BUMBLEBEE
    • TERRACOTTA TILE
    • CHERRY COBBLER
    • VERSAMARK
    • SOFT SUCCULENT
    • SHADED SPRUCE
  • EMBOSSING POWDERS:
    • COPPER Metallic (from the Metallic Trio Pack)
    • CLEAR
  • CARD STOCK:
    • Whisper White (5.25″ x 4″)
    • Soft Suede (Base card 5.5″ x 4.25″)
  • TOOLS:
    • Heat Tool
    • Embossing Buddy
    • Sharp Scissors or Tool to fray edges
  • EMBELLISHMENTS:
    • Metallic Pearls
    • Red Rhinestones
    • Double Stitched Real Red Ribbon Bow

https://www.stampinup.com/products/sparkle-of-the-season-bundle-english

https://www.stampinup.com/products/great-tidings-bundle


Spread the love!

Cutest Halloween Gift Bags and Tags

Spread the love!

Here’s a fast tutorial for making GIFT BAGS using 6″x6″ DSP (Cutest Halloween and Beautifully Penned DSP (FREE with a $50 purchase during SALE-A-BRATION) card stock.

Create easy tags using the Cutest Halloween stamp set and Tailor Made Tags Dies with the Metallic Mesh and Gorgeous Grape Sheer Ribbon.


VIDEO TUTORIAL

The video features all dimensions for cardstock and assembly details.


Tailored Made Tags Dies

Arrange the Tailor Made Tags on one piece of 8.5″ x 11″ card stock to yield 11 tags for gift giving or embellishing your gift bags. Below the card stock is cut to 6″ to fit your DIE CUT MACHINE to cut 8 tags. The remaining card stock will cut 3 tags for 11 total.

The die-cut tags add a finished look to any project.

Place on die cutting plates and hold in place with POST ITs or WASHI TAPE.
I love the smooth edging from the die-cut tags. However, I found the holes too small for practical use. I used a HALF CIRCLE PUNCH to create a larger hole for the ribbon

Easy Gift Bags

WHAT YOU NEED: Use 2 sheets of coordinating 6″x6″ paper. Preferably Designer Series Paper (DSP) from Stampin’ Up!’s vast assortment. And a SCORE BOARD.

Here is the pattern will all the dimensions for scoring and cutting both sheets. I have identified the direction for scoring and cutting to accommodate any direction-dependent pattern DSP “pattern top”.


Products Featured

https://www.stampinup.com/products/cute-halloween-suite-collection Here is the entire SUITE of products available.
https://www.stampinup.com/products/cutest-halloween-photopolymer-stamp-set CUTEST HALLOWEEN STAMP SET
https://www.stampinup.com/products/cute-halloween-6-x-6-(15-2-x-15-2-cm)-designer-series-paper
https://www.stampinup.com/products/tailor-made-tags-dies TAILOR-MADE TAGs


More Ideas


Spread the love!

Technique Stamping: Shadow Tile Coloring Technique

Spread the love!

Watch how adding ink to scored diagonal squares adds a dimension that mimics the look of tiles. All you need is Whisper White Card Stock, a Cut/Score Board, sponge dauber, and ink!

Supplies:

  • Whisper White Card Stock (base card at 5.5″x4.25″ and a layer piece for scoring at 5.25″x4″)
  • PAPER TRIMMER (152392)
  • Stamps: BEAUTY OF TOMORROW (156459), FOREVER FERN (152559) , DRAGONFLY GARDEN (154411)
  • Dies: BEAUTIFUL LEAVES (156468), STITCHED SO SWEETLY (151690)
  • INK: (use dark bold ink) BLACKBERRY BLISS
  • POST-IT NOTES
  • Sponge Dauber (133773)
  • Embellishments: Ribbons and METALLIC Pearls
  • BLACKBERRY BEAUTY EPHEMERA PACK (156469)
  • GOLD SHIMMER VELLUM (156471)
  • GOLD SHIMMER RIBBON (156470)

Basic Steps:

  1. Stamp image with dark bold ink on the 5.25″x4″ piece of cardstock FIRST
  2. Place the cardstock on the Paper Trimmer, using the gutter for the top LEFT and the 2″ mark for the bottom RIGHT to establish your first scored line that you will use as a guide.
  3. Score 1.25″ across
  4. Turn the card 90 degress and score
  5. Use that scored line as the guide for scoring 1.25″ across the rest of the cardstock
  6. Once the front is scored use POST-IT notes to mask the corners and carefully blend ink with the sponge dauber
  7. HINT: Use a HEAT TOOL to ensure the ink is DRY on your image before blending
  8. Once complete; embellish your card with ribbon and pearls
  9. REFER TO THE VIDEO TUTORIAL for more TIPS

Video Tutorial


Gallery

I used products from the new Blackberry Beauty Suite from the JULY-DEC 2021 Mini Catalog (ribbon, gold vellum, ephemera pack label)

Featured Products:

NOTE: The products from the BLACKBERRY BEAUTY Suite are not available until the Mini Catalog Launch but are featured during the Video. I have listed the ORDER # on the products listed above.


Spread the love!

Box Corner Card Inspiration featuring the Curvy Celebrations Variety Bundle

Spread the love!

This is a fun and easy card that is packed with WOW! There are so many of the Holiday Catalog products which inspire, but most of all is the versatility of the CURVY CELEBRATIONS Variety Bundle with includes the CURVY CHRISTMAS, CURVY DIES and CLASSIC CHRISTMAS DSP> Explore some of the ideas below and view the tutorial for the basic instructions.

Cards feature the Trimming the Town Suite and DSP, Coming Home Bundle, All the Trimmings Ribbon Combo Pack, and Embellishments. The Wishes and Wonder Bundle, Peace and Joy Bundle Gather Together Bundle, and Country Home stamps set.

Gilded Autumn DSP cut with the Curvy Dies and embellished with Gather Together Leaves Dies in Gold Brushed Metallic Cardstock and Country Home Stamp set. Embellish with Gold Gems and 3/8″ Embroidered Ribbon from the Plaid TIdings Suite.
Special DSP from the Curvy Celebrations Variety Pack makes the perfect backdrop with the Trimming the Town DSP and Coming Home Bundle. The JOY sentiment from the Peace and Joy bundle on Foam Adhesive Sheets and Glitter Paper. The curved DIES from the Curvy Celebrations Bundle and sentiment is perfect!
Plaid Tidings DSP cut with Curvy Celebrations and embellished with Adhesive Baked Snowflakes sets off the design using the stag from the Wishes and Wonder Bundle in Gold Foil. The backdrop is created using the In the Pines Bundle with Garden Green and Shaded Spruce on Pool Party cardstock texturized with the Subtle Embossing Folder. The snow banks are created using white glimmer paper and Whisper White Card stock (flocked paper (retired)).

Gallery of Cards


Video Tutorial

Supply List:

  • Cardstock (cut 8″ x 8″)
  • Coordinating Designer Series Paper, Ribbon (21″) and embellishments
  • Paper Trimmer
  • Scoring Tool
  • Adhesive (All Purpose Glue and Tear Tape
  • Stamp Set/Dies: Curvy Christmas Stamp Set and Dies, Coming Home Bundle, the Wishes and Wonder Bundle, Peace and Joy Bundle, Gather Together Bundle, and Country Home stamp set.

Directions:

  • Trim cardstock to measure 8″x8″
  • Score at 4″, and rotate and score again at 4″. This will divide the 8″x8″ into four sections.
  • In the top-right quadrant, score diagonally from the corner to the center of the page where all the score lines meet
  • Cut the bottom 4″ score line up to the center of the page. This will separate the bottom two quadrants.
  • Crease all score lines.
  • Fold the bottom right and apply adhesive
  • Secure the bottom right quadrant (the one with the adhesive) to the TOP of the bottom left quadrant. This forms the box corner
  • Again, crease the diagonally scored line and apply adhesive to the top triangle only.
  • CREATE SCENES: Cut four 3.5″x3.5″ Whisper White pieces (front, backsides and bottom of corner)
  • Cut DSP 3″x3″ square and cut designs using the Curvy Dies or the Home Together Dies.

Products Featured


Spread the love!

Fun DRACULA vampire Punch Art Card

Spread the love!

Join me as I assemble a wonderfully FUN and creative Halloween card using punches from my Stampin’ Up stash to create this Dracula Card!

Graciela Valdez Vera is the Demonstrator that created the original design. I took it a step further by creating a more ghoulish looking vampire..blood-red lips and all!

Graciela’s original design!
My take on a ghoulish vamp!

Video Tutorial


Pieces and Parts…ideas if you don’t have THAT punch!

Umbrella Punch, large OVAL of Stitched Shapes, Apple Builder Punch, a BOW punch, Snowman Builder Punch, Layering Triangles.
  • CARDSTOCK: Basic Black, Blackberry Bliss, Whisper White, Real Red
  • DSP: Black GLITTER paper, Magic in this Night DSP
  • EMBOSSING: Silver Embossing Powder
  • STAMP SET: Hallows Night Magic
  • DIES: Halloween Magic Dies, Stitched Shapes Dies and/or Triangle Dies
  • Punches: Umbrella Punch, Apple Builder Punch, Snowman Builder Punch, Gleaming Ornament Punch
  • SHAPES NEEDED: Bow Tie, circle punch for feet
  • PENS: Stampin’ Chalk, Stampin’ Write Marker, Gel Pens (white/black)
  • ADHESIVES: All Purpose Glue, Black Dimensionals
  • WOBBLE SPRING: available on AMAZON

Use the smallest CIRCLE of the Stitched Shapes Dies to create an easy VEST if you don’t have the retired OWL punch!

Just CUT the edges of the CIRCLE to create the vest shape!

Products Featured:


Spread the love!

Pendulum Swing Cards

Spread the love!

During my weekly LIVE broadcast….after fixing a broken MIC….I took a project inspired by Jennifer McGuire to the next level by using all Stampin’ Up! products to create a fun pendulum card!

I created several Halloween inspired cards featuring the STITCHED RECTANGLES DIES, HALLOW NIGHT MAGIC DIES, HARVEST HELLO stamps, CAT PUNCH, SNOW FRONT Stamps & the APPLE BUILDER PUNCH.

Follow my VIDEO TUTORIAL for all the steps and product checklist provided below.

Refer to my earlier tutorial for how to create the background and then create a pendulum card with the cat punch.

Checklist:

  • STAMP SET: Harvest Hellos, Snow Front, Hallows Night Magic
  • DIES & PUNCHES: Apple Builder Punch, Halloween Magic Dies, Cat Builder Punch, Stitched Rectangles dies
  • CARD STOCK: Whisper White, Pumpkin Pie, Blackberry Bliss, Black Glitter Paper, Gold and Silver Foil Sheets
  • TOOLS: Clear and Silver Embossing Powder, Adhesive Sheet, Foam Adhesive Sheets, Foam Adhesive Strips, Hole Punch, 1 Cent coin or metal washer (for weight)
  • INKS: Versamark for Embossing, Memento Black Ink, Pumpkin Pie for pumpkins, Blackberry Bliss ink for the tiny bats
  • Retired items: Seasonal Layers Thinlet Dies (143751) for the branch, Gift Card Envelop, and Trims Thinlits Dies (135854) for the round die.

Video Tutorial


TRY THIS!!! Use the SNOWMAN SEASON Bundle to build a pendulum card for the winter holidays!


PRODUCTS:


Spread the love!

Hallows Night Gift Bags using 6″x6″ DSP

Spread the love!

Here’s a great project to create gift bags from 6″x6″ Designer Series Paper (DSP) that is easy to follow. What led me to this idea is that I was looking for a creative way to use 6″x6″ DSP to create some gift bags to send to the Pediatrics Unit as part of my “make a card and give a smile” program for the holidays.

If you like this idea, don’t hesitate to take advantage of the month long sale this October to stock up on DSP at 15% discount! Check out the LINK to purchase the MAGIC IN THIS NIGHT DESIGNER SERIES PAPER (DSP) for only $9.78 (regularly $11.50).

Lastly, I’ve provided a quick tutorial with all the steps and tips for assembling these bags as well as the basic dimensions and scoring below!

Thanks for stopping by….please leave a comment!

Video Tutorial

Join me on my WEDNESDAY LIVE for weekly projects for more ideas!


Project Details

  • DIMENSIONS
  • 2 Sheets “6X6” DSP for front and back PANELS
  • 1 sheet coordinating cardstock for the BOTTOM – 3″x6″
  • 2 pieces cut 3″x6″ coordinating DSP for the SIDE PANELS
  • SCORE
  • Score both front and back PANELS at 1/4″ at the top. Score the back PANEL at 1 1/2″ from the bottom
  • Score the 2 SIDE PANELS both 1/4″ along the 6″ side and once along the 3″side
  • Score sides from 2″ from the bottom and 1 1/2″ for the center
  • Score the BOTTOM PANEL (3″ x 6″) 1/4″ along the 6″ side
  • ASSEMBLY
  • Refer to Video Tutorial
  • TOOLS
  • Cutting Machine
  • Scoreboard and Scoring Tool
  • All Purpose Glue
  • Hot Glue Gun

Products Featured


Spread the love!