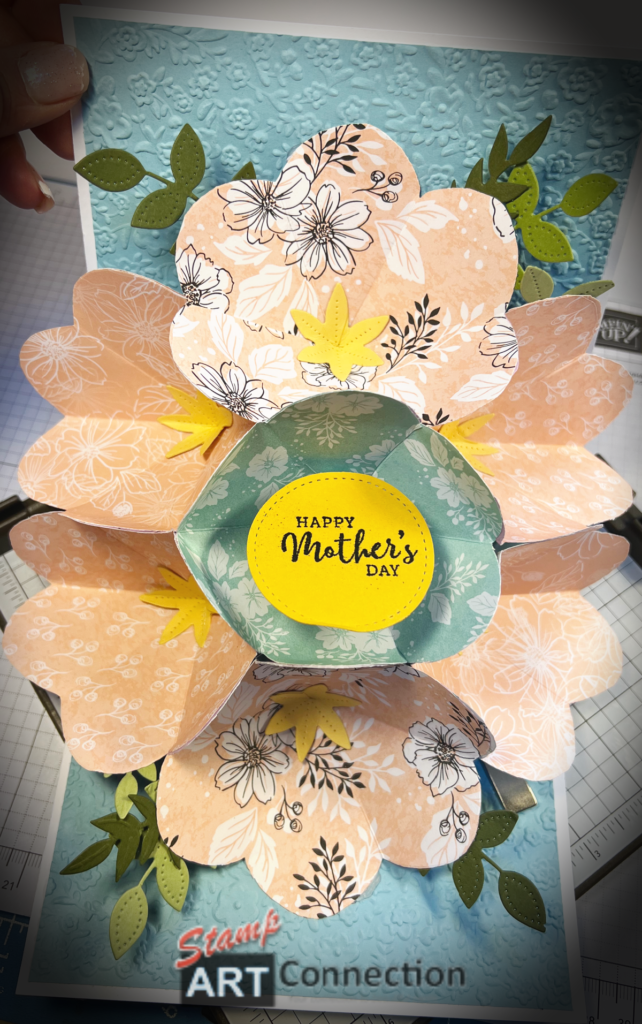
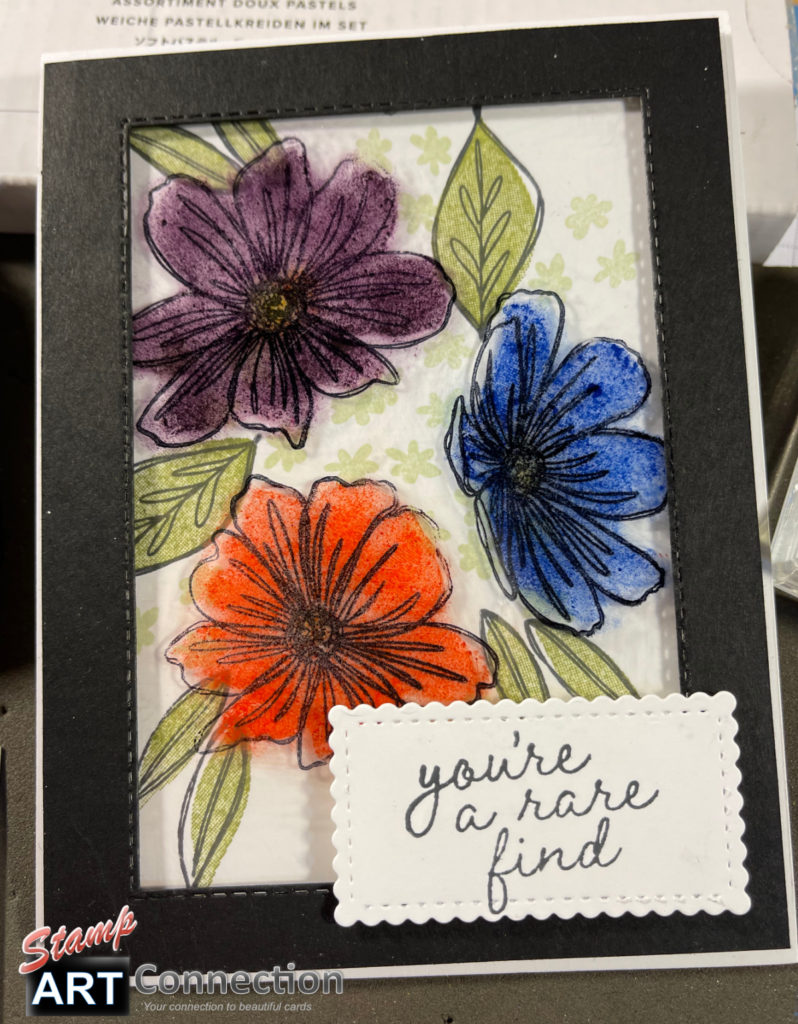
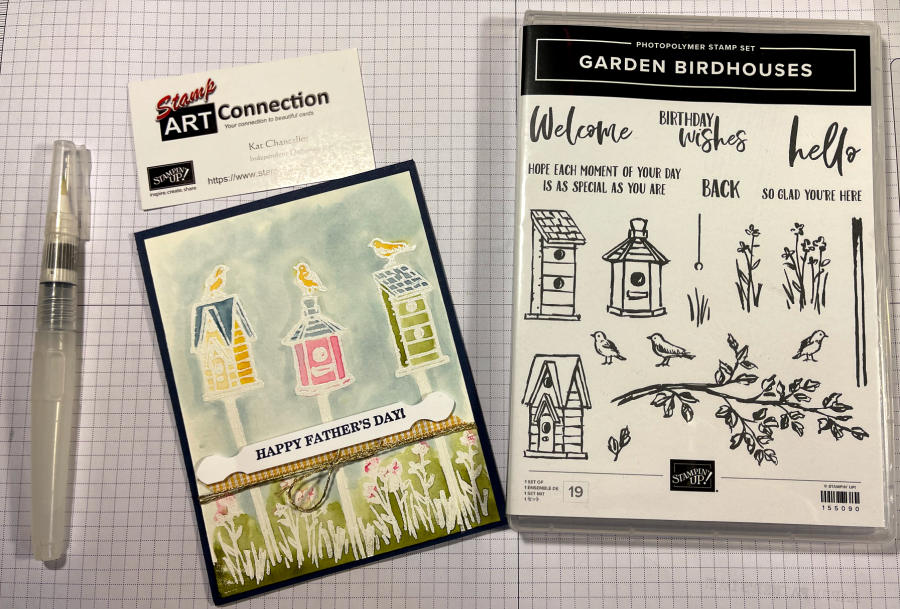
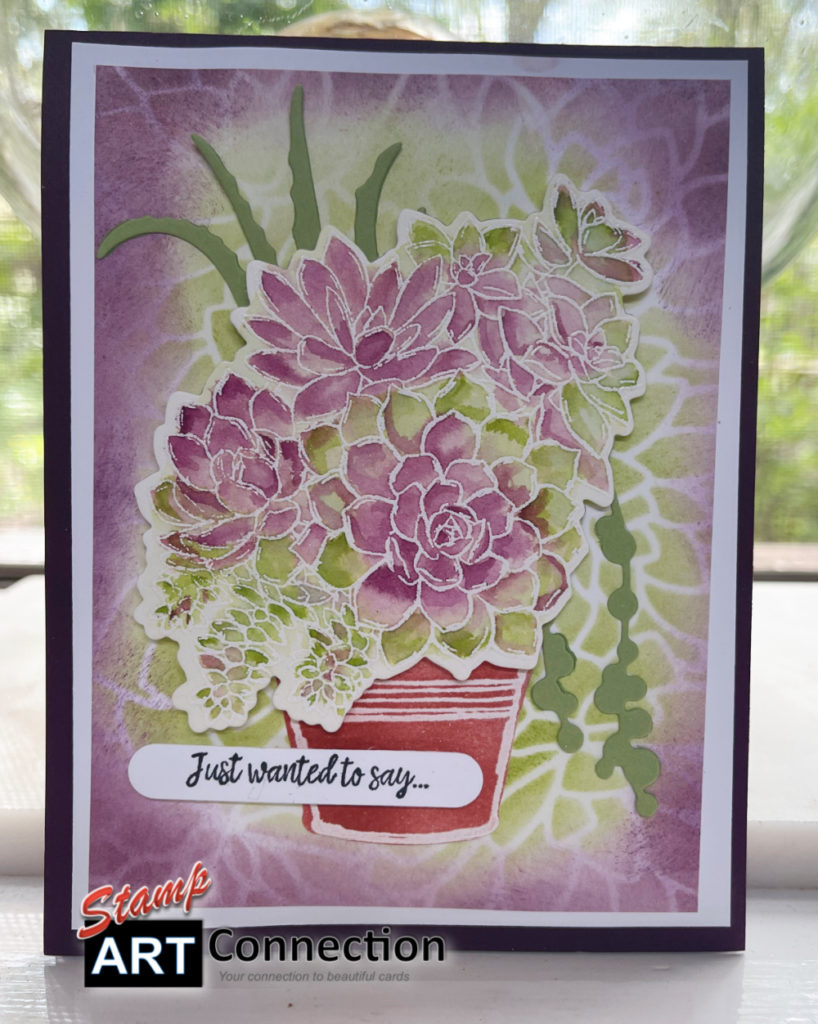
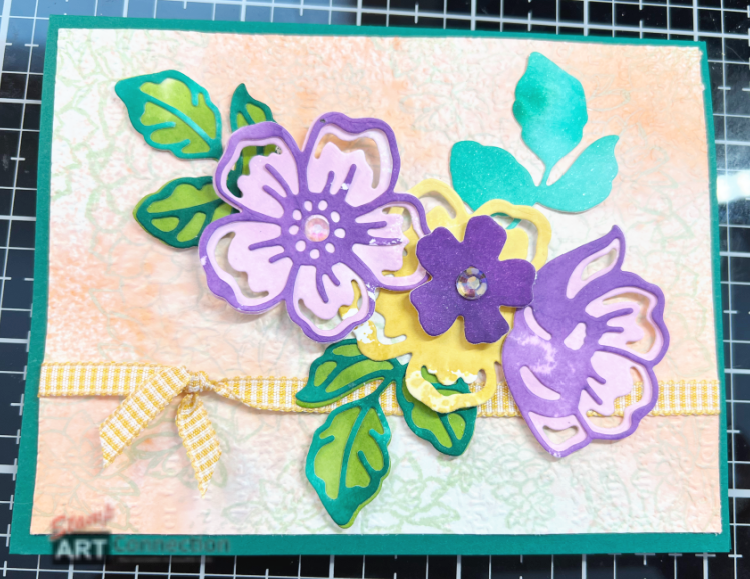
Coloring Techniques: Using PAPER, INK, STAMPS, and Dies

Spread the love!

I’ve just moved into a new house! As of yet, I still don’t have easy access to my stamping supplies. All I have is paper, ink pads, stamps, and dies.

What to do?

Well, because all I have on hand is paper, stamps, inks, and dies I’m going to have to get creative. This is a great opportunity to be a bit frugal and just use what I have in my craft room.

So here is a project using Basic White Cardstock and using an inking technique to design some background cardstock and then I use another inking technique for creating the flowers and leaves. I love the color variations that I’m able to create and really add to the beauty of the flower arrangements. I used coordinating cardstock for the BASE CARD to frame each bouquet. Watch my My Video Tutorial for all the steps. Thank you for stopping by and please leave a comment! Cheers, Kat


What You Need

PRODUCT LIST:

  • Stamps & Dies: 
    • Simply Succulents Stamp
    • Summer Shadows Dies
  • Card Stock:
    • Base Card: Highland Heather
    • Layers: Basic White
  • Ink:
    • Fresh Freesia,
    • Shaded Spruce,
    • Bumblebee (substitute Pale Papaya),
    • Granny Apple Green,
    • Gorgeous Grape ink pads
    • Bumblebee/Pale Papaya Re-inker 
  • Tools:
    • Stampin’ Cut & Emboss Machine  
    • Large Acrylic Block (H) for coloring
    • Water Painters (151298) for blending
    • Two Stampin’ Spritzers
      • Mix approximately 7 drops from the Re-inker bottle with H20 to create desired color strength (test on a paper towel)
      • H20 for blending
    • Heat Tool to accelerate the drying
    • FINE TIP GLUE
    • TEAR TAPE (to secure the ribbon to the back of the front layer)
    • MULTI-PURPOSE GLUE
    • REGULAR & MINI DIMENSIONALS
    • Best Ever Craft Mat (to keep the Die Cut Machine from slipping while cutting) –see MY FAVORITE PRODUCTS LINK
  • Embellishments
    • Coordinating ribbon (approximately 9”)
    • Iridescent Rhinestone Basic Jewels
    • Brushed Brass Butterflies

VIDEO TUTORIAL


GALLERY


Spread the love!

Fancy Fold – Flower POP-UP Card

Spread the love!

Thanks to Sam Calcott UK — Mixed Up Crafts– for this project. It’s a clever flower bouquet pop-up card that doesn’t need any fancy dies except for those needed for embellishments.

Here I present three versions using Stampin’ Up! products for Mother’s Day and as a Congratulatory Card.

I have also produced a VIDEO TUTORIAL with step-by-step directions.


Mother’s Day Card

Create the card front by laying DSP strips and adding DIE CUT lettering using the AMAZING THANKS Dies. DSP strips should coordinate with inside blossoms.
Non-directional DSP from the SUNSHINE & RAINBOWS 6×6″ DSP pack from Sale-a-brations. Here is use the Medium DAISY Punch for my flower centers. I tried to add a glitter center…but the centers were difficult to glue so I don’t recommend it. Sentiment from the DAFFODIL DAYDREAMS stamp set.

Congratulations Card

This is a special card made for a family member who is getting their degree this spring! I wanted something special that she wouldn’t expect since she is very familiar with my work and receives lots of my cards.

DSP is from the SUNSHINE & RAINBOWS DSP with GOLD FOIL layering and embellishments from the ABSTRACT BEAUTY EPHEMERA PACK. Just added some GENIAL GEMS as accents. AMAZING THANKS DIES for sentiment.
Just love the bright colors of Calypso Coral and Melon Mambo for the blossoms. All the cards used the BOUQUET OF LOVE Embossing Folder.

Another Mother’s Day Card

Here’s an idea you can adapt to any card front. I love the playful directions with the horizontal, vertical, and diagonal patterns crated with the ribbon.
I decided to try another DSP pattern using the FRIENDLY HELLO and colored cardstock for the inside embossed layer with POOL PARTY.

Video Tutorial


Here are some basic dimensions — but details are presented through-out the video.

Card Stock:

– 6″x12″ Basic White cardstock (score at 6″”)

– 2 pieces of 5.75-inch square Pool Party (color that coordinates with DSP) for inside Embossed layer

– 2 pieces of 5.75-inch square FOIL (I used SILVER)

– 2 pieces of 5.5-inch square DSP (Friendly Hello 12″x12″ Paper Pack from Sale-a-brations)

Flowers:

– 7 pieces of NON-DIRECTIONAL patterned DSP cut 4.75″ sq.

CARD FRONT LAYERS:

-Silver FOIL about 4.25″ x 5″ 

-DSP strips are 1 3/16 x 4 3/4″ (cut 3)

Go to my FAVORITE PRODUCTS for liquidFUSION, cordless WORKPRO GLU Gun information.


Numbering for Assembly


Die Pieces featured for blossom center & foilage

Mossy Meadow/Pear Pizzaz/Soft Succulent card stock

Pierced Blooms Dies
SAVE 20% ON MINI-EMBOSS AND DIE CUT MACHINE

Thank you for visiting….please LIKE and leave a comment!


Spread the love!

Treat Box & Easy-Make Tags using GINGERBREAD & PEPPERMINT products

Spread the love!

You never have enough treat boxes and easy-make tags for the holidays.

Here are two projects using Gingerbread & Peppermint Suite products that will be sure to inspire!

For the cute Treat BOX — check out my versions and then go to Brenda Quintana’s LINK for how step-by-step directions for how to make the boxes at: https://youtu.be/xozIYAWONaQ

For the EASY-MAKE Tags: Use the Gingerbread & Peppermint Memories and More Card Pack with the TAILOR-MADE TAG DIES.

These are RETIRING PRODUCTS…while supplies last….So….If you love these products…take advantage of the LAST CHANCE SALE and order these retiring products NOW! Check out all the details AND my FREE DSP offer here on my BLOG!


Filled with peppermint hard candy which coordinates with the whole theme! So cute!
I choose GOLD hard candies to fill this treat box because I love TOFFEE!
Here are the finished projects filled with real peppermint KISSES! I put about 12-14 kisses per box.

Stitched Triangle Dies


Gingerbread & Peppermint DSP

You will recognize these wonderful patterns used to cover the Treat Boxes. This is a retiring product so you want to stock up NOW. Consider putting in an order on my ONLINE store and get FREE DSP with a qualifying order!


Frosted Gingerbread Stamp Set

https://www.stampinup.com/products/frosted-gingerbread-photopolymer-stamp-set-(english)

Easy-Make Tags

I needed some quick tags for my personal gifting of my grandmother’s “bischochitos” and for my “Make a Card – give a smile” project for the Children’s Hospital using the Memory & More Card Pack and the Tailor Made Dies. Watch my Video Tutorial for tips and tricks!

Wrapped and ready for gifting!


Video Tutorial


Thanks for stopping by and LEAVE a message


Spread the love!

Acetate Panel Technique using ART IN BLOOM and the SOFT PASTELS ASSORTMENT

Spread the love!

Here is a technique for creating a unique “window card” using Versamark and the new SU Soft Pastels Assortment featured in the 2021-2022 Annual Catalog.

TIP: If you order a photopolymer stamp set from SU, the stamps are fixed between two window sheets. One is a thin acetate and the other is thicker. Remove your stamps and adhere them to the case — then you have the thick ACETATE sheet to use for this project. Otherwise, the window sheets are sold on page 136 of the Annual Catalog (142314).

I clean the acetate sheet with alcohol wipes to remove any dirt/smudges. Follow my Video Tutorial for all the steps.

Basic Steps:

  • Clean the acetate sheet
  • Use a Two Step Stamp set (outline and fill stamps) like the ART IN BLOOM set
  • Use your STAMPARATUS to position your stamps on the acetate
  • Stamp with STAZON Black permanent ink with the outline stamps
  • Stamp with VERSAMARK using the “fill” stamps
  • Choose colors from the SOFT PASTELS ASSORTMENT
  • Take a sheet of GRID PAPER (cut or folded)
  • RUB the chaulk on the paper until there is a pile of powder
  • Pick the powder up using a sponge dauber and then lightly apply to the VERSAMARK on the acetate.
  • I used a background piece of Whisper White cardstock that I stamped with Memento Black ink for the LEAVES and OLD OLIVE and SOFT SEAFOAM for suble background stamping
  • Mount the acetate on Dimensionals after you have framed with Basic Black cardstock
  • I used the layering Rectangle Stitched Framelit Dies to create my frame.
  • Pick a sentiment and mount in the corner. I used the dies from the COLOR & CONTOUR Bundle

Products needed are:

  • Window Sheet (repurpose from a SU stamp set)
  • Whisper White Card Stock (5.5″ x 4.25″)
  • Basic Black Card Stock (5.25″ x 4″)
  • Versamark, StazOn, Memento Black, Old Olive and Soft Seafoam Inks
  • Soft Pastels Assortment (Gorgeous Grape, Night of Navy, Poppy Parade, Daffodil Delight)
  • Rectangle Stitched Framelit Dies
  • STAMPARATUS
  • Sponge Daubers
  • Cotton Swabs
  • Adhesives: TEAR TAPE
  • Stampin’ Dimensionals (Black)

Video Tutorial


Featured Products


Close Up Detail


Spread the love!

Garden Birdhouses offers inspiration for watercolor, soft pastels and alcohol inks coloring

Spread the love!

COLORING TECHNIQUES: Reverse Embossing, Soft Pastels, Watercolor Pencils

There is a lot of versatility with this set. It can be very masculine and perfect for a Father’s Day or just a Birthday card or it can match any occasion. It can also just say, “HELLO” when combined with the BIGGEST WISH stamp set.

I used the SOFT PASTELS ASSORTMENT to color this card. I stamped with VERSAMARK on Whisper White cardstock and then used a sponge dauber to pick up the chalk dust and tapped it on the image. The dust “took” where there was VERSAMark and then I gently blended the color around the tree limb. Not my favorite…but if it inspires…then okay! n


Try the reverse embossing technique using White Embossing Powder on watercolor paper demonstrated here for a soft effect.


Video Tutorial


Here’s a lovely card using WATERCOLOR PENCILS over Stazon ink on watercolor paper. I used the second of the largest STITCHED RECTANGLES (151820) to give it a nice edge. I also used a LIGHT GREY Alcohol Ink Marker to outline the figures and give them a big of depth on the right side. Great technique that makes your images (when stamped on a white background) really “pop”!


This is an easy technique. Using watercolor paper, take your water-painter brush and apply color swatches to the areas you want to stamp the image. Let dry and then stamp with the same color — here I used Mossy Meadow and Misty Moonlight. The basecard background are the three BIRD stamps stamped on Daffodil Delight cardstock using Mango Melody ink.


Color the images with BLACKS and GREYS alcohol inks then use the BEAUTY OF THE EARTH DSP as a background! Fast and easy!

PRODUCTS FEATURED

GARDEN BIRDHOUSES
https://www.stampinup.com/products/garden-birdhouses-photopolymer-stamp-set
https://www.stampinup.com/products/beauty-of-the-earth-designer-series-paper

Spread the love!

Simply Succulents

Spread the love!

Coloring Techniques: Reverse Embossing – Masking – Pastels – Watercolor – Inks

Embossing with WHITE Embossing Powder with my HEAT GUN on watercolor paper and then coloring with ink is my favorite technique for coloring using this stamp set. Get creative and use the dies to cut out the images and then layer using color card stock or vellum for a more ethereal effect.

I also like using the largest of the Potted Succulents Dies for creating a background by using the die with WINDOW SHEET for making a MASK that you can then color with a sponge dauber. Everything is available on my ONLINE STORE:


Video Tutorial


Products Featured


Soft Pastels Coloring Technique

I used the SOFT PASTELS ASSORTMENTS much like a chalk crayon. Then I used my Water Painters to dissolve the color and blended it with the other colors…DAFFODIL DELIGHT, MOSSY MEADOW, GRANNY APPLE GREEN and just a touch of NIGHT OF NAVY for the shadows and edges.


Spread the love!