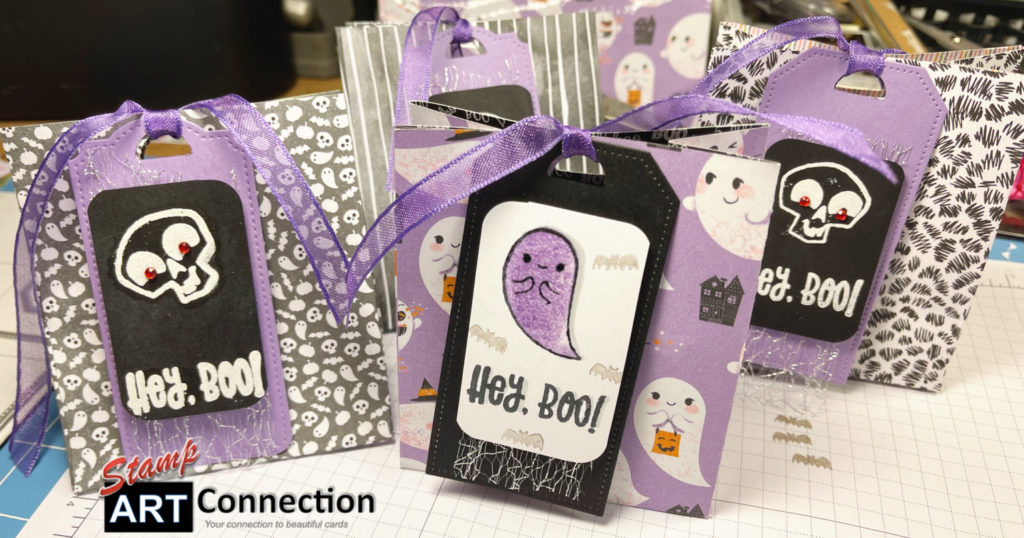
Depth of Field & Wreath Building Stamping Techniques

Spread the love!

Here are several techniques shared last week during my weekly LIVE. I created background patterns using the WHALE DONE stamp set and the “depth of field” stamping technique.

I also demonstrated how to use a Stamparatus to create wreaths using the GATHER TOGETHER, BEAUTIFUL AUTUMN and PEACEFUL BOUGHS stamps sets.

View the video tutorial for tips and tricks and check out the gallery of final cards. Don’t forget to leave a comment and thank you for stopping by!


Video Tutorial


TECHNIQUE I: DEPTH OF FIELD

  • INKS: Smokey Slate (grey), Mint Macaroon, Shaded Spruce, Pretty Peacock, Misty Moonlight, Granny Apple Green, Night of Navy
  • CARDSTOCK: Whisper White and Very Vanilla
  • STAMP SET: Whale Done

Gallery of Depth of Field Technique Cards

Smokey Slate, Shaded Spruce, and Granny Apple Green. I stamped with some SILVER metallic ink to add some glimmer to this card. But it’s a great pattern for a simple card! Base card is SHADED SPRUCE with BLACK.
Smokey Slate, Misty Moonlight and Shaded Spruce. Basecard is NIGHT OF NAVY and I used a Smokey Slate (retired) ribbon for accent.
Pretty Peacock, Shaded Spruce and Mint Macaroon. Base card is SHADED SPRUCE and I used the Seaside Textured (retired) embossing folder to add some depth to the pattern. You can barely see the WINK OF STELLA…but it adds some nice glimmer.
Night of Navy, Misty Moonlight, and Smokey Slate Inks. I love this background and it goes perfectly on POOL PARTY basecard with some SHEER RIBBON in POOL PARTY which is NOT retired!!! : )
Great layer of shapes on SHADED SPRUCE and mounted on Whisper White base card.
WHALE DONE

TECHNIQUE II: WREATH BUILDING WITH THE STAMPARATUS

  • INKS: Bubblebee, Cajun Craze, Early Espresso, Crumb Cake, Mint Macaroon, Gold Metallic Ink
  • STAMP SET: Beautiful Autumn, Gather Together and Peaceful Boughs
  • TOOLS: Stamparatus

Gallery of Wreaths using the Stamparatus

This is the first wreath I demonstrated on the video, I cut it down to create a regular card. I added so GOLD METALLIC ink accents and the base card is Early Espresso.
This is the second wreath I made in the video. I fussy cut around to create a wreath shape and mounted it on 6″x6″ Real Red card stock. I added some GOLD GEMS and GOLD trimmed ribbon as accents. I am very happy with this card.

Featured Products


Spread the love!

Peony Flower using Glimmer, Velveteen, and Vellum Papers…

Spread the love!

For my weekly LIVE on Wednesday, I choose some different cardstock and paper to create the blossoms from the PEONY GARDEN Suite.

After assembling the Velveteen Peony, the card base is HIGHLAND HEATHER with Vellum and a PURPLE POSEY layer. The Vellum is embossed with the GREENERY Embossing Folder. I used Highland Heather INK with a sponge dauber around the flower edges of the Peony. The center is BLACK Glimmer paper. The leaves are Soft Seafoam velveteen. The edges have been sponged with same ink for added accent.
Card base of Highland Heather is embossed with the TASTEFUL TEXTURES embossing folder. The Whisper White layer is embossed with the GREENERY embossing folder and the scalloped edges are created using the edgelets from the bundle. The leaves are cut from the SOFT SEAFOAM Velveteen cardstock.
This is a FANCY FOLDS one sheet wonder card (see FANCY FOLDS WORKSHOP details to learn how to create this card) and features products from the PEONY GARDEN SUITE. I used WW card stock and sponged with PETAL PINK ink. I love the monochromatic theme with the coordinating DSP and cardstock. Perfect for all occasions…weddings, birthdays, anniversaries.
Peony featured from TUTORIAL…card is FLIP TAB…another FANCY FOLDS WORKSHOP product.
I used GREY GRANITE, SMOKY SLATE to create a soft background for this peony cut from the RAINBOW Glimmer paper. Scripty Embossing folder and frayed edges add a shabby chic vibe. The word die is cut with the FOAM ADHESIVE backing on BLACK cardstock for added dimension.
I had some retired Petal Pink and Green VELLUM. Added layers of DSP, embossing and ribbon from the PEONY Garden SUITE.

Video Tutorial


Featured Products


Spread the love!

Box Project featuring the GATHER TOGETHER & BEAUTIFUL AUTUMN suites

Spread the love!

This lovely project inspired by the Artisan Design Team member, Caroline van der Straaten included products from the new mini catalog in line with a fall theme of thanksgiving.


Register for my WORKSHOP!


Featured Products


Spread the love!

Stand Alone Cards Tutorial

Spread the love!

I loved putting this project together because it was EASY and also a great way to show off the new product suites from the Annual Catalog. Here is an easy card that when assembled stands alone! The cards featured products from FOREVER GREENERY, IN GOOD TASTE, and WORLD OF GOOD.

Please follow the Video Tutorial for all the tips and tricks!


Supplies Needed:

  • Score Board and Bone Folder
  • Ruler
  • Pencil and Eraser
  • X-Acto Knife
  • Self-Healing Cutting Mat
  • SU Silicon Mat
  • All-Purpose Glue and Dimensionals
  • CARDSTOCK: 4″x 12″ Cardstock or DSP (use 12″x12″ cardstock)
  • Whisper White Matt: 2.75″ x 3.75″ and piece for the back and die-cutting sentiments
  • DSP for front: 3.5″ x 2.5″
  • IN GOOD TASTE Suite (154147)
  • Cutting Machine/Big Shot
  • INK: MISTY MOONLIGHT

The cards can be made with 12″ DSP or with 12″ cardstock.

Featured Products:


Spread the love!

Easy Frame Die Cut Techniques

Spread the love!

Use concentric dies to create a “frame die-cut technique” as a background for cardmaking. You don’t have to invest in the new THIN FRAME DIES that are being advertised by some craft suppliers. Here is the fastest and easiest way to create this concentric background.

I started out just going through my scrap file and selected five colors. I used the Stitched Shape Circle Dies and cut-out all the concentric rings for each color. I used the excess card stock (negative space) to mat the concentric rings with All-Purpose glue after running through with the Tasteful Textile 3D Embossing Folder. Lastly, add the Foam Adhesive Sheets to Black cardstock, and cut out with word dies for the perfect card!


Rectangle Concentric Pattern

Check out my Video Tutorial that using the Stitched Rectangle concentric dies:


Video Tutorial


Basic Supplies:

  • Concentric Dies (Stitched Rectangle and Stitched Shape dies)
  • Card Stock (colors and amount to match the number of dies used for your concentric design)
  • TOOLS: Die cutting machine
  • ADHESIVE: All Purpose Glue, Foam Adhesive Sheets (152815)
  • WORD DIES: Well Written Dies (151816)

Featured Products:

Recommended Products:


Spread the love!

Corner Bookmark Tutorial

Spread the love!

While creating some projects for hospitalized kids, I came across this technique for making bookmarks. Here’s a fast and easy tutorial for making bookmarks out of your scraps and extra embellishments.

Using WHALE DONE Bundle and DSP scraps
Tulip Punch, Small Daisy Punch and DSP scraps
PERFECT PETS Bundle with some extra embellishments and scrap DSP

BASIC SUPPLIES:

Most of the supplies I used came from scraps and extra pieces left over from other card projects. I pulled out a couple of favorite punches to use.

  • Trimmer
  • 4″ x 4″ cardstock
  • 2.75″ x 2.75 cardstock or Designer Series Paper (DSP)
  • Scoring Board & Bone Folder
  • Border or Corner Punches
  • Diecut or punched images
  • Tear Tape
  • Scissors
  • All-Purpose Glue

Spread the love!

Fancy Folds – Wiper Card Technique featuring the Whale of a Time Suite

Spread the love!

The Whale Of A Time suite really makes a splash with wonderful seascapes that just begs with possibilities and an ocean of inspiration! I have provided a gallery of ideas that this suite has inspired. The DSP, colors, and embellishments (seashell-shaped sequins) add so much!

However, if you like me — have time on your hands….might as well challenge yourself with a fast and easy “fancy folds” card that is very unique. The wiper feature pops up when you stretch the card out and delights any recipient — young or old!

The Whale of a Time Suite of products was chosen for this project because it makes card-making just that more simple! Just follow the pattern and the video tutorial for crafting success!!!

Supplies

  • CARDSTOCK: Misty Moonlight, Whisper White
  • 2 pieces of Cardstock 4.25″ x 8.5″ (for front and back of card)
  • 1.5″ x 3.25″ Cardstock (for pop-up wiper tab)
  • Additional cardstock and DSP for decorating the front of the card
  • Bone Folder
  • Score Board
  • Paper Trimmer
  • Ruler
  • Scissors
  • Tear Tape, All Purpose Glue, Fine Tip Glue, Dimensionals
  • WHALE DONE Bundle (154053)
  • Whale of a Time DSP (152460)
  • MISTY MOONLIGHT Ink Pad (153118)
  • Whale of a Time SEQUINS (152461)

Video Tutorial – Wiper Card Technique


GalleryMore Ideas!

Take the SEABED EMBOSSING folder, ink with Misty Moonlight, and spritz with water before embossing. Recommend using Shimmery White Card Stock. Stamp and fussy-cut seaweed and coral and embellish with sequins. Take a piece of POOL PARTY Sheer ribbon and twist across the front to create the look of a wave.

I love how easy the Whale of a Time Suite of products creates fast and fun cards! Just at a piece of fussy cut coral and Sequins on the DSP!

Run the Shimmery White Cardstock with Misty Moonlight spritzed with water on the Seabed Embossing Folder. Take additional ink with an Aqua Painter (Calypso Coral, Magenta Madness and Granny Apple Green) on the damp cardstock to create more color. Embellish with fussy-cut seaweed and sequins!

Stamp 5.25″ x 4″ Whisper White card stock with seaweed and coral (Granny Apple Green and Calypso Coral) stamps then emboss using the Seabed Embossing 3D Embossing folder to create a rich background for a piece of DSP (cut with Layering Rectangles), embellished with Sequins and Sheer Pool Party Ribbon.

I love Sea Turtles! Use the DSP to full advantage with this fast and easy card. Stamp the Sea Turtle on WW Card Stock with Granny Apple Green ink and shade with MOSSY MEADOW colored pencil for added depth.

This card was made of scraps! Just arrange odd pieces together and add a medallion of color using the stamps and Granny Apple Green, Magenta Madness, Highland Heather, Bumble Bee, Pool Party, and Misty Moonlight inks. Just a hint of WINK OF STELLA provides just the right amount of underwater sparkle.

So, not crazy about using the SHIMMERY CRYSTAL EFFECTS over the seahorses…but the card is still pretty and worth a post!

PRODUCTS FEATURED:

WHALE DONE STAMP SET
I love the SEASHELL Sequins!


Spread the love!

Mosaic Background Technique

Spread the love!

This month I am featuring workshops using the Forever Greenery Suite of products.

During the assembly of workshop KITs, I created a table full of paper scraps!

What to do with paper scraps? #simplestamping Well, follow my Video Tutorial while I create some background paper using a piece of 8.5″ x 11″ Whisper White cardstock and a handful of scraps. Since the cards coordinated with the featured products…I used the background paper, mounted them on Whisper White Cards stock, embossed some with the TASTEFUL TEXTILE 3D Embossing Folder on a base card of Pear Pizzazz to create a stack of THANK YOU cards to tuck in the Workshop KITS as a special “thank you” for their business.

Please subscribe to my email and let me know if you are interested in my future workshops!


Video Tutorial


Featured Products


Spread the love!

Social Distancing through Crafting: Background Stamps & Flower Coloring Techniques

Spread the love!

The new 2020-2021 Catalog will feature 6 background stamps — three of which will be new. I wanted to demonstrate a couple of stamping techniques that you can apply to these as well as any stamps you may own. My homework following the session was to create the final cards!

BACKGROUND TECHNIQUES:

  • Watered Inking
  • Faux Gelato inking

MAGNOLIA COLORING TECHNIQUES:

  • Craft Foam Stamping with Stamparatus
  • Thumping Technique with Stampin’ Write Markers
  • Stampin’ Write Marker Inking

Enjoy the Video Tutorial and the cards in the Gallery.


Products Used:

  • Shimmery White Cardstock (cut 5 1/4″ x 4″)
  • 3 Stampin’ Spritzers (one for each color and water)
  • Hair Gel (Clear gel)
  • INK REFILLS: Pacific Point, Daffodil Delight (mixed with H20 in spritzer)
  • INK Pads: Blushing Bride, Calypso Coral, Old Olive
  • Heat Tool (to dry ink)
  • Craft FOAM (Amazon)
  • Stazon Ink
  • Stampin’ Write Markers: Garden Green, Pear Pizzazz, Early Espresso, Calypso Carol, Blushing Bride, So Saffron or Daffodil Delight
  • Stamps: Good Morning Magnolia, Crackle Paint

GALLERY OF FINISHED CARDS

My homework from the evening’s demonstration was to create cards! I really liked the water effect from the background stamping that drew me to the Lovely Lily Pad (retired) and the Seaside Notions (which is still available in the new catalog). Some other great stamp sets that would work include: Under My Umbrella, Sailing Home, Seaside View, Whale Done bundle, By the Dock and the cute duck from Field Journal (all in the new catalog).

Lovely Lily Pad Bundle stamped on Watercolor Paper in White Embossing Powder and inked with a Water Painter with Melon Mambo. Granny Apple Green is the color for both lily pad inking and base card. Lovely You for a sentiment on black card stock (white embossing powder). Gold thread and pearls for embellishments.
Gorgeous Grape to color lilies
I thought the gold thread looked like the water rings around the lily pads!
My absolute favorite. The seahorse is white embossed on watercolor paper and painted with Gorgeous Grape and Wink of Stella. Same with coral and shell in Calypso Coral and Mango Melody. I used tons of sequins from the retired Woven Threads collection to create a glittery seabed. I love how the tail curls around the coral!
The glitter makes me smile!

Magnolia Flower Color Techniques

Thumping Technique with Early Espresso, Garden Green and Crumb Cake.
Craft Foam color with Stamparatus
I used the die from the Ornate Frames to give a little frill to this softly feminine card and some pink ribbon edged in GOLD.

Products Featured


Spread the love!

Social Distancing Through Crafting: Fancy Folds T-Slide Card

Spread the love!

This was a challenging card…but I may have made it harder than it should be. It was definitely a learning experience and I’m anxious to share what I learned.

Some tips: Don’t add DSP to the base card (unless it covers the top layer and there are NO seams). The “t-slide” needs to move smoothly. Recommend using WW THICK cardstock for the top layer. Recommend measuring and centering the “t-slide” and sentiment card strips. The more these pieces are centered — the easier the “t-slide” will move.

Here I focus on making several cards with this technique to include the initial video using the Geared Up Garage set and then a second video featuring the A Good Man stamp set to review nuanced improvements! After viewing both videos, you should be all set to create your own version!


CARD #1: Featuring Geared Up Garage


Video Tutorial for Geared Up Garage


CARD # 2: Featuring A Good Man Stamp Set


Video Tutorial A Good Man


Basic Supplies and Measurements:

  • CARDSTOCK and DIMENSIONS:
  • Base Card: 5 1/4″ square, Layer (for cutting) 5″ square
  • See diagram for CUT and SCORE measurements
  • 3 1/2″ x 1 1/4″ Cardstock
  • 4 1/4″ x 1″ Cardstock
  • 4″ x 1″ Cardstock
  • Additional Cardstock for Card Front
  • TOOLS: Paper Trimmer, Tear Tape, Score Board, Bone Folder, Stamparatus
  • STAMP SET and DIES: Geared Up Garage, A Good Man, Stitched So Sweetly Dies, Layering Circle Dies, Stitched Shapes Framelits
  • INKS: Crumb Cake, Memento Black Ink, Calypso Coral

DIMENSIONS and DIAGRAMS:

Base Card and Front Layer
Diagram of Front Layer for Scoring and Cutting

PRODUCTS FEATURED:

More Card Ideas using Geared Up Garage


Refer to both the T-Slide Video for stamping the paper and the “Fancy Fold Gate Card” to fold the base and create this easy card for Father’s Day!


Spread the love!

2020-2021 Stampin’ Up! Annual Catalog Reveal #simplestamping

Spread the love!

Demonstrator Pre-Order Products and #simplestamping technique

Due to COVID-19, Stampin’ Up! canceled the Spring ON STAGE convention to launch the new catalog across the global market. Albeit a good decision — I missed the opportunity to join 2,000 of my best friends in Atlanta to view the products and create samples! But once I got the new products in my hands….it was GAME ON!

I am so excited to share the products from the new 2020-2021 Annual Catalog. I loved getting my pre-order and taking the time to explore as many of the new products as I could for the first time! Not having the chance to make samples at ON STAGE was at first a disadvantage. However, I had a great time making samples and learning about all the great features. I have a lot of tips and information to share about these great products!

Please enjoy the video and samples. I have also included a VIDEO from my weekly FB Live broadcast with steps and information for a simple stamping technique using the “Flowers for Every Season” called the Retiform or Grid Stamping Technique.

Please leave comments and share your favorites!


Flowers for Every Season Suite

Social Distancing through Crafting Series: The Retiform or Grid Technique using stamps from the “Celebrate Sunflowers” and the “Jar of Flowers”

Products featured include the Celebrate Sunflowers and Jar of Flowers Stamp sets.
Products featured include the Celebrate Sunflowers Stamp Set and Balmy Blue ink.

What you need:

  • CARDSTOCK: Whisper White Card Stock (5 1/4″ x 4″ or 5″ x 3 3/4″) for stamping
  • Coordinating cardstock to mat the 5″x 3 3/4″ size ( 5 1/4″ x 4″ -Early Espresso)
  • Cardstock for the base card (Crushed Curry)
  • INKS: Soft Suede (or Balmy Blue), Crushed Curry and Mint Macaroon
  • TOOLS: Scrap piece of card stock for inking, Post-it Notes for masking and a Sponge Dauber for coloring
  • STAMPS: Celebrate Sunflowers, Jar of Flowers and Forever Fern

More cards using the Flowers for Every Season Collection of Products:

Products featured include the Celebrate Sunflowers Dies and the Flowers for Every Season Memories and More Card Packs and Cards and Envelopes from the suite. This features the new IN COLOR Misty Moonlight, Bumble Bee and Just Jade.
Products featured include the Celebrate Sunflowers Stamp Set and Dies. Paper from 2020-2022 In Color DSP, Bumble Bee Ribbon and label and sentiment from the Tasteful Touches Bundle.

Forever Greenery Suite

Any sample using the Retiform or Grid stamping technique (#simplestamping) using the Forever Fern Stamp set. Gold Thread is taken from the Forever Greenery Trim Combo Pack. Inks are Mint Macaroon, Pear Pizzazz and Shaded Spruce with flecks of GOLD.
Garden Green cardstock base embossed with the Greenery Embossing Folder and Forever Greenery DSP strip. Forever Gold Laser-cut Specialty Paper and Gold Thread embellishment. Circle is cut 2″ Vellum embossed with gold with stamp from the Lovely You stamp set.

Blossoms in Bloom Bundle

Image stamped with the Blossoms in Bloom stamp and gold foil die cut with the Many Layered Dies which is part of the bundle. See more ideas demonstrated on the Reveal Video.

Birds & Branches Bundle

Birds and More Dies to cut 4″x4″ card and backed with acetate. Ribbon from the Forever Greenery Trim Combo Pack. Flowers from the Timeless Tropical Suite with Rhinestone centers. Sentiment from the Lovely You stamp set.
In Color DSP in Bumble Bee mat for the Whisper White with Bumble Bee Gingham Ribbon. Nest includes COPPER TRIM to create nest for eggs. Label and sentiment from the Lovely You Bundle.

Thank you for visiting! Please LIKE and SHARE. Come back for more ideas!


Spread the love!

Social Distancing Through Crafting: Fancy Gatefold Card

Spread the love!

The fancy gatefold card is easy and quick if you follow my Video Tutorial. I also feature a quick coloring technique using craft foam and my Stamparatus. I provide all the dimensions and featured products below.


What you need to make the Fancy Gatefold Card

  • CARDSTOCK and DIMENSIONS:
  • Base card 12″ x 5.5″ / Scored at 2″, 4″, 8″ and 10″
  • Designer Series Paper cut at 4″ x 5.25″ and four strips cut at 1.75″ x 5.25″
  • Whisper White for stamping image cut at 5″ x 3.75″
  • Layering cardstock to mat the stamped image 4″ x 5.5″ in coordinating color
  • Whisper White and coordinating cardstock for sentiment and label die.
  • TOOLS:
  • Stamparatus with several plates
  • Craft Foam (Amazon)
  • Adhesives
  • STAMP SETS:
  • FOREVER BLOSSOMS
  • SO SENTIMENTAL BUNDLE
  • PARISIAN BEAUTY
  • VERY VERSAILLES
  • INK:
  • Early Espresso, Terracotta Tile, Crumb Cake, Mint Macaroon
  • Embellishments: Pearls or Faceted Gold Gems


Featured Products for making the Fancy Gateway Card


Spread the love!

Social Distancing Through Crafting: Coloring Techniques using the Ornate Garden Suite

Spread the love!

This week I feature some EASY coloring techniques using the Ornate Garden Suite. This is an “early release” item that will be featured in the new 2020-2021 Annual Catalog scheduled to go live on 3 June 2020. It is packed with floral designs and lots of sentiments and contains two bundles…making it a “mega-suite”.

The style of the lovely flowers in the Ornate Garden Suite Collection can be said to be a modern take on classic Victorian florals. Coupled with the gold foil accented Designer Series Paper, Gold Faceted Gems, and shimmery ribbon all combined to add sparkle and elegance to any projects.

I not only love what you can do with this versatile collection; but, due to current events….it’s a blessing to be “grateful”, and being able to share your gratitude with the included sentiments or pair with any sentiments for all-occasion projects is another plus.

Here is a list of all the products the Ornate Garden Suite Collection includes:
* Ornate Style Cling Stamp Set (10% off)
* Ornate Thanks Photopolymer Stamp Set (10% off)
* Ornate Borders Dies (10% off)
* Ornate Layers Dies (10% off)
* Ornate Floral 3D Embossing Folder
* Ornate Garden Ribbon Combo Pack
* Ornate Garden Specialty Designer Series Paper
* Gilded Gold Faceted Gems

Read on and allow me to share some techniques for coloring the floral image using watercolor pigments, inks, reverse embossing using Aqua Painters, Sponge Daubers, and Craft Foam using Flirty Flamingo, Blushing Bride, Terra cotta Tile, Mint Macaroon, Old Olive, Daffodil Delight and Crushed Curry inks.

ORNATE STYLE BUNDLE
ORNATE THANKS BUNDLE

Coloring with the Color Sprinkles

PIGMENT SPRINKLES

These are fun to use if you like just being loose and creative. I have predominantly used them for background coloring; but, wanted to come up with a more controlled technique for coloring a stamped image.

There are several coloring tools you can use: I recommend dampened Sponge Daubers (for each color), Aqua Painter, and Stampin’ Spritzer.

Using the various coloring tools there are several coloring techniques I demonstrate in my Video Tutorial.

Various Steps:

  1. Begin by stamping the image with either with Stazon Black ink or Clear embossing powder on Shimmery White Card stock
  2. Using the Sprinkles apply color on the image to the areas you want to color
  3. Using a coloring tool — a dampened sponge dauber (use one for each separate color) or aqua painter spread the pigment around the image to your liking
  4. You can also use the aqua painter and using the ink directly from the ink pads to color the embossed image (Mossy Meadow, Terracotta Tile and Flirty Flaming)
  5. Do the same as in #4 — but squeeze the ink pads and pick up the color from the back of the ink pad lid to create a soft muted image

Video Tutorial on Coloring Techniques


Coloring with Craft Foam

WHITE FUN FOAM 9″ X 12″ X 1/16″ THICK (12 PCS/PACK)
Color:White

Here’s a coloring technique that can be adapted for coloring ANY stamped image! It’s fun and fast when using a Stamparatus and several stamping plates. View the Video Tutorial for all the steps and some tips and tricks!

Video Tutorial for EASY Coloring with Craft Foam


Mosaic Background Pattern

A room full of paper scraps can still inspire! I used all my scraps from cardmaking and cut using the Tailored Tag punch, and then textured the plain color (Mint Macaroon and Terracotta Tile) card stock with the Embossing Folder to create a mosaic of color and texture. For a little sparkly filled in with both Gold Foil and Gimmer paper.

Begin with a piece of Whisper White (here I cut to 5.75″ x 4″) and arrange the paper pieces in a mosaic pattern and adhere with all purpose glue. Once dry, cut with one of the Layering Rectangles. I cut two — so that I could make two cards and then layered on the final card with cardstock cut from larger rectangles.


Gallery of Cards

Products Featured


Spread the love!