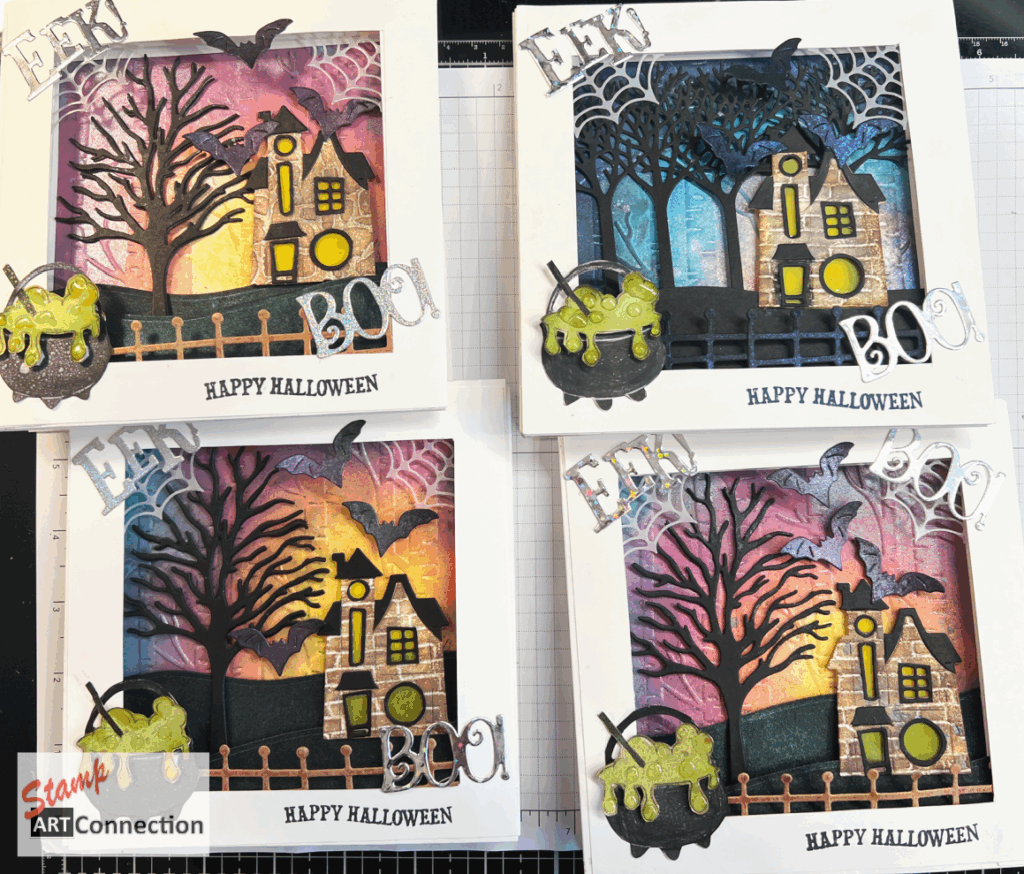
3D Project: Gatefold Accordion Album

Spread the love!

Here is a 3D project for creating a 6 x 5.25″ album for photos or scrapbooking. Make and give as a gift with photos as a special memento. Or, make and give as a wedding, baby shower, or anniversary gift for the recipient to embellish for a cherished remembrance of a special day.

This is a very versatile project and takes advantage of utilizing SU coordinating products creatively. It’s great for using your craft room “stash”. In fact, I used some retired DSPs and then embellished them with current products from the Annual Catalog.

A Video Tutorial and a 3D Project PDF are available below.


FEATURED PROJECT

Products featured are the Friends Are Like Seashells stamps, Seaside Seashells dies, and Seashells 3D Embossing folders. The sentiments are from the Peaceful Moments Cling and the Daisy Lane Cling (RET) stamps.


Video Tutorial


Project PDF

If you are my SU customer — contact me for your FREE PDF.

Otherwise, click below for a copy of the Instructional Project PDF that includes all the dimensions and instructions.

First & Last Name
Email Address

Gallery

This was my first effort. Recommend using a RANDOM DSP pattern since it is challenging to try to align a plaid or strip pattern perfectly. I also used my favorite SUMMER SHADOW DIES.
SUMMER SHADOW DIES using Blushing Bride, Calypso Coral, Basic White, Old Olive, and Mossy Meadow card stock. For my last couple of albums, I backed the flowers with GOLD FOIL cardstock for an added glimmer.

Spread the love!

FANCY FOLD MOTION CARD: Venetian Blinds Card featuring SALE-a-bration Products

Spread the love!

This is a fancy folds “motion card”. The front flap lifts like a Venetian blind — it’s so much fun. I use several products featured during the 2022 SALE-a-brations offering.

WONDERFUL WORLD stamp and Designer Series Paper (DSP) is FREE with a $100 qualifying order. Sentiment from the HONEYBEE HOME stamps set. Glittered Organza Ribbon.
WONDERFUL WORLD DSP creates the Venetian shade front.
Gently pull the ribbon to reveal the inside. Tie the ribbon to display the card.
Using the reverse pattern from the WONDERFUL WORLD with Glitter Organza Ribbon.
2021-2023 IN COLOR 6×6 DSP in Polished Pink is used for the Venetian Shade that is embellished with FOR EVERYTHING FANCY Sequins. The HIPPEST HIPPOS & HIPPO Dies are stamped with Memento Black ink and colored with Stampin’ Blends. Our dancing Hippo is glued on a piece of embossed Basic White card stock that creates a textured background. Soft Sea Foam ribbon is used to lace the accordion folds to create the Venetian blind movement.

Video Tutorial


Materials:

  • Wonderful World Stamp (SALE-a-bration)
  • Wonderful World 12″x12″ DSP (SALE-a-bration)
  • Hippest Hippos Stamp (SALE-a-bration)
  • Hippo Dies (SALE-a-bration)
  • Honeybee Home Stamp (for the sentiment)
  • CARD STOCK:
    • 5.5″x 4.25″ Base Card (Orchid Oasis, Highland Heather, Petal Pink)
    • 5.25″ x 4″ Background in Basic White and embossed with a mini-embossing folder
    • 5.25″ x 4″ DSP (Wonderful World / 2021-2023 IN COLOR DSP)
      • Score — .5″ increments — along the 5.25″ length
      • the TOP is the .25″ edge that will be used to attach to the card with Tear Tape
      • Mark with pencil .25″ from the 5.25″ edge to align where to punch holes
    • Basic Black / Basic White to stamp/heat emboss sentiments
  • DIES:
    • To create the flower medallion use the LAYERING OVALS dies (retired) with Basic White (stamped image) and scalloped Petal Pink layer
  • EMBELLISHMENTS
    • Cut 36″ of coordinating ribbon (Soft Sea Foam Seam Binding Ribbon)
      • Do not recommend using the Glittered Organza ribbon. It works well in the tutorial, but the ribbon is very stiff and abrasive. It will cause more wear and tear on the Venetian blind than a softer ribbon.
      • Knot or add beads to the end of the ribbon to avoid fraying
    • For Everything Fancy Sequins (Pink and Green)
  • TOOLS
    • Simply Scored Scoring Tool
    • Stampin’ Trimmer
    • Fine Tip Glue
    • Hole Punch
    • Bone Folder
    • Pencil for marking .25″ to align hole punch
    • White Embossing Powder / Embossing Buddy / Heat Tool
  • Refer to the video tutorial for assembly instructions.

Click to access my ONLINE Store


SALE-a-bration Items

WONDERFUL WORLD BUNDLE https://youtu.be/_immAmxDeTM

Spread the love!

The Framed Rosette Card

Spread the love!

Create a “WOW” card! This is an Avid Stamper’s dream card. But any stamper can learn how to assemble a simple rosette to create a striking focal point. Then embellish with die-cut flowers and leaves on a textured background using (my favorite) Summer Shadows Dies & and use the decorative masking techniques to create a richly textured background. You can tailor the card to your taste and preference. It was inspired by Debbie P. from the UK and a featured artist from Practical Publishing “craft” magazine.

I took the original card and updated the design to accommodate SU products. My design includes creating a half rosette using colorful Designer Series Paper (DSP) — both a floral and patterned DSP version. You must use 12″X12″ DSP and begin by cutting the paper 3″ x 12″ wide. You will need a scoring tool to score @ .25″ inch intervals. Start with one mountain fold and one valley fold across the length of the DSP, then fan out to create half a rosette and glue with a glue gun.

Cut a “frame” from gold/brushed metallic cardstock and use this as the pattern.

My ONLINE STORE has all the materials you will need for this project.

Now, refer to the Video Tutorial for all the assembly and details.


CARDSTOCK:

  • Basic White-Base Card
  • Daffodil Delight – used for masking layer
  • Die Cut Flowers:
    • Just Jade-retired (sub: Pear Pizzaz) & Evening Evergreen
    • Highland Heather & Blackberry Bliss
  • Brushed Metallic or Gold Foil Card Stock for the FRAME

STAMPS & DIES

  • Flowering Tulips stamps set (sentiment)
  • Summer Shadows Dies (Die cut flowers)
  • Scalloped Contour Dies (to cut the frame for the rosette)
  • Stitched Shapes Framelits (for the center medallion)
  • Layering Circle Framelits (use a scalloped edge for the center medallion)

MASKING TECHNIQUE:

  • Decorative Mask (Plenty of Patterns-retired — Sub: Artistic Mix & Butterflies & Flowers)
  • Embossing Paste
  • Palette Knives

TOOLS:

  • Stampin’ Trimmer
  • Scoreboard
  • Emboss & Die Cut Machine
  • HOT GLUE GUN
  • Dimensionals
  • Coordinating ribbon/jewels
https://s.tamp.in/VCJ9l6

My Favorite “craft room” products


Gallery

Floral rosette version using retired Flowering Tulips DSP, coordinating card stock, and matching ribbon.
https://s.tamp.in/N4O4Rp TIP: Use the Adhesive Sheets to adhere the detailed die cuts to the flower base die cuts for easy assembly.
I used this diagonally patterned paper with Calypso Coral and Blushing Bride colors to demonstrate that you can be versatile when choosing your DSP for creating your rosette.
https://s.tamp.in/N4O4Rp

Spread the love!

Coloring Techniques: Using PAPER, INK, STAMPS, and Dies

Spread the love!

I’ve just moved into a new house! As of yet, I still don’t have easy access to my stamping supplies. All I have is paper, ink pads, stamps, and dies.

What to do?

Well, because all I have on hand is paper, stamps, inks, and dies I’m going to have to get creative. This is a great opportunity to be a bit frugal and just use what I have in my craft room.

So here is a project using Basic White Cardstock and using an inking technique to design some background cardstock and then I use another inking technique for creating the flowers and leaves. I love the color variations that I’m able to create and really add to the beauty of the flower arrangements. I used coordinating cardstock for the BASE CARD to frame each bouquet. Watch my My Video Tutorial for all the steps. Thank you for stopping by and please leave a comment! Cheers, Kat


What You Need

PRODUCT LIST:

  • Stamps & Dies: 
    • Simply Succulents Stamp
    • Summer Shadows Dies
  • Card Stock:
    • Base Card: Highland Heather
    • Layers: Basic White
  • Ink:
    • Fresh Freesia,
    • Shaded Spruce,
    • Bumblebee (substitute Pale Papaya),
    • Granny Apple Green,
    • Gorgeous Grape ink pads
    • Bumblebee/Pale Papaya Re-inker 
  • Tools:
    • Stampin’ Cut & Emboss Machine  
    • Large Acrylic Block (H) for coloring
    • Water Painters (151298) for blending
    • Two Stampin’ Spritzers
      • Mix approximately 7 drops from the Re-inker bottle with H20 to create desired color strength (test on a paper towel)
      • H20 for blending
    • Heat Tool to accelerate the drying
    • FINE TIP GLUE
    • TEAR TAPE (to secure the ribbon to the back of the front layer)
    • MULTI-PURPOSE GLUE
    • REGULAR & MINI DIMENSIONALS
    • Best Ever Craft Mat (to keep the Die Cut Machine from slipping while cutting) –see MY FAVORITE PRODUCTS LINK
  • Embellishments
    • Coordinating ribbon (approximately 9”)
    • Iridescent Rhinestone Basic Jewels
    • Brushed Brass Butterflies

VIDEO TUTORIAL


GALLERY


Spread the love!

Fancy Fold – Flower POP-UP Card

Spread the love!

Thanks to Sam Calcott UK — Mixed Up Crafts– for this project. It’s a clever flower bouquet pop-up card that doesn’t need any fancy dies except for those needed for embellishments.

Here I present three versions using Stampin’ Up! products for Mother’s Day and as a Congratulatory Card.

I have also produced a VIDEO TUTORIAL with step-by-step directions.


Mother’s Day Card

Create the card front by laying DSP strips and adding DIE CUT lettering using the AMAZING THANKS Dies. DSP strips should coordinate with inside blossoms.
Non-directional DSP from the SUNSHINE & RAINBOWS 6×6″ DSP pack from Sale-a-brations. Here is use the Medium DAISY Punch for my flower centers. I tried to add a glitter center…but the centers were difficult to glue so I don’t recommend it. Sentiment from the DAFFODIL DAYDREAMS stamp set.

Congratulations Card

This is a special card made for a family member who is getting their degree this spring! I wanted something special that she wouldn’t expect since she is very familiar with my work and receives lots of my cards.

DSP is from the SUNSHINE & RAINBOWS DSP with GOLD FOIL layering and embellishments from the ABSTRACT BEAUTY EPHEMERA PACK. Just added some GENIAL GEMS as accents. AMAZING THANKS DIES for sentiment.
Just love the bright colors of Calypso Coral and Melon Mambo for the blossoms. All the cards used the BOUQUET OF LOVE Embossing Folder.

Another Mother’s Day Card

Here’s an idea you can adapt to any card front. I love the playful directions with the horizontal, vertical, and diagonal patterns crated with the ribbon.
I decided to try another DSP pattern using the FRIENDLY HELLO and colored cardstock for the inside embossed layer with POOL PARTY.

Video Tutorial


Here are some basic dimensions — but details are presented through-out the video.

Card Stock:

– 6″x12″ Basic White cardstock (score at 6″”)

– 2 pieces of 5.75-inch square Pool Party (color that coordinates with DSP) for inside Embossed layer

– 2 pieces of 5.75-inch square FOIL (I used SILVER)

– 2 pieces of 5.5-inch square DSP (Friendly Hello 12″x12″ Paper Pack from Sale-a-brations)

Flowers:

– 7 pieces of NON-DIRECTIONAL patterned DSP cut 4.75″ sq.

CARD FRONT LAYERS:

-Silver FOIL about 4.25″ x 5″ 

-DSP strips are 1 3/16 x 4 3/4″ (cut 3)

Go to my FAVORITE PRODUCTS for liquidFUSION, cordless WORKPRO GLU Gun information.


Numbering for Assembly


Die Pieces featured for blossom center & foilage

Mossy Meadow/Pear Pizzaz/Soft Succulent card stock

Pierced Blooms Dies
SAVE 20% ON MINI-EMBOSS AND DIE CUT MACHINE

Thank you for visiting….please LIKE and leave a comment!


Spread the love!

Tonal Stamping using the WAVE of INSPIRATION “wave” stamp

Spread the love!

I’m back with the “big wave” stamp from the Waves of Inspiration Collection. I love exploring all the ways you can use a stamp to create different techniques.

In this case, the Two-Tone technique uses two complementary colors to create some depth (Balmy Blue, and Misty Moonlight) when added directly to the stamp. When the ink is applied using an Aqua Painter, you get an even more ethereal effect. Both variations of the same technique are worthy of some creative exploration — especially with this collection. Please check out my short Video Tutorial.

I applied ink using a Water Painter to create an ethereal wave effect.

NOT ALWAYS PERFECTION: We may strive for perfection — but it is not always what we get. We all make those mistakes or “boo-boos” when stamping. Rather than get flustered during my tutorial — I worked through the problem to give you some ideas on possible solutions to a very common stamping problem — the ink “halo” created from too much ink on a rubber stamp.

The ink “halo” created from a seagull stamp is somewhat camouflaged– : )
Another color combination — Pacific Point and Pool Party.

VIDEO TUTORIAL


Project Details:

  • STAMP SETS:
    • WAVES OF INSPIRATION
    • AFTER THE STORM (clouds, large & small seagulls stamps) (pg. 50 AC)
  • BASE CARD: Misty Moonlight & Night of Navy (5.5″x4.25″)
  • Stamping Layer:
    • Begin with a piece cut at 5.5″ x 4.25″
      • Basic White Card Stock
      • Shimmery White Card Stock
    • Final layer will be cut down to 5.25″ x 4″ after the image is stamped
  • INKS:
    • Balmy Blue (light)
    • Misty Moonlight (medium)
    • Night of Navy (dark)
  • STAMPARATUS
  • WATER PAINTERS (pg. 129 / 151298)
  • STAMPIN’ SPRITZERS (pg. 129 / 126185)
  • RHINESTONE WAVES BASIC JEWELS (part of the Waves of Inspiration Collection)
  • Gelly ROLL Pens (go to my PRODUCT LINKS)

Thanks for stopping by! Leave a comment! Kat


Spread the love!

Acetate Panel Technique using ART IN BLOOM and the SOFT PASTELS ASSORTMENT

Spread the love!

Here is a technique for creating a unique “window card” using Versamark and the new SU Soft Pastels Assortment featured in the 2021-2022 Annual Catalog.

TIP: If you order a photopolymer stamp set from SU, the stamps are fixed between two window sheets. One is a thin acetate and the other is thicker. Remove your stamps and adhere them to the case — then you have the thick ACETATE sheet to use for this project. Otherwise, the window sheets are sold on page 136 of the Annual Catalog (142314).

I clean the acetate sheet with alcohol wipes to remove any dirt/smudges. Follow my Video Tutorial for all the steps.

Basic Steps:

  • Clean the acetate sheet
  • Use a Two Step Stamp set (outline and fill stamps) like the ART IN BLOOM set
  • Use your STAMPARATUS to position your stamps on the acetate
  • Stamp with STAZON Black permanent ink with the outline stamps
  • Stamp with VERSAMARK using the “fill” stamps
  • Choose colors from the SOFT PASTELS ASSORTMENT
  • Take a sheet of GRID PAPER (cut or folded)
  • RUB the chaulk on the paper until there is a pile of powder
  • Pick the powder up using a sponge dauber and then lightly apply to the VERSAMARK on the acetate.
  • I used a background piece of Whisper White cardstock that I stamped with Memento Black ink for the LEAVES and OLD OLIVE and SOFT SEAFOAM for suble background stamping
  • Mount the acetate on Dimensionals after you have framed with Basic Black cardstock
  • I used the layering Rectangle Stitched Framelit Dies to create my frame.
  • Pick a sentiment and mount in the corner. I used the dies from the COLOR & CONTOUR Bundle

Products needed are:

  • Window Sheet (repurpose from a SU stamp set)
  • Whisper White Card Stock (5.5″ x 4.25″)
  • Basic Black Card Stock (5.25″ x 4″)
  • Versamark, StazOn, Memento Black, Old Olive and Soft Seafoam Inks
  • Soft Pastels Assortment (Gorgeous Grape, Night of Navy, Poppy Parade, Daffodil Delight)
  • Rectangle Stitched Framelit Dies
  • STAMPARATUS
  • Sponge Daubers
  • Cotton Swabs
  • Adhesives: TEAR TAPE
  • Stampin’ Dimensionals (Black)

Video Tutorial


Featured Products


Close Up Detail


Spread the love!