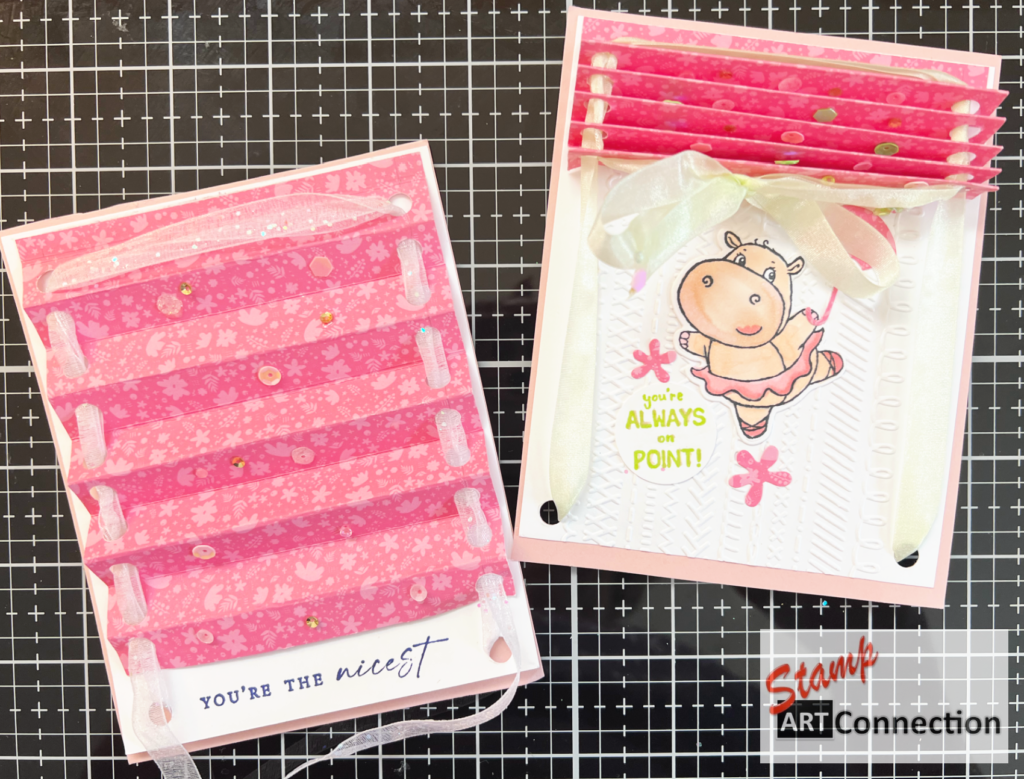
Project Ideas using the Christmas Countdown KIT for Any Occasion — while available ON SALE for $15!

Spread the love!

Purchase the Christmas Countdown KIT during the YEAR END SALE and find inspiration for how to decorate and re-purpose the box for any occasion trinkets, jewelry, office or crafting supplies, and MORE!

Storage Place

Customize the boxes by using your choice of Designer Series Paper and decorate the front and back of the boxes for additional versatility. I used one piece from the KIT to make a template. You can create a storage place that goes with your decor.

Birthday Countdown

Or make fun BIRTHDAY packaging for your favorite little person as a 30 day countdown to the big day?

Deployment Countdown

Is a parent DEPLOYED? Use the 30 day countdown to get the family ready for Mom or Dad’s return from deployment by filling each box with a notes and small gifts to share! There is NO LIMIT what you can do!

I choose to create jewelry boxes for my nieces. I choose a paper pattern, colors and design that would appeal to eaches personality and interests…something they can have fun…something with a touch of whimsy…and with a smile!


UPTOWN GIRL: Peony Garden Designer Series Paper and coordinating ribbons and plenty of bling for my girly girl.
OCEAN LOVER: Whale of a Time Designer Series Paper for my outdoor girl who loves everything about the ocean!
ANIMAL LOVER: Playful Pets Designer Series Paper and coordinating ribbons and trinkets for my pet lover…pets with attitude are perfect to bring a smile.
The Fine Art Floral Designer Series Paper (available 4 January from the new Mini-Catalog) takes it to next level. View my Video Tutorial!

Video Tutorial

Featured Products:


Spread the love!

Repurpose Paper Pumpkin Kits

Spread the love!

Paper Pumpkin offers a monthly subscription for $22 a month (shipping included) with a stunning project that can be repurposed with a little creativity to more project ideas! Subscribe NOW to discover Paper Pumpkin.

This month, I took both my October and November PAPER PUMPKIN kits and repurposed for some alternate projects. The October card kit was transformed into Christmas Crackers adorned with Tags made from the kit contents. The November card kit was transformed into cute gingerbread treat boxes. Check out all the steps and dimensions from my Video Tutorial.

All of these projects were packaged and sent to support the “Give a SMILE – one card at a time” PROGRAM. Anyone is welcome to join the effort by clicking the BUTTON below for more information.

If you are a current PP Subscriber you are eligible to order Kit Refills from my ONLINE Store. If not, consider an annual subscription as one option.


OCTOBER Paper Pumpkin

The contents of the kit were repurposed to create these lovely Christmas Crackers!


NOVEMBER Paper Pumpkin

This kit is available to purchase as a REFILL KIT now. See LINK below.

Repurposed the kit contents to create these great gingerbread treat boxes!

I embellished the front with the “candy” dots provided. I also went through my stash of retired items and added “dots” around the front to add more of a “candied gingerbread look”.

And now……the VIDEO TUTORIAL!

View tutorial for all the steps and information needed to construct this project!


Subscribe to Paper Pumpkin!


Spread the love!

Shadow Box Technique using WHALE DONE and PAMPERED PETS DSP

Spread the love!

The Shadow Box technique is a great technique for any occasion. Unlike the previous shadow box project, the only stamping to be done here is for the sentiment! It’s just cardstock and DSP! All the products featured are from the Annual Catalog — PAMPERED PETS & WHALE OF A TIME suites. I either fussy cut, die-cut or used a punch to create the characters! SO EASY! I used the Layering Squares (151772) to create the window panes for these cards. There were made with my nieces in mind…and they LOVED them! I love the beauty and artistry of the Stampin’ Up! Designer Series Paper!

Follow the same general directions (see BUTTON) and view the Video Tutorial for tips and directions for constructing the card. It is really easy and once you make your first card–like me—you won’t want to stop!


Card Gallery

The Whale of a Time DSP is perfect for this project since the DSP offers so many scenes and the added advantage of punching out the whale!

Video Tutorial


FEATURED PRODUCTS

https://www.stampinup.com/products/playful-pets-suite-collection?demoid=2156415PLAYFUL PETS SUITE
https://www.stampinup.com/products/whale-of-a-time-suite-collection-(english)?demoid=2156415 Whale Done Suite includes Seabed Embossing Folder
WINDOW SHEETS https://www.stampinup.com/products/window-sheets?demoid=2156415

Layering Squares
https://www.stampinup.com/products/layering-squares-dies?demoid=2156415

Spread the love!

Fancy Folds Diagonal Fold Card featuring Poinsettia Place Suite

Spread the love!

I love demonstrating “fancy folds” using Stampin’ Up! products. SU makes it so easy since all their products are coordinated! Here is a really neat project that is looks harder than it really is! It is also known as the “Hip to be Square” card by Roni Johnson!

I created several projects using this fancy fold technique — Using the POINSETTIA PLACE Suite, SNOWMAN SEASON stamp and Snowman Builder Punch in the full 6″x6″ format with the matching box.

I also adapted the technique to 3″x3″ format to create fun smaller cards that fit perfectly in the 3″ Square Envelopes (145829) or Acetate Card Boxes (150428).

Follow my Video Tutorial below and I’ll show how to create a “WOW” card and custom box that you will love gift-ing for any occasion!

POINSETTIA PLACE SUITE Project

Supplies Needed:

  • CARD:
    • 2 pieces of 6″ x 12″ card stock in either the same (Whisper White) or coordinating colors (Real Red and Garden Green)
    • 3 pieces of 5 3/4″ square card stock for layers (Real Red)
      • Cut two in half to create 4 diagonal pieces.
      • The Third will be used for the center (with 5 1/2″ square piece for the sentiment)
    • 2 pieces of 5 1/2″ square card coordinating Designer Series Paper (DSP) (Plush Poinsettia and Poinsettia Place DSP)
      • Cut in half to create 4 diagonal pieces.
    • ADHESIVE SHEETS (152334) needed to back the Plush Poinsettia Specialty Paper
    • GOLD EMBOSSING POWDER
    • Versamark Ink
  • CARD FRONT:
    • FOREVER GOLD LASER-CUT SPECIALTY PAPER
    • 4″ x 4″ Whisper White Card stock
    • 3 3/4″ square Real Red CS (embossed with PARISIAN FLOURISH EMBOSSING FOLDER)
    • RED VELVET PAPER — create Poinsetta Flower (Click LINK Below)
    • BEADED PEARLS
  • BOX:
    • Bottom (Whisper White CS) 7 1/2″ square
    • Score 5/8″ all around
    • Lid (Real Red CS) 7 5/8″ square
    • Score 5/8″ all around
  • BOX FRONT:
    • 6″ x 6″ square in Whisper White CS
    • 5″ square Real Red CS
    • 4 3/4″ square Plush Poinsettia Paper
    • PEACE and JOY BUNDLE dies to cut “peace & joy”
    • FOAM ADHESIVE SHEETS with Whisper White CS
    • Gold Foil
    • Red GLimmer or Foil CS
    • WONDER OF THE SEASON Ribbon Combo Pack (Shaded Spruce Satin Ribbon)
  • TOOLS:
    • Simply Scored Scoring Tools (Score Board)
    • Paper Trimmer
    • Bone Folder
    • Take Your Pick Tool
    • Paper Snips
    • Tear & Tape Adhesive
    • Multipurpose Glue
    • Stampin’ Cut & Emboss Machine

Video Tutorial


MORE IDEAS — SNOWMAN Project

All the card stock and DSP dimensions are the same — just mix it up by choosing you own coordinating paper from the Holiday Catalog.


DOWNSIZE the Technique for Upsized WOW!

Downsize all dimensions to 3″ x 3″ square using DSP from the ‘TIS THE SEASON paper pack and the PEACE AND JOY BUNDLE!


PRODUCTS FEATURED:


Spread the love!

Box Corner Card Inspiration featuring the Curvy Celebrations Variety Bundle

Spread the love!

This is a fun and easy card that is packed with WOW! There are so many of the Holiday Catalog products which inspire, but most of all is the versatility of the CURVY CELEBRATIONS Variety Bundle with includes the CURVY CHRISTMAS, CURVY DIES and CLASSIC CHRISTMAS DSP> Explore some of the ideas below and view the tutorial for the basic instructions.

Cards feature the Trimming the Town Suite and DSP, Coming Home Bundle, All the Trimmings Ribbon Combo Pack, and Embellishments. The Wishes and Wonder Bundle, Peace and Joy Bundle Gather Together Bundle, and Country Home stamps set.

Gilded Autumn DSP cut with the Curvy Dies and embellished with Gather Together Leaves Dies in Gold Brushed Metallic Cardstock and Country Home Stamp set. Embellish with Gold Gems and 3/8″ Embroidered Ribbon from the Plaid TIdings Suite.
Special DSP from the Curvy Celebrations Variety Pack makes the perfect backdrop with the Trimming the Town DSP and Coming Home Bundle. The JOY sentiment from the Peace and Joy bundle on Foam Adhesive Sheets and Glitter Paper. The curved DIES from the Curvy Celebrations Bundle and sentiment is perfect!
Plaid Tidings DSP cut with Curvy Celebrations and embellished with Adhesive Baked Snowflakes sets off the design using the stag from the Wishes and Wonder Bundle in Gold Foil. The backdrop is created using the In the Pines Bundle with Garden Green and Shaded Spruce on Pool Party cardstock texturized with the Subtle Embossing Folder. The snow banks are created using white glimmer paper and Whisper White Card stock (flocked paper (retired)).

Gallery of Cards


Video Tutorial

Supply List:

  • Cardstock (cut 8″ x 8″)
  • Coordinating Designer Series Paper, Ribbon (21″) and embellishments
  • Paper Trimmer
  • Scoring Tool
  • Adhesive (All Purpose Glue and Tear Tape
  • Stamp Set/Dies: Curvy Christmas Stamp Set and Dies, Coming Home Bundle, the Wishes and Wonder Bundle, Peace and Joy Bundle, Gather Together Bundle, and Country Home stamp set.

Directions:

  • Trim cardstock to measure 8″x8″
  • Score at 4″, and rotate and score again at 4″. This will divide the 8″x8″ into four sections.
  • In the top-right quadrant, score diagonally from the corner to the center of the page where all the score lines meet
  • Cut the bottom 4″ score line up to the center of the page. This will separate the bottom two quadrants.
  • Crease all score lines.
  • Fold the bottom right and apply adhesive
  • Secure the bottom right quadrant (the one with the adhesive) to the TOP of the bottom left quadrant. This forms the box corner
  • Again, crease the diagonally scored line and apply adhesive to the top triangle only.
  • CREATE SCENES: Cut four 3.5″x3.5″ Whisper White pieces (front, backsides and bottom of corner)
  • Cut DSP 3″x3″ square and cut designs using the Curvy Dies or the Home Together Dies.

Products Featured


Spread the love!

Fun DRACULA vampire Punch Art Card

Spread the love!

Join me as I assemble a wonderfully FUN and creative Halloween card using punches from my Stampin’ Up stash to create this Dracula Card!

Graciela Valdez Vera is the Demonstrator that created the original design. I took it a step further by creating a more ghoulish looking vampire..blood-red lips and all!

Graciela’s original design!
My take on a ghoulish vamp!

Video Tutorial


Pieces and Parts…ideas if you don’t have THAT punch!

Umbrella Punch, large OVAL of Stitched Shapes, Apple Builder Punch, a BOW punch, Snowman Builder Punch, Layering Triangles.
  • CARDSTOCK: Basic Black, Blackberry Bliss, Whisper White, Real Red
  • DSP: Black GLITTER paper, Magic in this Night DSP
  • EMBOSSING: Silver Embossing Powder
  • STAMP SET: Hallows Night Magic
  • DIES: Halloween Magic Dies, Stitched Shapes Dies and/or Triangle Dies
  • Punches: Umbrella Punch, Apple Builder Punch, Snowman Builder Punch, Gleaming Ornament Punch
  • SHAPES NEEDED: Bow Tie, circle punch for feet
  • PENS: Stampin’ Chalk, Stampin’ Write Marker, Gel Pens (white/black)
  • ADHESIVES: All Purpose Glue, Black Dimensionals
  • WOBBLE SPRING: available on AMAZON

Use the smallest CIRCLE of the Stitched Shapes Dies to create an easy VEST if you don’t have the retired OWL punch!

Just CUT the edges of the CIRCLE to create the vest shape!

Products Featured:


Spread the love!

Easy Wobble Card w/ Hand-stamped Background

Spread the love!

Here’s a fun and easy wobble card that is simple to assemble and will bring a smile to whoever receives it! It is a wobble card that features the turtle from the “Back on Your Feet” stamp set from Stampin’ Up with a creative hand-stamped background.

Inspired by a card I made for a family member recovering from surgery; I created my own background for the “Back on Your Feet” turtle using the stamp-stamp-off technique, fussy cut the rolly-polly turtle after some Stampin’ Blends color and popped on a WOBBLE SPRING to create my wobble card!

With the Beginning or Casual Stamper in mind, this is great card to employ the stamp-stamp-off technique, fussy cutting, blending colors with the stamping blends, designing using a monochromatic theme and adding a special feature like the wobble spring.

Follow the VIDEO TUTORIAL and find all the featured products below!

Products Needed:

  • STAMP SETS: BACK ON YOUR FEET, TROPICAL CHIC
  • DIES: Circle framelit from the PAINTED POPPIES bundle
  • CARD STOCK: Soft Seafoam, Whisper White, Old Olive
  • INKS: Old Olive, Mossy Meadow, Soft Seafoam and Memento Black Inks
  • STAMPIN’ BLENDS (Light/Dark): Old Olive, Mossy Meadow and Soft Seafoam
  • Action WOBBLE Springs (Amazon)
  • TOOLS: Regular and MINI-Paper Trimmer, Die Cutting Machine for dies

Featured Stamp Sets

Back On Your Feet Stamp Set (149385)


Tropical Chic Stamp Set (146753)


Painted Poppies Bundle (153827)

Circle Framelit from Bundle

AMAZON.COM: HAMPTON ART

More featured products


Back on Your Feet” Stamp Set

Spread the love!

Christmas Gleaming Cards and Tags

Spread the love!

Looking for a simple project? Combine the CHRISTMAS GLEAMING bundle with the NIGHT BEFORE CHRISTMAS 6″x6″ Designer Series Paper for cards and tags!

Package cards and tags in an ACETATE BOX for family and friends as a holiday gift!

Thank you for stopping by and please leave a comment! I love to hear what you think!

CARD Directions:

  • Whisper White Card Stock for the base card (5.5″ x 4.25″)
  • Cherry Cobbler Card Stock (5.25″ x 4″) layer embossed with your favorite pattern using an Embossing Folder
  • DSP cut 5″ x 2″
  • Gleaming Ornament Punch used on Whisper White, Night of Navy and Cherry Cobbler
  • Use GOLD Embossing Powder to emboss sentiments and designs frm the Chrismas Gleaming stamp set
  • Dimensionals for adhering ornaments

TAG Directions:

  • Cut DSP and MERCURY GLASS ACETATE in strips to approximately 1.5″ X 5″
  • Use Scalloped Tag Topper and Banner Triple Punches
  • Use ornament punch to cut WW for TO/FROM label (from ITTY BITTY CHRISTMAS stamp)
  • Stamp with Cherry Cobbler ink on CC cardstock and cut out with an ornament punch
  • Stamp “Happy Christmas” from the ITTY BITTY CHRISTMAS stamp set in Cherry Cobbler ink and cut with the Stitched Shapes Oval die with your cutting machine or Label punch
  • Use ribbon or twine to tie tags and embellish with RED RHINESTONES

PRODUCTS FEATURED:

  • Click on the Photo to find the products on my ON-LINE store!
Christmas Gleaming Bundle
The Christmas Gleaming Bundle includes the Christmas Gleaming Cling Stamp Set and the Gleaming Ornaments Punch Pack. Also available in French and German. Christmas Gleaming Cling Stamp Set Deck the halls this year with the gorgeously detailed ornaments and other images in the Christmas Gleaming Stamp Set. It’s a beauty. Quantity: 9 cling stamps Suggested clear blocks (sold separately): a, b, c, d, g Gleaming Ornaments Punch Pack Cut fun Christmas ornaments for your projects using the Gleaming Ornaments Punch Pack—a must-have Christmas punch set. * 2 punches

Itty Bitty Christmas Cling Stamp Set
There’s nothing itty bitty about the number of greetings in the Itty Bitty Christmas Stamp Set! There’s something for every type of Christmas project, from tags to cards and more!

Night Before Christmas 6″ X 6″ (15.2 X 15.2 Cm) Designer Series Paper
150437 Price: $11.50 Night Before Christmas 6″ x 6″ (15.2 x 15.2 cm) Designer Series Paper features traditional Christmas imagery and basic all-purpose patterns that give you options for Christmas and beyond. This fun designer paper will help you get into the spirit of the season.

Cherry Cobbler Card Stock
Whisper White 8-1/2″ X 11″ Cardstock 100730 Price: $9.75 The best projects start with the best products. Start your projects with our high-quality cardstock, formulated especially for discerning crafters. The ultrasmooth surface is ideal for stamping, so you get clean, crisp images. * 40 sheets
Mercury Glass Designer Acetate 150441 Price: $11.50 Mercury Glass Designer Acetate features a faux mercury glass finish on acetate sheets. * 4 sheets: 2 each of 2 designs * 12″ x 12″ (30.5 x 30.5 cm)
SCALLOPED TAG TOPPER
Banner Triple Punch 138292 Price: $23.00 Crafting without punches? Inconceivable! Punches are a quick and easy way to add interest and depth to your projects. Our punches are of high quality, affordable, and easy to use. The Banner Triple Punch gives you triple the banner options in one punch. You can make banners in three widths–1″, 1-1/2″, and 2″ (2.5 cm, 3.8 cm and 5.1 cm)–in any length. Just slide the paper in, punch, and get perfectly notched banners (or gift tags, bookmarks, belly bands) every time.

Holiday Rhinestone Basic Jewels 150457 Price: $6.00 Holiday Rhinestone Basic Jewels are bright self-adhesive rhinestones in Stampin’ Up! colors. * 140 pieces: 3 mm (20 each of 5 colors), 4 mm (4 each of 5 colors), and 5 mm (4 each of 5 colors). * Product colors: Cherry Cobbler, Coastal Cabana, Night of Navy, Pumpkin Pie, Shaded Spruce

Stitched Shapes Dies 152323 Price: $30.00 Create custom die-cut shapes including circles, ovals, and squares with a stitched look in record time using the Stitched Shapes Dies. Dies help you create unique die-cuts with just a quick run through your die-cutting and embossing machine. Detailed dies include ejection holes so you can remove the paper easily. * 12 dies * Largest die: 3-1/4″ x 2-3/8″ (8.3 x 6 cm) * Use with a die-cutting and embossing machine

Heat Tool (Us And Canada) 129053 Price: $30.00 If you heat emboss, you’ll need a heat tool. It melts embossing powder and Heat & Stick Powder. Our Heat Tool is slim, sleek, quiet, and easy to hold. * 2 heat settings: low for drying ink, high for heat-setting powder * Has a protective plastic tip to cover the hot metal end
Embossing Buddy 103083 Price: $6.00 Prevent extra powder or glitter from sticking to your project. Just rub across paper before application. * 1 per package * 2″ x 2-1/2″ (5.0 x 6.3 cm) antistatic fabric pouch
Gold EMBOSSING POWDER

Spread the love!

Spooky Glam Coffin Box Wreath

Spread the love!

I love all the possibilities for creating fun projects especially when Stampin’ Up! provides some great inspiration with the pre-cut coffin boxes. Just by themselves, they are cute! I experimented with techniques when I made several to give away to my customers during my last workshop (more details below) and then decided to create a spooky glam wreath for Halloween! I used the BAT Punch which is retired from last year as an homage to my customers who ask that I incorporate old and new SU products to inspire and demonstrate how versatile your crafting investments really are! So don’t tarry….load up on these great products now for this year…or be ready for next year!

Please check out the Video Tutorial taped while I was putting this project together. I had an idea in my “mind’s eye” but wasn’t totally sure how I was going to pull it together. I didn’t want to create a wreath of entire coffins because I wanted the wreath to have more visual interest. I was also limited to use the products I had at hand.

I wanted a glam look and choose to use BLACK card stock and the MERCURY GLASS DESIGNER ACETATE for a black and silver look. I added GOOGLY EYES as whimsy and used my bat punch from last season to cut silver foil and silver glimmer pieces. Lastly, the 3/8″ GLITTERED ORGANDY RIBBON adds sparkle and sophistication!


Decorating Techniques

Before assembling the coffin boxes; I used a different embossing medium to stencil the filigree pattern mask from the BASIC PATTERN DECORATIVE MASKS on the lid with:

  • Gold DELICATA Ink applied with a sponge dauber
  • Silver Embossing paste applied with a palette knife
  • White Embossing Paste applied with a palette knife then distressed with a sponge dauber using Memento Black Ink

My video tutorial provides all the details from decorating, assembly, and embellishment.  


Featured Products

Coffin Boxes
Price: $7.00 What better Halloween gift box than a coffin box? Black cardstock coffin boxes with lids, just right for Halloween treat giving.
*12 boxes and 12 lids
* Food safe
Basic Pattern Decorative Masks
150697 Price: $6.00 Create textured backgrounds in four styles. Use with Embossing Paste and Palette Knives or Classic Stampin’ Ink. * 4 masks: 1 each of 4 designs * 6″ x 6″ (15.2 x 15.2 cm)
Black Stampin’ Emboss Powder
146956 Price: $6.00 Turn stamped images into glossy raised designs. * 1/2 oz (14 g)
Mercury Glass Designer Acetate
150441 Price: $11.50 Mercury Glass Designer Acetate features a faux mercury glass finish on acetate sheets. * 4 sheets: 2 each of 2 designs * 12″ x 12″ (30.5 x 30.5 cm) Product color: silver
Banner Triple Punch
138292 Price: $23.00 Crafting without punches? Inconceivable! Punches are a quick and easy way to add interest and depth to your projects. Our punches are of high quality, affordable, and easy to use. The Banner Triple Punch gives you triple the banner options in one punch. You can make banners in three widths–1″, 1-1/2″, and 2″ (2.5 cm, 3.8 cm and 5.1 cm)–in any length. Just slide the paper in, punch, and get perfectly notched banners (or gift tags, bookmarks, belly bands) every time.
Black 5/8″ (1.6 Cm) Glittered Organdy Ribbon 147897 Price: $8.50
This sparkly black ribbon for Halloween or sophisticated projects.
* Black * 10 yards (9.1 cm)
Silver Foil Sheets
Price: $5.00 Make your own foil accents. Cut with punches or Big Shot. Foil on one side. * 2 sheets * Silver * 12″ x 12″ (30.5 x 30.5) * Acid free
Silver Glimmer Paper
146960 Price: $5.00 Without a glimmer of a doubt, a must-have for your festive projects. These sheets are so thin that they can also be used with the Big Shot. * 2 glittered sheets * 12″ x 12″ (30.5 x 30.5 cm)
Assorted Googly Eyes
150453 Price: $6.00
Add life to stamped images with these fun Assorted Googly Eyes. Use with your choice of adhesive for all your googly eye craft needs. * 100 pieces in 4 colors: Crushed Curry, Granny Apple Green, Gorgeous Grape, white * 2 sizes: 1/8″ (3.2 mm) and 1/4″ (6.4 mm)

Utilize embellishments and stamps from the Monster Bash Suite!

Purchase the suite with great embellishments when you order the complete SUITE!

Monster Bash Suite Bundle (En)
153485
Price: $89.50

The Monster Bash Suite Bundle gives you a coordinating selection of products with one simple purchase. It includes the stamp set and tool bundle at 10% off plus one each of the other items listed.

The Monster Bash Suite Bundle includes
* Spooktacular Bash Cling Stamp Set (10% off)
* Ornate Frames Dies (10% off)
* Monster Bash Designer Series Paper
* Stylish Scroll Embossing Folder
* Basic Black 3/8″ (1 cm) Scalloped Edge Ribbon
* Monster Bash Enamel Shapes
* Coffin Treat Boxes

Spread the love!

Perfectly Plaid Creations

Spread the love!

Here are the second group of projects featuring the products from the 25 PRODUCTS UNDER $25 list using the Wrapped in Plaid suite!

I was inspired by the products featured on page 12 of the Holiday Catalog!

This suite speaks to a happy “O’ Christmas Tree” feeling. I love the traditional colors (Cherry Cobbler, Night of Navy, Shaded Spruce and Gold Foil accents) and patterns (plaid, holly berries, pine cones, and Christmas stocking) on the Specialty Designer Series Paper. The sentiments are great for either card or tags greetings.

Explore further and you find great versatility using the Perfectly Plaid stamp set and Pine Tree punch. Below I feature cards with Christmas Trees fronts stamped with ink using both classic and mock watercolor techniques. The stamps are perfect for tags on GOLD FOIL pizza boxes! These are great for treats since they are food safe. Look at all the perfect holiday projects you can get from this ONE suite! Happy Holidays!


Card Recipe

STAMP SETS: Perfectly Plaid
CARD STOCK/DSP: Wrapped in Plaid Specialty DSP stack (3″x4″ piece and 4″ x 2″ piece for card front using standard 5.5″ x 4.25″ card in Whisper White), Gold Foil is cut using the Layered Stitched Rectangles (using the size that will fit the sentiment stamped in Cherry Cobbler)
INK/COLORING TOOLS: Night of Navy & Shaded Spruce Classic Stampin’ pads, Versamark ink, White Stampin’ Emboss Powder. Stamp the tree images using Night of Navy ink on Shaded Spruce card stock and stamp with Shaded Spruce ink on WW card stock, lastly emboss the Shaded Spruce cardstock with White and cut all the trees with a punch.
ACCESSORIES: Embellish the tree with Gold Metallic Pearls, 3/8” Shaded
Spruce & Gold Ribbon is used to hide the seam between both DSP pieces on the front.

ADHESIVES: Snail, Dimensionals & Multipurpose
Liquid glue. Pop the tree (embellished with the Gold Pearls) on dimensionals and arrange the other trees behind – staggering their heights.
TOOLS: Stitched Rectangles, Pine Tree Punch, Heat
Tool for the white embossing.
TECHNIQUE: I used the small pinecone stamp piece to create a tree pattern on Whisper White Card Stock that I then cut out with the Tree Punch (see the far right tree)


Card Recipe:


STAMP SET: Perfectly Plaid
CARD STOCK/DSP: Shaded Spruce Card Stock (cut standard size 5.5″ x 4/25″), Wrapped in Plaid Specialty DSP stack (cut 1″ x 4″) for accent, & Cherry Cobbler CS (cut .75″ x 4″ with pennant end), Watercolor Paper (5″ x 3.75″)
INK/COLORING TOOLS: Pool Party, Shaded Spruce, Night of Navy Classic Stampin’ pads, Versamark ink, White Stampin’ Emboss Powder
ACCESSORIES: Iridescent Sequin Assortment, Twine, Wink of Stella
ADHESIVES: Snail, Dimensionals & Multipurpose Liquid glue
TOOLS: Aqua Painter, Pine Tree Punch, Stampin’
Spritzer and scissors to rough edges on watercolor paper.
Technique: (1) First prepare the background by wetting WC paper with water and using the Aqua Painter to mix SMALL AMOUNTS both Pool Party and Night Of Navy ink as a faint wash. Let dry. (2) the Faux Watercolor technique – mist the inked stamp surface prior to stamping the Shaded Spruce image on the watercolor paper. (3) Let dry before punching the shapes so the paper doesn’t tear. (4) Assemble with dimensionals and staggering the heights. Use dimensionals to add the sentiment which is embossed in White on Cherry Cobbler Card Stock. Wrap with twine and tie a bow. (5) Added a wash of Wink of Stella around the edges of the trees for a touch of glimmer.


Gold Pizza Gift or Treat Box

Gift Box Recipe:


STAMP SET: Perfectly Plaid
CARD STOCK/DSP: Wrapped in Plaid Specialty DSP stack,
Whisper White, Cherry Cobbler card stock
INK/COLORING TOOLS: Night of Navy and Shaded
Spruce Classic Stampin’ pads
ACCESSORIES: Gold Twine, Gold Pizza Box, Red Rhinestones
ADHESIVES: Snail, Dimensionals & Multipurpose
Liquid glue
TOOLS: Stitched Shapes Circle Dies, Pine
tree Punch, Layering Circles Dies (scalloped edge for first circle layer). (1) Cut both a scalloped and stitched circle in Cherry Cobbler (size should be dictated by the size of box or your choice). (2) Stamp tree images with both Shaded Spruce (on WW) and Night of Navy inks (on Shaded Spruce) card stock and cut with tree punch. Embellish the WW tree with RED Rhinestones and layer on Cherry Cobbler circles. (3) Cut 2.75″ x 1″ (approx) to stamp the sentiment in Night of Navy ink. (4) Cut Wrapped in Plaid DSP by 3.25″ x 1″ and cut into a pennant. (5) Layer pieces with Multipurpose Glue and wrap the WW sentiment with gold twine for glimmer.


North Pole Delivery Tags

STAMP SET: Perfectly Plaid
CARD STOCK/DSP: Wrapped in Plaid Specialty DSP stack,
Cherry Cobbler, Shaded Spruce, and Whisper White Card Stock
INK COLORING TOOLS: Night of Navy Classic Stampin’
Pad
ACCESSORIES: Nature Twine, Jingle Bells, Gold Star
ADHESIVES: Snail, Dimensionals
TOOLS: Pine Tree Punch, Stitched Shapes Dies

(1) Punch two tree shapes and score both in the middle to create a crease . Use the crease to FOLD one tree. (2) Use FINE TIP GLUE and place a bead along the crease of the flat tree. Place the FOLDED edge of the other tree into the crease along with the glue. Hold until glue sets. and then glue tree in the center of the Stitched Circle in either Cherry Cobbler or Shaded Spruce. (3) For the TAG: Cut a piece of Whisper White 2″ x 4.5″ and use the TAG TOPPER to punch top. (4) Stamp sentiment in Night of Navy ink on the bottom and affix the tree medallion. Use your choice of twine and bell to embellish your tag!

HO HO HO Tag

Using the same product list; fussy cut stockings from DSP, Cut DSP 3″x 2.75″ and use the TAG TOPPER punch and punch both ends. Cut Shaded Spruce with small SQUARE stitched shapes framelits, using WHITE embossing powder stamp HO HO HO on Cherry Cobbler. Layer, add embellishment and tie with twine.

Paper Bow

(1) Using any DSP cut each in the following lengths: eight 1″x6″ (need eight total for the outer ring), 1″x5″ for the inner ring and one 1″x4″ for the center loop.

(2) Take FOUR of the 1×6 strips of paper and place the pattern you want OUTSIDE face down; put adhesive on one end of each strip. (3) Take the FOUR other of the 1×6 pieces and do the same. (4) Take the FOUR 1×5 pieces and do the same. (5) Twist each strip and adhere the ends to where you have POINTED ends. Wrap the 1×4 strip and create a circle.

(6) Take a BRAD and attached four of the petals together until you have THREE separate “bows” and the center circle. Then place GLUE DOTS into the center and begin to layer the bows by stacking each layer and then putting the circle in the center to complete the bow.


Here are samples of all the different trees that are possible with this set!


Perfectly Plaid Bundle (En)
151143
Price: $31.50

The Perfectly Plaid Bundle includes the Perfectly Plaid Photopolymer Stamp Set and the Pine Tree Punch. Also available in French and German.

Perfectly Plaid Photopolymer Stamp Set 
With three styles of Christmas trees in the Perfectly Plaid Stamp Set, you’ll be able to create a full forest of projects. We think this set is perfectly plaid in every way. This is a Two-Step Stampin’ set; it allows you to layer two or more images to create one final image with extra texture and dimension in the colors you want.
* Quantity: 13 photopolymer stamps
* Suggested clear blocks (sold separately): a, c, h

Pine Tree Punch
Cut pine trees for your projects using the Pine Tree Punch.
* Punched image: 1-5/8″ x 2″ (4.1 x 5.1 cm)
Wrapped In Plaid 6″ X 6″ (15.2 X 15.2 Cm) Specialty Designer Series Paper
149596
Price: $14.50

This fun Christmas designer paper is great for all your projects! Wrapped in Plaid 6″ X 6″ (15.2 X 15.2 Cm) Specialty Designer Series Paper features classic Christmas plaids with gold foil accents on some designs. 

* 48 sheets of designer paper: 4 each of 12 double-sided designs
* 6″ x 6″ (15.2 x 15.2 cm)
* Acid free
* Lignin free

Product colors: Cherry Cobbler, gold, Night of Navy, Shaded Spruce, Whisper White

Save time and 10% Off when purchased as a SUITE!

Wrapped In Plaid Suite Bundle (En)
153326
Price: $65.00

The Wrapped in Plaid Suite Bundle gives you a coordinating selection of products with one simple purchase. It includes the stamp set and tool bundle at 10% off plus one each of the other items listed.
The Wrapped in Plaid Suite Bundle includes 
* Perfectly Plaid Photopolymer Stamp Set (10% off)
* Pine Tree Punch (10% off)
* Wrapped in Plaid 6″ x 6″ Specialty Designer Series Paper
* Shaded Spruce/Gold 3/8″ (1 cm) Striped Ribbon
* Jingle Bells
* Gold Mini Pizza Boxes
Add ink, cardstock, and adhesive to complete your project.
Holiday Rhinestone Basic Jewels
150457 Price: $6.00 Holiday Rhinestone Basic Jewels are bright self-adhesive rhinestones in Stampin’ Up! colors. * 140 pieces: 3 mm (20 each of 5 colors), 4 mm (4 each of 5 colors), and 5 mm (4 each of 5 colors). * Product colors: Cherry Cobbler, Coastal Cabana, Night of Navy, Pumpkin Pie, Shaded Spruce
Star Designer Elements
150430 Price: $9.00 Star Designer Elements are adhesive-backed, faceted stars. Copper-colored metal. * 40 pieces * 8 mm
Iridescent Sequin Assortment
144212 Price: $5.00 * Faceted sequins * Approximately 750 per package in 3 sizes: 3 mm, 4 mm, 5 mm * Iridescent colors: Calypso Coral, Pool Party, So Saffron, Pear Pizzazz, Pool Party, Powder Pink, So Saffron * Metallics colors: Black, Copper, Gold, Iridescent, Silver
Layering Circles Dies
141705 Price: $35.00 Create custom die-cut circles and scallop circles in record time using the Layering Circles Dies. Dies help you create unique die cuts with just a quick run through your die-cutting and embossing machine. Detailed dies include ejection holes so you can remove the paper easily. * 16 dies * Largest die: 3-5/16″ (8.4 cm) * Use with a die-cutting and embossing machine
Stitched Shapes Dies
152323 Price: $30.00 Create custom die-cut shapes including circles, ovals, and squares with a stitched look in record time using the Stitched Shapes Dies. Dies help you create unique die-cuts with just a quick run through your die-cutting and embossing machine. Detailed dies include ejection holes so you can remove the paper easily. * 12 dies * Largest die: 3-1/4″ x 2-3/8″ (8.3 x 6 cm) * Use with a die-cutting and embossing machine
Stitched Rectangle Dies
148551 Price: $35.00 Creating die-cut shapes like these stitched rectangles is easy using the Stitched Rectangles Dies. Dies help you create unique die cuts with just a quick run through your die-cutting and embossing machine. Detailed dies include ejection holes so you can remove the paper easily. * 13 dies * Largest die: 5-1/4″ x 3-7/8″ (13.3 x 9.8 cm) * Use with a die-cutting and embossing machine
Delightful Tag Topper Punch
149518 Price: $23.00 The Delightful Tag Topper Punch is a delightful way to add a fun shape to your tags and projects. Cuts tag toppers in 1″ (2.5 cm), 1-1/2″ (3.8 cm), and 2″ (5.1 cm) widths. Our punches are of high quality, affordable, and easy to use. * Sleek body style * Large surface area offers precise cutting and leverage * Locks to store * Slim and stackable

Spread the love!

Born to Shine

Spread the love!

I take a weekly exercise class with a great instructor who also teaches ballet and is herself an accomplished ballerina having danced with several local dance companies here on the Gulf Coast (to include Pensacola’s own ballet company!). So, when I saw the “Born to Shine” stamp set…I had no one else but Kathleen the Ballerina in mind!

I spent the weekend making several cards that I wrapped carefully with a purple ribbon and gave her. She loved them!

It is so nice when a stamp is perfectly suited; and when you combine and layer color, texture, shine and sparkle….it becomes really a fun and satisfying creation! The sentiments are lovely.

I have a lot more ideas of what to do with this set I will likely share later; but I couldn’t resist the combination of Highland Heather and Purple Posy framing the Swirls and Curls embossed layer.

See below for products, technique and steps below:


Born To Shine Cling Stamp Set
149244
Price: $19.00

Bring these elegant ballerinas to life with projects made using the Born to Shine Stamp Set.

Products and Steps:

  • STAMP SETS:
    • Born to Shine
    • Bokeh Dots
  • CARD STOCK:
    • Highland Heather or Rocco Rose (5.5″x 4.25″) Base Card
    • Purple Posy or Blushing Bride Layer (5.25″ x 4″)
    • Whisper White Card Stock
  • INK:
    • MEMENTO Black
    • FROST WHITE Shimmer Paint
  • COLORING:
    • Stampin’ Blends in L/D Highland Heather, Petal Pink, Mango Melody or Soft Suede (hair color), L Petal Pink for skin. Dark PP or RR for dress.
  • TOOLS:
    • Sponge brayer or dauber to spread shimmer paint ink on stamp.
    • 1.75″ x 7/8″ Oval (Punch or Layering Ovals) for sentiment
  • EMBELLISHMENTS:
    • Woven Threads Sequin Assortment
    • Ribbon: Very Vanilla Scalloped Lace Trim
    • Highland Heather Ribbon (OC) Retired
  • INSTRUCTIONS:
  • Cut base cards and Layers in Hh/PP or RR/BB
  • Whisper White layer (5″x 3.75″) embossed with the Swirls and Curls Embossing Folder
  • Whisper White cut (4″ X 2.75″) and stamped with the BOKEH DOTS stamp using FROST WHITE SIMMER PAINT
  • Stamp dancer with Memento Black ink (careful that the shimmer paint has dried completely)
  • Color image with Stamping Blends when MB ink is dry to avoid smears.
  • Use STAR stamp with Shimmer paint to stamp around arms.
  • Color Very Vanilla with Stampin’ Blends (Light) to coordinate with card stock and wrap around embossed WW layer.
  • Adhere dancer with Dimensionals
  • Add coordinating sequins with Mini-Glue Dots
Swirls & Curls Embossing Folder
147923
Price: $7.50
Embossing shapes like swirls and curls make fun backgrounds that take your projects to the next level. It’s easy to do using the Swirls & Curls Embossing Folder.

It’s easy to make a great impression! Just place flat cardstock in this embossing folder, run it through a die-cutting and embossing machine, and out comes cardstock with a bold textured design. Embossing Folders make deep, crisp impressions—great for card fronts and accents.

* 4-1/2″ x 6-1/4″ (11.4 X 15.9 cm) 
* Use with a die-cutting and embossing machine
Bokeh Dots Cling-Mount Stamp Set
151368
Price: $15.00

Are these actual stamps? It’s amazing what our Distinktive stamps can do, right? What’s more, each image is sized for an ink pad. So what’s stopping you?!
* Have deeply etched images so you get a superior stamped impression each time. 
Frost White Shimmer Paint
147046
Price: $8.00

Add subtle shimmer and shine. Sponge on stamps, paint accents on cards, or stamp and heat-set on fabric. 
* 1/2 fl. oz. (15 ml)
* Acid free, nontoxic
Woven Threads Sequin Assortment
149498
Price: $5.00

The Woven Threads Sequin Assortment features the 2019–2021 In Colors.

* Faceted sequins 
* Approximately 750 per package in 3 size: 3 mm, 4 mm, 5 mm
* In 2019–2021 In Colors: Pretty Peacock, Purple Posy, Rococo Rose, Seaside Spray, Terracotta Tile
Very Vanilla 3/8″ (1 Cm) Scalloped Lace Trim
149593
Price: $7.00

Our Very Vanilla 3/8″ (1 cm) Scalloped Lace Trim is a lace craft ribbon with a scalloped edge. Ribbon is an easy way to add style to your projects. Tie it, loop it, wrap it, cut it. We have the styles you love in the colors you want.

* 3/8″ (1 cm)
* 10 yards (9.1 m)
Purple 3/8″ (1 Cm) Tricolor Ribbon
149708
Price: $7.00

Our 3/8″ (1 cm) Tricolor Ribbon has Gorgeous Grape, Highland Heather, and Purple Posy stripes on one craft ribbon. Ribbon is an easy way to add style to your projects. Tie it, loop it, wrap it, cut it. We have the styles you love in the colors you want.

* Gorgeous Grape, Highland Heather, Purple Posy
* 3/8″ (1 cm)
* 10 yards (9.1 m)

Spread the love!

Tropical Santa! For the “SO SANTA” Beach Bum this Christmas!!

Spread the love!

Take the “SO SANTA” Clear mount stamp set and add some tropical colors to create a fun and witty Christmas card!

Begin with the TROPICAL ESCAPE 6″x6″ Designer Series Paper featured GRANNY APPLE GREEN, SHADED SPRUCE and add some LEMON LIME TWIST cardstock and ribbon.


PRODUCTS FEATURED:

So Santa Clear-Mount Stamp Set 

Have you ever wondered what Santa is doing in his spare time? Well, here are some snapshots! Happy crafting!
Our clear-mount stamps
* Are made of the same premium rubber as our wood-mount stamps.
* Have deeply etched images so you get a superior stamped impression each time.
* Are precut so you don’t have to trim.
* Are repositionable; temporarily mount them on clear blocks for stamping, then remove them for storage.
* Save space—you need only one set of blocks for all your clear-mount stamps (blocks sold separately).
* Come packaged in cases with images on the spine for easy storage and quick reference.
Quantity: 10 rubber stamps
Suggested clear blocks (sold separately): a, c, d, g


Tropical Chic Clear-Mount Stamp Set

Whatever your inspiration (Jungle Book, your best vacation ever), the projects you create with this set will be eye-catching!

CARDSTOCK, INKS and MARKERS:

–SHADED SPRUCE  (base card) and INK

— LEMON LIME TWIST (layering) and INK

— WHISPER WHITE  (layering)

— BERMUDA BAY (base card)

— Memento Black Ink (Santa figure)

— Stampin’ Blends Alcohol Based Markers (see color chart below)

Tropical Escape Cardstock Pack (24 sheets 6″x6″) Designer Series Paper 146916 Bora Bora? The Maldives? Turks and Caicos? Bali? No matter the tropical destination of your choice, this paper will put you into a traveling mood in no time! 48 sheets: 4 each of 12 double-sided designs * 6″ x 6″ (15.2 x 15.2 cm) * Acid-free * Lignin free Coordinating colors: Basic Black, Blushing Bride, Granny Apple Green, Shaded Spruce, Whisper White

Tropical Escape 8-1/2″ X 11″ Cardstock Pack The best projects start with the best products. Start your projects with our high-quality cardstock formulated especially for discerning crafters. The ultrasmooth surface is ideal for stamping, so you get clean, crisp images. And it’s dyed with pure color all the way through, so there’s no white core. * 24 sheets – 8 sheets each of 3 colors: Blushing Bride, Granny Apple Green, Shaded Spruce
* 8-1/2″ x 11″
* Acid-free
* Lignin free

RIBBON:

— 1/4″ OMBRE RIBBON in LEMON LIME TWIST


Lemon Lime Twist 1/4″ Ombre Ribbon 
Go from one color and fade to another. The ribbon is an easy way to add style to your projects. Tie it, loop it, wrap it, cut it. We have the styles you love in the colors you want.
* Color fades from dark on one edge to light on the other
* 1/4″ (6.4 mm) Ombre Ribbon
* 10 yards (9.1 m)
* Color: Lemon Lime Twist

COLOR:


Stampin’ Blends Markers


Memento Black Ink

ADHESIVES:

Tear Tape Adhesive

Foam Adhesive Dimensionals

Snail Adhesive Tape


Spread the love!

World of Magic and Make-Believe with the Mythical Day Unicorn Rainbow Card

Spread the love!

Enter the wonderful world of make-believe, where unicorns prance against the iridescent glittered designs of the Myths and Magic Speciality Designer Series Paper between a glimmering rainbow and Dazzling Diamonds clouds by utilizing the Magical Day Bundle and the Rainbow Builder Framelits dies from the Sunshine and Rainbows bundle featured in the 2018 Occasions Catalog.

I couldn’t wait to get my hands on this bundle once I saw the DSP up close.  It is so pretty and ethereal.   I decided to pair it up with the Sunshine and Rainbows bundle in order  to add a sparkling rainbow  for a unicorn to follow to where dreams come true!   Fun!  Right?   I guess I had my niece in mind when I created this card; but I have gotten so many positive comments from clients who love the fun and whimsy.  It is not a hard card to make and I make it easy if you check out my HOW TO video (click link) for all the step by step details and tips.


Rainbows and Unicorns

Pretty Unicorns

Lofty Unicorn Thoughts


How to Video:


Featured Products and Dimensions:

WHISPER WHITE :
  • Need a piece to stamp the UNICORNS and then color with STAMPIN’ BLENDS markers
  • Need a 5″ x 3 1/4″ piece to cut out the clouds with the Rainbow edgelits
BERMUDA BAY,  BERRY BLISS and POOL PARTY or SOFT SKY
  • Choose either BERRY BLISS or POOL PARTY for your base card at 5 1/2″  x 4 1/4″
  • Use BERMUDA BAY at 5 1/4″ x 4″ to layer and frame the DSP

Pool Party

Bermuda Bay

Berrry Bliss

Click HERE to Explore the Myths and Magic Product Suite

MYTHS AND MAGIC SPECIALITY DESIGNER SERIES PAPER
  • Unicorn Paper cut at 5″ x 3 1/4″

Shop Myths and Magic DSP Here

MYTHS AND MAGIC GLIMMER PAPER
  • I used every color from the Glimmer Paper to cut the Rainbow including some retired pieces i had from last year’s Sale-A-Bration.   I would recommend adding GOLD, CHAMPAGNE, COPPER  or SILVER FOIL to add shine.  You can’t go wrong with anything shimmering or sparkly.
  • I also used the Dazzling Diamond (white) for cutting out the clouds.

Myths and Magic Glimmer Paper Pack 6″x 6″


Myths and Magic DSP Here


Champagne, Gold or Silver Foil Paper

Silver Glimmer Paper

Gold Glimmer Paper

MYTHICAL MAGIC CLEAR MOUNT BUNDLE
  • Stamp the UNICORN with MOMENTO BLACK ink and use the matching die to cut out the figures.
  • I used Stampin’ Blends – Powder Pink, Bermuda Bay, Berry Bliss, Yellow colors…

Myths and Magic Clear Mount Bundle

Shop Mythical Bundle Here

Sunshine and Rainbows Bundle

Shop Sunshine and Rainbow Bundle


Momento Black Ink

Other Products Featured:

Big Shot Die Cutting Machine

Big Shot Platforms

Precision Base Plate

Regular and Mini Dimensionals


Stampin’ Blends Alcohol Free Markers

Shop Stampin’ Blends Markers

Thank you for stopping by and please subscribe to my Newsletter for more ideas!


Spread the love!

Sweet Soiree Bundle Card by Stamp ART Connection

Spread the love!

Watch my tutorial for how to make these delicious SWEET SOIREE cards!

Sweet Soiree Card Video Tutorial

Sweet Soiree Product Suite:  I fell in love with the SWEET SOIREE CAKE AND FRAMELITS BUNDLE while putting together a card for my best friends mother who just turned 80 this year.  I loved the detail and femininity that these products offer; as well as the versatility as a card maker.  I  can make either a birthday (either big girl or for a little princess, an anniversary or wedding card)!   Lots of possibilities and really gets your creative juices flowing!

My personal FAV was decorating the cakes with the SHIMMERY WHITE and SILVER Embossing Paste.  While visiting a friend I was able to put on an impromptu “work shop” on using the embossing paste.  I think once she watched me do it…she realized it wasn’t that hard…maybe a bit messy.  I would recommend using a separate container with warm soapy water to wash your mask and palette knives to to keep them clean.  I would also use paper towels as a surface to keep the paste contained.

Now, once you get over the initial “messiness”…I say…GO FOR IT…it’s fun!  My friend Kathryn, grabbed paper and we just experimented with different colors of paper, added some ink to the Shimmery White paste and really got some neat effects!  If you friend me on FB; I can share our stamping forum where we share ideas and cards…Soooo….jump in…and have fun!    I hope that you will check out the video and can visualize all the possibilities!   If nothing else…the SWEET SOIREE SPECIALITY Designer Series Paper and the rich colors is to die for.  I love the colors featured (Berry Burst, Old Olive and Marina Mist and well as Calypso Coral) and the Silver foil accents.  It makes it so easy to dress up any project.

SHIMMERY WHITE AND SILVER EMBOSSING PASTE

SWEET SOIREE SPECIALITY DESIGNER SERIES PAPER

PETAL PAIR TEXTURED EMBOSSING FOLDERS

To be used with the Embossing Paste
SWEET SOIREE DECORATIVE MASKS

SWEET SOIREE EMBELLISHMENT KIT

CAKE SOIREE CLEAR MOUNT BUNDLE


BERRY BURST, MARINA MIST & OLD OLIVE
SWEET SOIREE CARD STOCK PACK with Berry Burst, Marina Mist and Old Olive colors.

SHOP SWEET SOIREE PRODUCTS HERE!!


Spread the love!