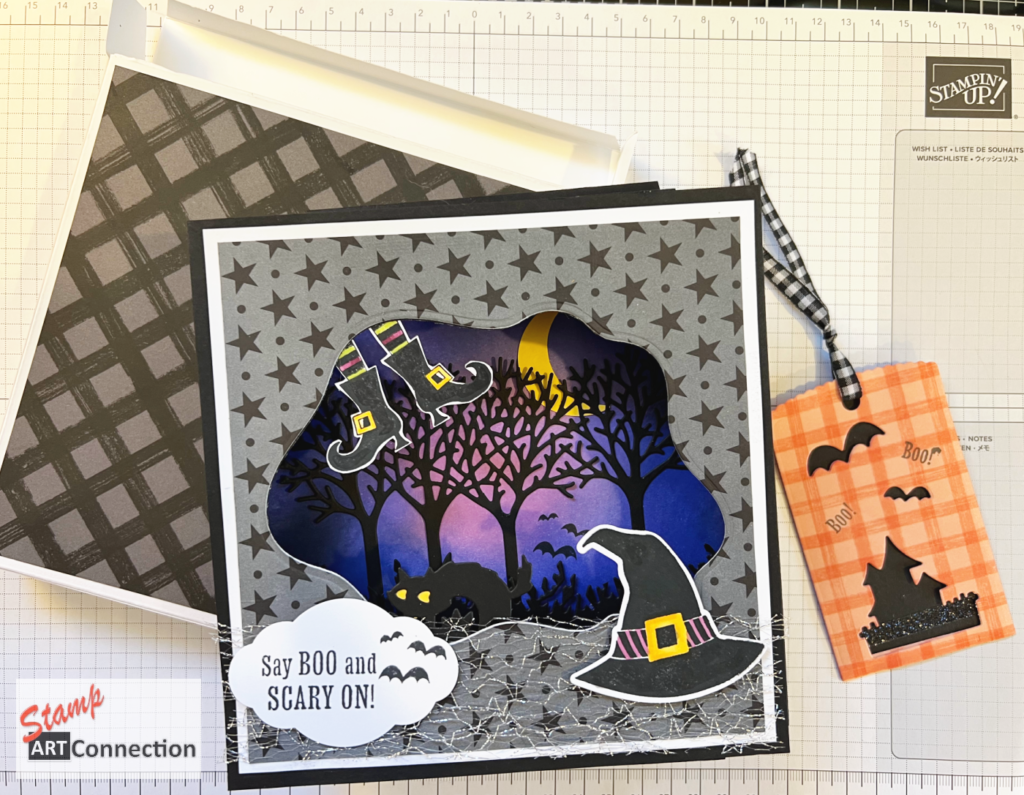
Box Corner Card Inspiration featuring the Curvy Celebrations Variety Bundle

This is a fun and easy card that is packed with WOW! There are so many of the Holiday Catalog products which inspire, but most of all is the versatility of the CURVY CELEBRATIONS Variety Bundle with includes the CURVY CHRISTMAS, CURVY DIES and CLASSIC CHRISTMAS DSP> Explore some of the ideas below and view the tutorial for the basic instructions.

Cards feature the Trimming the Town Suite and DSP, Coming Home Bundle, All the Trimmings Ribbon Combo Pack, and Embellishments. The Wishes and Wonder Bundle, Peace and Joy Bundle Gather Together Bundle, and Country Home stamps set.

Gilded Autumn DSP cut with the Curvy Dies and embellished with Gather Together Leaves Dies in Gold Brushed Metallic Cardstock and Country Home Stamp set. Embellish with Gold Gems and 3/8″ Embroidered Ribbon from the Plaid TIdings Suite.
Special DSP from the Curvy Celebrations Variety Pack makes the perfect backdrop with the Trimming the Town DSP and Coming Home Bundle. The JOY sentiment from the Peace and Joy bundle on Foam Adhesive Sheets and Glitter Paper. The curved DIES from the Curvy Celebrations Bundle and sentiment is perfect!
Plaid Tidings DSP cut with Curvy Celebrations and embellished with Adhesive Baked Snowflakes sets off the design using the stag from the Wishes and Wonder Bundle in Gold Foil. The backdrop is created using the In the Pines Bundle with Garden Green and Shaded Spruce on Pool Party cardstock texturized with the Subtle Embossing Folder. The snow banks are created using white glimmer paper and Whisper White Card stock (flocked paper (retired)).

Gallery of Cards


Video Tutorial

Supply List:

  • Cardstock (cut 8″ x 8″)
  • Coordinating Designer Series Paper, Ribbon (21″) and embellishments
  • Paper Trimmer
  • Scoring Tool
  • Adhesive (All Purpose Glue and Tear Tape
  • Stamp Set/Dies: Curvy Christmas Stamp Set and Dies, Coming Home Bundle, the Wishes and Wonder Bundle, Peace and Joy Bundle, Gather Together Bundle, and Country Home stamp set.

Directions:

  • Trim cardstock to measure 8″x8″
  • Score at 4″, and rotate and score again at 4″. This will divide the 8″x8″ into four sections.
  • In the top-right quadrant, score diagonally from the corner to the center of the page where all the score lines meet
  • Cut the bottom 4″ score line up to the center of the page. This will separate the bottom two quadrants.
  • Crease all score lines.
  • Fold the bottom right and apply adhesive
  • Secure the bottom right quadrant (the one with the adhesive) to the TOP of the bottom left quadrant. This forms the box corner
  • Again, crease the diagonally scored line and apply adhesive to the top triangle only.
  • CREATE SCENES: Cut four 3.5″x3.5″ Whisper White pieces (front, backsides and bottom of corner)
  • Cut DSP 3″x3″ square and cut designs using the Curvy Dies or the Home Together Dies.

Products Featured

Curvy Celebrations Exclusive Reveal

I love these new curvy stamps, dies, and more! Designed for a variety of special occasions–including Christmas, the Quite Curvy Variety Bundle includes everything you need to create one-of-a-kind crafts.

The curvy dies are fun and easy to use with all the wonderful Designer Series Paper (DSP) patterns and colors.

Gilded Autumn Specialty DSP makes this lovely and very classic card for Fall
In Good Taste DSP featured makes for a good masculine card design
A card using the Dandy Garden Suite which will be featured in the next 2021 Catalog is added for a more feminine touch!

Early Release Available Soon

Get a 10% Discount on the Variety Bundle

Quite Curvy Variety Bundle

Curvy Celebrations

Fun DRACULA vampire Punch Art Card

Join me as I assemble a wonderfully FUN and creative Halloween card using punches from my Stampin’ Up stash to create this Dracula Card!

Graciela Valdez Vera is the Demonstrator that created the original design. I took it a step further by creating a more ghoulish looking vampire..blood-red lips and all!

Graciela’s original design!
My take on a ghoulish vamp!

Video Tutorial


Pieces and Parts…ideas if you don’t have THAT punch!

Umbrella Punch, large OVAL of Stitched Shapes, Apple Builder Punch, a BOW punch, Snowman Builder Punch, Layering Triangles.
  • CARDSTOCK: Basic Black, Blackberry Bliss, Whisper White, Real Red
  • DSP: Black GLITTER paper, Magic in this Night DSP
  • EMBOSSING: Silver Embossing Powder
  • STAMP SET: Hallows Night Magic
  • DIES: Halloween Magic Dies, Stitched Shapes Dies and/or Triangle Dies
  • Punches: Umbrella Punch, Apple Builder Punch, Snowman Builder Punch, Gleaming Ornament Punch
  • SHAPES NEEDED: Bow Tie, circle punch for feet
  • PENS: Stampin’ Chalk, Stampin’ Write Marker, Gel Pens (white/black)
  • ADHESIVES: All Purpose Glue, Black Dimensionals
  • WOBBLE SPRING: available on AMAZON

Use the smallest CIRCLE of the Stitched Shapes Dies to create an easy VEST if you don’t have the retired OWL punch!

Just CUT the edges of the CIRCLE to create the vest shape!

Products Featured:

Pendulum Swing Cards

During my weekly LIVE broadcast….after fixing a broken MIC….I took a project inspired by Jennifer McGuire to the next level by using all Stampin’ Up! products to create a fun pendulum card!

I created several Halloween inspired cards featuring the STITCHED RECTANGLES DIES, HALLOW NIGHT MAGIC DIES, HARVEST HELLO stamps, CAT PUNCH, SNOW FRONT Stamps & the APPLE BUILDER PUNCH.

Follow my VIDEO TUTORIAL for all the steps and product checklist provided below.

Refer to my earlier tutorial for how to create the background and then create a pendulum card with the cat punch.

Checklist:

  • STAMP SET: Harvest Hellos, Snow Front, Hallows Night Magic
  • DIES & PUNCHES: Apple Builder Punch, Halloween Magic Dies, Cat Builder Punch, Stitched Rectangles dies
  • CARD STOCK: Whisper White, Pumpkin Pie, Blackberry Bliss, Black Glitter Paper, Gold and Silver Foil Sheets
  • TOOLS: Clear and Silver Embossing Powder, Adhesive Sheet, Foam Adhesive Sheets, Foam Adhesive Strips, Hole Punch, 1 Cent coin or metal washer (for weight)
  • INKS: Versamark for Embossing, Memento Black Ink, Pumpkin Pie for pumpkins, Blackberry Bliss ink for the tiny bats
  • Retired items: Seasonal Layers Thinlet Dies (143751) for the branch, Gift Card Envelop, and Trims Thinlits Dies (135854) for the round die.

Video Tutorial


TRY THIS!!! Use the SNOWMAN SEASON Bundle to build a pendulum card for the winter holidays!


PRODUCTS:


Hallows Night Gift Bags using 6″x6″ DSP

Here’s a great project to create gift bags from 6″x6″ Designer Series Paper (DSP) that is easy to follow. What led me to this idea is that I was looking for a creative way to use 6″x6″ DSP to create some gift bags to send to the Pediatrics Unit as part of my “make a card and give a smile” program for the holidays.

If you like this idea, don’t hesitate to take advantage of the month long sale this October to stock up on DSP at 15% discount! Check out the LINK to purchase the MAGIC IN THIS NIGHT DESIGNER SERIES PAPER (DSP) for only $9.78 (regularly $11.50).

Lastly, I’ve provided a quick tutorial with all the steps and tips for assembling these bags as well as the basic dimensions and scoring below!

Thanks for stopping by….please leave a comment!

Video Tutorial

Join me on my WEDNESDAY LIVE for weekly projects for more ideas!


Project Details

  • DIMENSIONS
  • 2 Sheets “6X6” DSP for front and back PANELS
  • 1 sheet coordinating cardstock for the BOTTOM – 3″x6″
  • 2 pieces cut 3″x6″ coordinating DSP for the SIDE PANELS
  • SCORE
  • Score both front and back PANELS at 1/4″ at the top. Score the back PANEL at 1 1/2″ from the bottom
  • Score the 2 SIDE PANELS both 1/4″ along the 6″ side and once along the 3″side
  • Score sides from 2″ from the bottom and 1 1/2″ for the center
  • Score the BOTTOM PANEL (3″ x 6″) 1/4″ along the 6″ side
  • ASSEMBLY
  • Refer to Video Tutorial
  • TOOLS
  • Cutting Machine
  • Scoreboard and Scoring Tool
  • All Purpose Glue
  • Hot Glue Gun

Products Featured

Holloween Ideas: Packaging and Cards

Inspired to create Halloween packaging for the Pediatrics Unit as part of my “Give a SMILE…one card at a time” program — I designed some projected using some of the products I had in my studio. To replace any retired items, consider some of the products from the Mini-catalog featured below (such as the bat dies from the HALLOWS NIGHT MAGIC Bundle).

My video tutorial is part of my Wednesday LIVE series where I demonstrate stenciling, embossing, and coloring techniques for creating some unique packaging options that can applied to any Holloween project.

I used some retired KRAFT PILLOW BOXES and MINI PIZZA BOXES (available in the catalog) using embossing and stenciling coloring techniques. I also used some non-traditional products like the APPLE BUILDER PUNCH, SNOW FRONT stamp set to create fun Halloween cards with the CAT PUNCH. Please leave a comment and thank you for stopping by!

Halloween Projects

Using the BASIC PATTERNS DECORATIVE MASKS with Basic Grey & Highland Heather ink. Tag is made from the EVERYTHING ESSENTIAL BUNDLE with silver embossing powder on Black cardstock (2 inch Highland Heather cardstock punch with Tag Topper Punch) and tied with the Metallic Mesh Ribbon.
Using both the BASIC PATTERNS DECORATIVE MASKS stencil with SHIMMER PASTE and the COBWEBS 3D Embossing folder techniques can be used for cardmaking as well!

Card Ideas

Whisper White base card with RICH RAZZLEBERRY cardstock cut at 5 1/4″ x 4″ is embossed trees from the SNOW FRONT stamp set in CLEAR embossing powder. Reverse emboss with RR ink and SPONGE DAUBER to create a spooky effect. The CAT PUNCH from BLACK GLIMMER paper and the bats from the EVERYTHING ESSENTIAL Stamp set. Since my BAT PUNCH is retired, replace with the HALLOWS NIGHT MAGIC BUNDLE that include BAT dies. The moon is White Glimmer paper.
Use the APPLE BUILDER PUNCH and PLAID TIDINGS DSP with a surprise wobble spring to create this fun and simple card!
Use the HARVEST HELLOS to create the pumpkin using the COB WEBS 3D embossing folder and BATS from the HALLOWS NIGHT Bundle

Video Tutorial


3D Embossing Folder Techniques

Here are a couple of techniques that can add some interest as backgrounds to your holiday cards. Consider tissue or toilet paper as another texture when embossing with your favorite embossing folders. My favorites for this technique are EVERGREEN FOREST (153576), SCRIPTY (149634), and PARISIAN FLOURISH 3D (151474) Embossing Folders. All are available at my ONLINE Store.

I coordinated the backgrounds with products from the CHRISTMAS GLEAMING, FOR UNTO US, PEACE AND JOY stamp sets and the POINSETTIA PLACE suite.

Please view my video tutorial for some tips, tricks and project ideas!

You can really see the detail here. My tissue paper embossed sheets drying before being colored using a sponge dauber and an ink pad. The STYLISH SCROLL embossing folder is the only one of the group retired from last year’s mini-catalog.


Scripty embossing folder creates an old-world vibe. Real Red Sheer Ribbon creates the frame for the Gold embossed sentiment (For Unto Us) and holly (Christmas Gleaming) colored with Stampin’ Blends. I also used adhesive-backed SNOWFLAKES.
I love the detail from the Parisian Flourish 3D embossing folder and Poinsettia.
My first effort using Shaded Spruce cardstock, ink and ribbon.
Sometimes simple is best. Garden Green ink and cardstock with Old Olive and the PEACE and JOY Dies with GOLD Foil cardstock rocks this card.
The Night of Navy “inked” sky on Whisper White and sponged with Gold is striking! The INK is DELICATA Golden Glitz and the accent All Purpose Ink is 70 – Vegas Gold (TSUKINEKO) — these are all products that had been offered by SU and are no longer in the catalog. Check AMAZON or your local Big Box craft store.

Products Featured

POINSETTIA PLACE Suite is Magic!

I love, love, love this suite. I think these are the best Poinsettia blooms I have worked with. Stampin’ Up! hit it out of the park this time! This is a MUST HAVE for your collection. Pair this suit with other products to include the REAL RED VELVET SPECIALTY PAPER, FOREVER GOLD SPECIALTY DESIGNER SERIES PAPER, and ribbons from the TRIMMING THE TOWN & WONDER OF THE SEASON suites and you can create some brilliant combinations!

Below I provide my weekly LIVE on my YOUTUBE channel where I demonstrate some tips and tricks for assembling and coloring the poinsettia. Also, learn how versatile the PLUSH POINSETTIA SPECIALITY PAPER can be for creating projects. Get all the details and scroll further for the gallery of final projects.

Learn about workshops:


Poinsettia Place YOUTUBE Tutorial

Lots of good info…tips…tricks…ideas for you!!!

Gallery of Projects

This is the BOX Front for my CARDS and TAGS Workshop project using the POINSETTIA PLACE dies with Real Red Velvet Paper, the Forever Gold Specialty DSP, the SUBTLE TEXTURE 3D Embossing folder on Whisper White on Garden Green.
Cards and tags featuring the Poinsettia Petals Stamp set that is part of the Poinsettia Place Suite, Real Red Sheer Ribbon, Real Red and Whisper White card stock and Poinsettia Place DSP strips. GO to my blog for when I am offering the workshop for this project.
Using the POINSETTIA DIES with some retired WHISPER WHITE Velvet Paper, this bloom matches beautifully with the featured DSP, the Beaded Pearls and Gold Laser DSP. I used GOLD ink and a sponge dauber to add glimmer to the edges of the flower. The base card and leaves are OLD OLIVE.
If you viewed my tutorial, you will see where I demonstrate that you can use the FRAMELIT to cut the PLUSH Poinsettia DSP to create individual blooms. Again, embellished with GOLD LASER-CUT DSP and Berry DIES with GOLD FOIL.
My FAVORITE COMBINATION! Real Red Velvet flower on DSP with the Gold Laser-cut paper! Can’t go wrong!!!
I used the framelits to cut out the poinsettias from the PLUSH POINSETTIA Specialty Paper and then sponged with REAL RED and CHERRY COBBLER to create a bold effect on the DSP.

FEATURED PRODUCTS:

FANCY FOLDS: Say “pleats” please!

As part of my weekly broadcast, I demonstrated different pleated card fronts using products from the IN GOOD TASTE SUITE: In Good Taste DSP, Tasteful Textile 3D Embossing Folder, In Good Taste Elements and the Tasteful Touches Stamp Set. To keep the videos short, I have edited the broadcast into two parts; one for each technique.

Here are the final cards and basic measurements: Please LIKE and SHARE!

Pleated FRONT

  • Featured Card Stock: Magenta Madness – 8 1/2″ x 5 1/2″ and folded at 4 1/4″ and Whisper White cut at 5 1/4″ X 4″ for inside. Enough cardstock for sentiment and layers.
  • Featured Stamp Set: Tasteful Touches Stamps Set and Tasteful Labels Dies
  • Embellishments: In Good Taste Elements
Here are the measurements for MARKS to be made to create the V-FOLDS
Here is the PATTERN for scoring: A to D, B to E, B to, C to G.

Part I: Video Tutorial of Pleated Front Card


MORE CARDS

Used the GATHER TOGETHER Bundle and the ACORN TRINKETS tied with Metallic RIbbon which is featured with the GILDED AUTUMN Suite. Card stock is BUMBLE BEE.
This card features elements from the PLAYFUL PETS suite. I used the DSP and fussy cut the sassy kitty from the DSP.

PART II: Double Pleated Front Card

  • Card Stock: Base card is CRUMB CAKE (8 1/2″ by 5 1/2″ folded at 4 1/4″), MISTY MOONLIGHT (5 1/4″x4″), Whisper White (5″ x 3 3/4″), Card stock for sentiment and White Embossing Powder on MM.
  • DSP: IN GOOD TASTE Designer Series Paper
  • TASTEFUL TEXTURES 3D Embossing Folder
  • “Tags and Blooms” (retired)
  • Ink: Misty Moonlight or Night of Navy
  • IN GOOD TASTE Elements for embellishments

VIDEO TUTORIAL


FEATURED PRODUCTS

IN GOOD TASTE Suite
BEAUTIFUL AUTUMN
GATHER TOGETHER
Tasteful Texture 3D Embossing Folder
Score Board
Bone Folder
In Good Taste Elements

Depth of Field & Wreath Building Stamping Techniques

Here are several techniques shared last week during my weekly LIVE. I created background patterns using the WHALE DONE stamp set and the “depth of field” stamping technique.

I also demonstrated how to use a Stamparatus to create wreaths using the GATHER TOGETHER, BEAUTIFUL AUTUMN and PEACEFUL BOUGHS stamps sets.

View the video tutorial for tips and tricks and check out the gallery of final cards. Don’t forget to leave a comment and thank you for stopping by!


Video Tutorial


TECHNIQUE I: DEPTH OF FIELD

  • INKS: Smokey Slate (grey), Mint Macaroon, Shaded Spruce, Pretty Peacock, Misty Moonlight, Granny Apple Green, Night of Navy
  • CARDSTOCK: Whisper White and Very Vanilla
  • STAMP SET: Whale Done

Gallery of Depth of Field Technique Cards

Smokey Slate, Shaded Spruce, and Granny Apple Green. I stamped with some SILVER metallic ink to add some glimmer to this card. But it’s a great pattern for a simple card! Base card is SHADED SPRUCE with BLACK.
Smokey Slate, Misty Moonlight and Shaded Spruce. Basecard is NIGHT OF NAVY and I used a Smokey Slate (retired) ribbon for accent.
Pretty Peacock, Shaded Spruce and Mint Macaroon. Base card is SHADED SPRUCE and I used the Seaside Textured (retired) embossing folder to add some depth to the pattern. You can barely see the WINK OF STELLA…but it adds some nice glimmer.
Night of Navy, Misty Moonlight, and Smokey Slate Inks. I love this background and it goes perfectly on POOL PARTY basecard with some SHEER RIBBON in POOL PARTY which is NOT retired!!! : )
Great layer of shapes on SHADED SPRUCE and mounted on Whisper White base card.
WHALE DONE

TECHNIQUE II: WREATH BUILDING WITH THE STAMPARATUS

  • INKS: Bubblebee, Cajun Craze, Early Espresso, Crumb Cake, Mint Macaroon, Gold Metallic Ink
  • STAMP SET: Beautiful Autumn, Gather Together and Peaceful Boughs
  • TOOLS: Stamparatus

Gallery of Wreaths using the Stamparatus

This is the first wreath I demonstrated on the video, I cut it down to create a regular card. I added so GOLD METALLIC ink accents and the base card is Early Espresso.
This is the second wreath I made in the video. I fussy cut around to create a wreath shape and mounted it on 6″x6″ Real Red card stock. I added some GOLD GEMS and GOLD trimmed ribbon as accents. I am very happy with this card.

Featured Products

Peony Flower using Glimmer, Velveteen, and Vellum Papers…

For my weekly LIVE on Wednesday, I choose some different cardstock and paper to create the blossoms from the PEONY GARDEN Suite.

After assembling the Velveteen Peony, the card base is HIGHLAND HEATHER with Vellum and a PURPLE POSEY layer. The Vellum is embossed with the GREENERY Embossing Folder. I used Highland Heather INK with a sponge dauber around the flower edges of the Peony. The center is BLACK Glimmer paper. The leaves are Soft Seafoam velveteen. The edges have been sponged with same ink for added accent.
Card base of Highland Heather is embossed with the TASTEFUL TEXTURES embossing folder. The Whisper White layer is embossed with the GREENERY embossing folder and the scalloped edges are created using the edgelets from the bundle. The leaves are cut from the SOFT SEAFOAM Velveteen cardstock.
This is a FANCY FOLDS one sheet wonder card (see FANCY FOLDS WORKSHOP details to learn how to create this card) and features products from the PEONY GARDEN SUITE. I used WW card stock and sponged with PETAL PINK ink. I love the monochromatic theme with the coordinating DSP and cardstock. Perfect for all occasions…weddings, birthdays, anniversaries.
Peony featured from TUTORIAL…card is FLIP TAB…another FANCY FOLDS WORKSHOP product.
I used GREY GRANITE, SMOKY SLATE to create a soft background for this peony cut from the RAINBOW Glimmer paper. Scripty Embossing folder and frayed edges add a shabby chic vibe. The word die is cut with the FOAM ADHESIVE backing on BLACK cardstock for added dimension.
I had some retired Petal Pink and Green VELLUM. Added layers of DSP, embossing and ribbon from the PEONY Garden SUITE.

Video Tutorial


Featured Products

Box Project featuring the GATHER TOGETHER & BEAUTIFUL AUTUMN suites

This lovely project inspired by the Artisan Design Team member, Caroline van der Straaten included products from the new mini catalog in line with a fall theme of thanksgiving.


Register for my WORKSHOP!


Featured Products

Stand Alone Cards Tutorial

I loved putting this project together because it was EASY and also a great way to show off the new product suites from the Annual Catalog. Here is an easy card that when assembled stands alone! The cards featured products from FOREVER GREENERY, IN GOOD TASTE, and WORLD OF GOOD.

Please follow the Video Tutorial for all the tips and tricks!


Supplies Needed:

  • Score Board and Bone Folder
  • Ruler
  • Pencil and Eraser
  • X-Acto Knife
  • Self-Healing Cutting Mat
  • SU Silicon Mat
  • All-Purpose Glue and Dimensionals
  • CARDSTOCK: 4″x 12″ Cardstock or DSP (use 12″x12″ cardstock)
  • Whisper White Matt: 2.75″ x 3.75″ and piece for the back and die-cutting sentiments
  • DSP for front: 3.5″ x 2.5″
  • IN GOOD TASTE Suite (154147)
  • Cutting Machine/Big Shot
  • INK: MISTY MOONLIGHT

The cards can be made with 12″ DSP or with 12″ cardstock.

Featured Products: