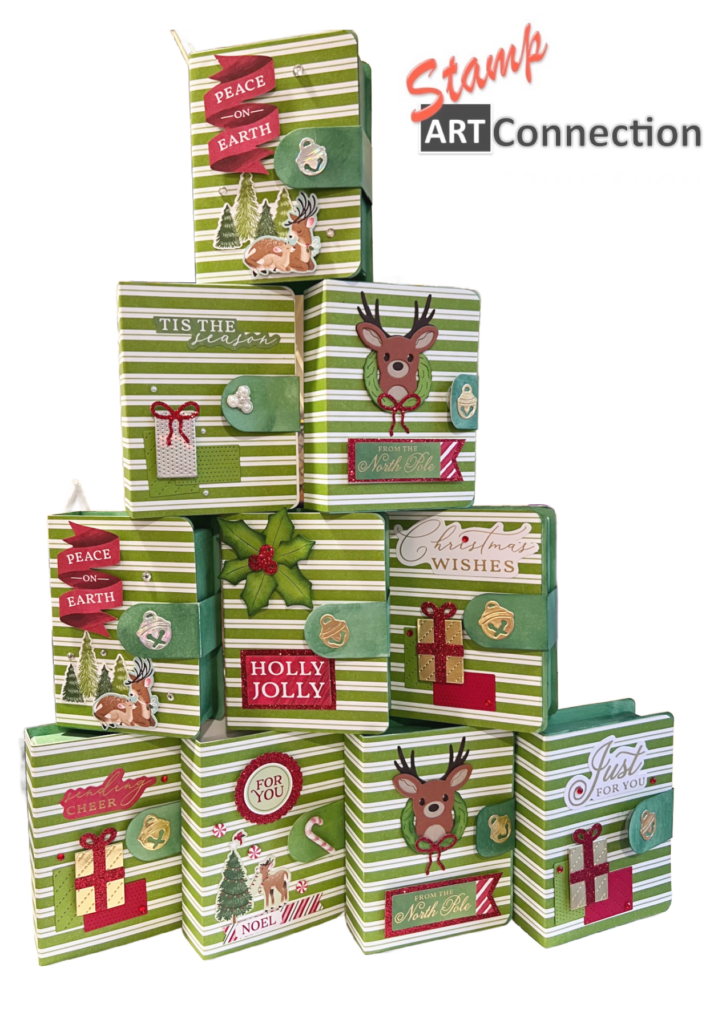
SU’s Enamel Effects Feature Big for this Gingerbread Gift Box Project

Spread the love!

Join me as I demonstrate step-by-step how to create delightful Gingerbread Gift Boxes by using a combination of various current and retired STAMPIN’ Up! products, as well as items easily found at your local craft store or in the baking aisle of your favorite supermarket. Get ready to unleash your creativity as I guide you through the process, from collecting products, and cutting the cardstock to assembling and decorating the final gift boxes.

The key features of this Gingerbread Gift Box Project are the Pearlized and Metallic Enamel Effects and the Shimmery White Embossing Paste on SU card stock (Cinnamon Cider / Pecan Pie / Copper Clay / Fresh Freesia / Moody Mauve).

I provide detailed instructions and helpful tips as well as showcase a variety of techniques using the versatile STAMPIN’ Up! products specifically designed to add an extra touch of charm to your gift boxes with PEARLIZED OR METALLIC ENAMEL EFFECTS, SHIMMERY WHITE EMBOSSING PASTE, festive ribbons, and glittered embellishments, you’ll discover endless possibilities to customize your creations.

But don’t worry if you don’t have access to retired STAMPIN’ Up! products, as I also suggest alternative items. You’ll be surprised at how creative you can get with items you already have in your craft room.

Allow me to guide you on how to create handmade gift boxes for your loved ones or simply enjoy a fun craft activity. Join me on an exciting journey as we bring some gingerbread magic into your life. Let’s get started!

Don’t forget to shop ONLINE products below! Wishing you a MERRY crafting Season!


Gingerbread Gift Box

Front Facade — Embellished with Copper and Gold Metallic Enamel Effects
Shimmery White Embossing Paste adds the perfect Gingerbread roof!
Back Facade Detail

Additional Inspiration

Front Facade- Featuring FRESH FREESIA and MOODY MAUVE cardstock. Additional embellishments from your local craft store add glimmer.
Back Facade Detail

Supply List & Measurements Used for this Project

  • STAMPS / DIES:
    • POP on BY Bundle (stamps & dies) Retired (Stamps 146641 / Thinlet Dies 146829)
  • CARDSTOCK:
    • Cinnamon Cider (retired)
    • Pecan Pie
    • Copper Clay (roof)
    • Fresh Freesia
    • Moody Mauve (roof)
  • Sizes & Dimensions:
    • two pieces cut 7 5/8 x 10 1/2 ” for gift box
    • two pieces cut 4 1/4″ x 3 3/8″ using darker color card stock for the roof
  • SCORE:
    • Along the 7″ side score: 2 7/8, 7 1/8″
    • Along the 10″ side (with the 1/4″ tab at the bottom)
      • Score: 2 7/8″, 7 1/8, 10″
    • CUT: Follow the VIDEO tutorial
  • Stampin’ TRIMMER / Scoring Tool
  • Multi-Purpose Glue (TOMBOW / Fine Tip Glue)
  • Stampin’ Cut & Emboss Machine
  • Stampin’ Up! Shimmery White Embossing Paste
  • MASKS / STENCIL
  • Glimmer Paper
  • BASIC WHITE CARD STOCK
  • Stampin’ Up Enamel Effects
    • Metallic
    • Pearlized

Video Tutorial


Featured Products & ON-LINE STORE:

Here are some of the featured products that are available on my ONLINE store…so convenient — just click and it will ADD TO YOUR CART below:


Spread the love!

The Holiday Horse & Sleigh Meet the Never-Ending Card

Spread the love!

Title: The Holiday Horse & Sleigh Meet the Never-Ending Card

Are you ready to immerse yourself in the enchanting spirit of the holiday season? Picture this: a cozy winter’s evening, a horse-drawn sleigh gliding through a snow-covered landscape, and a magical surprise waiting for you. Allow me to introduce you to the extraordinary combination of the Holiday Horse & Sleigh and the captivating Never-Ending Card.

The Holiday Horse & Sleigh Bundle is a timeless symbol of festive charm. Imagine a scene nestled under a warm blanket, feeling the crisp winter air as the gentle jingle of sleigh bells fills the air. The majestic horse pulling the sleigh creates a mesmerizing holiday scene to immerse recipients in the nostalgia of traditional winter celebrations.

The Never-Ending Card adds a touch of whimsy and intrigue to this delightful scene using the ONE-HORSE OPEN SLEIGH 6″x 6″ Designer Series Paper. Crafted with ingenuity, the Never-Ending Card is a marvel of paper engineering. As you open it, it reveals a series of folds and surprises, continuing endlessly in an infinite loop. Each fold unravels a new scene, telling a story of holiday wonder and joy that captivates all who encounter it.

The combination of the Holiday Horse & Sleigh and the Never-Ending Card makes it a perfect card that also stands up and will add to anyone’s holiday décor.

Follow my Video Tutorial, where I demonstrate several ways to color using both STAMPIN’ BLENDS and WATERCOLOR PENCILS. I also show you how to take advantage of the DSP to create wonderful winter scenes! Embrace this delightful pairing and unlock the possibilities of a holiday season filled with wonder, warmth, and endless joy.

Shop the collection below! Happy crafting!


Card 1: Winter Flurries

Front Panel — Coloring with Stampin’ Blends
Second Panel
Third Panel – features the Traditions of St. Nick DSP embellished with Loose Holiday Gems.
Back Panel – featuring the Traditions of St. Nick DSP

Card 2: Snow and Ice

Front Panel – Horse & Sleigh stamped with Pecan Pie ink on Basic White cardstock. Additional colored card stock pieces are stamped separately and fussy cut. Figures are colored with Real Red and Pool Party Stampin’ Blends. Horse stamped with on Crumb Cake cardstock. Sleigh stamped on Boho Blue cardstock. All Shadow accents using Stamping Blends Pecan Pie.
Second Panel.
Third panel – stamp directly on the Traditions of St. Nick DSP and add Adhesive Snowflakes to embellish!
Back Panel – Traditions of St. Nick DSP patterns coordinate perfectly for the Holidays

Card 3: Winter Branches

Front Panel – Colored with Watercolor Pencils using Real Red, Cherry Cobbler, Pecan Pie, Early Espresso, Cajun Craze, Crushed Curry, and Granny Apple Green. The plaid pattern is drawn with a Garden Green pencil over the Granny Apple Green color wash. The sleigh runners and tree branches have glitter- for added sparkle.
Second Panel

Back Panel without the note card

Card 4: Winter Slope

Front Panel – Colored using Stamping Blends. Glitter is added for sparkle.

Supply List & Measurements Used for this Project

  • STAMPS / DIES:
    • HORSE & SLEIGH BUNDLE (stamps & dies)
    • DECKLED RECTANGLES (for sentiments)
  • CARDSTOCK:
    • ONE HORSE OPEN SLEIGH 6″x6″ Specialty Designer Series Paper
    • BASIC WHITE CARD STOCK
    • BASIC BLACK CARD STOCK
    • REAL RED / CHERRY COBBLER
    • TRADITIONS OF ST. NICK 12″X12″ SPECIALTY DESIGNER SERIES PAPER
    • SILVER FOIL 12″X12″ SPECIALITY PAPER
  • INK:
    • MEMENTO BLACK (for coloring with Stampin’ Blends)
    • STAZON (for coloring with watercolor)
    • VersaMark to emboss with WHITE embossing powder
  • MISC:
    • Loose Gems
    • Watercolor Pencils: Real Red, Cherry Cobbler, Crushed Curry, Cajun Craze, Granny Apple Green, Garden Green, Pecan Pie, Early Espresso, Basic Black
    • Flesh Color: SU1000 (Stampin’ Blends)
    • Stampin’ Blends: Smokey Slate, Calypso Coral, Black, Real Red, Balmy Blue, Cherry Cobbler, Pecan Pie
  • NEVER ENDING CARD – FRONT PANEL:
    • Basic White – 6″ X 6″ (cut two)
      • Cut each to 3″ x 6″
      • Score along the 6″ edge: 1.5″ and 4.5″ DSP – 5″ x 3.75″
      • You should have 4 pieces measuring 3″ x 6″
      • Assemble according to AUTUMN LEAVES VIDEO with TEAR TAPE (link below)
        • https://youtu.be/bbiMwUVQWK8
    • DSP Pieces: (these are dimensions — choose the DSP Scene to match your own design and follow the video)
      • four cut 3.75″ x 1.25″ from DSP
      • two cut 2.75″ square DSP
  • SECOND PANEL (open):
    • two pieces cut 2.75″ from DSP
    • two pieces cut 2.75″ x 1.25″
    • four pieces cut 1.25″ square
  • THIRD PANEL:
    • cut four from DSP 1.25″ square for the corners
    • the two center panels are 1.25″ x 2.75″
  • BACK PANEL: two pieces 2.75″ square (Basic White for note is 2.5″ square)
    • four pieces cut 2.75″ x 1.25″ long
      • Coordinate with DSP and cardstock
  • Stampin’ TRIMMER / Scoring Tool
  • Multi-Purpose Glue (TOMBOW / Fine Tip Glue) / Tear Tape
  • Mini & Regular Dimensional(s)
  • Stampin’ Cut & Emboss Machine
  • Heat Gun

Video Tutorial


Featured Products & ON-LINE STORE:

Here are some of the featured products that are featured in the new catalog and available on my ONLINE store…so convenient — just click and it will ADD TO YOUR CART below:


More Ideas

Use all the winter holiday scenes to create traditional 5.5″ x 4.25″ cards!


Spread the love!

Autumn Leaves Meet the Never-Ending Card

Spread the love!

Once upon a time, there was a magical forest of Stampin’ Up! known for its vibrant display of colors during the fall season.

In the heart of the forest, stood a majestic oak tree. Its branches stretched out in all directions, adorned with leaves that shimmered in shades of Copper Clay, Moody Mauve, Mossy Meadow, and Pretty Peacock.

One crisp autumn morning, a group of paper crafters decided to explore the depths of the enchanted forest. They stumbled upon a hidden chest tucked beneath the roots of the oak tree. Curiosity getting the better of them, they opened it to discover a stack of personalized cards crafted with the ALL ABOUT AUTUMN Speciality Designer Series Paper (DSP). This 6″x 6″ paper pack was the perfect size for these personalized cards — the 6X6 Never Ending Card.

Intrigued, they opened the first card, revealing a breathtaking scene of trees bursting with fiery hues. As they turned the card panels over, they were surprised to find another panel awaiting their discovery. And so, they discovered the magic of the Never Ending Card, designed to tell a story that seemed to go on forever. Each panel showcased different snippets of autumn and captured the essence of the season.

The sentiments written on each panel were filled with warmth and gratitude, reminding them of the simple joys that autumn brings. Each card invokes the magic of autumn, the crisp air, and the gentle rustling of leaves. The All About Autumn Suite Collection transports you to the beauty and tranquility of the season. Create the Never Ending Card, and relish each new panel as it tells your story!

Don’t wait! Watch my video tutorial and create your own autumn magic with the Never Ending Card! Scroll through the gallery and explore all the design possibilities.

Shop the collection below! Happy crafting!


Card 1: Autumn Sunlight

Front Panel
Second Panel
Third Panel
Back Panel

Card 2: Autumn Lane

Front Panel
Second Panel.
Third panel.
Back Panel.

Card 3: Autumn Branches

Front Panel
Second Panel
Third Panel
Back Panel

Card 4: Autumn Harvest

Front Panel
Second Panel
Third Panel
Back Panel without the note card

Supply List & Measurements Used for this Project

  • STAMPS / DIES:
    • AUTUMN LEAVES BUNDLE (stamps & dies)
  • CARDSTOCK:
    • ALL ABOUT AUTUMN 6″x6″ Specialty Designer Series Paper
    • BASIC WHITE CARD STOCK
    • PRETTY PEACOCK
    • MOODY MAUVE
    • COPPER CLAY
    • MOSSY MEADOW
    • OXIDIZED COPPER 12″X12″ SPECIALTY DESIGNER SERIES PAPER
    • DISTRESSED GOLD 12″X12″ SPECIALITY PAPER
    • 2023-2025 IN COLOR 12″X12″ LUSTER SPECIALITY PAPER
    • TARTAN FOIL 12″X12″ SPECIALITY DESIGNER SERIES PAPER
    • VELLUM
  • INK:
    • COPPER CLAY
    • Pretty Peacock
    • VersaMark to emboss with COPPER embossing powder
  • MISC:
    • DISTRESSED TILE 3D EMBOSSING FOLDER
    • COPPER & & NATURAL RIBBON
    • ADHESIVE-BACKED SPECKLED DOTS
  • CARD FRONT PANEL:
    • Basic White – 6″ X 6″ (cut two)
      • Cut each to 3″ x 6″
      • Score along the 6″ edge: 1.5″ and 4.5″ DSP – 5″ x 3.75″
      • You should have 4 pieces measuring 3″ x 6″
      • Assemble according to VIDEO with TEAR TAPE
    • Pieces: (these are dimensions — choose the DSP Scene to match your own design and follow the video)
      • four cut 3.75″ x 1.25″ from DSP
      • two cut 2.75″ square DSP
  • SECOND PANEL (open):
    • four pieces cut 2.75″ from DSP (foil)
      • Two for the front and two will slip behind the front panel to share the third panel when opened
    • four pieces of cardstock (embossed with embossing folder) 1.25″ square
  • THIRD PANEL:
    • cut four from cardstock and emboss pieces 1.25″ square for the corners
    • the center panels were already cut (see previous step)
  • BACK PANEL: two pieces 2.75″ square (Basic White for note is 2.5″ square)
    • four pieces cut 2.75″ x 1.25″ long
      • Coordinate with DSP and cardstock
      • Alternate by flipping DSP to show foil side
  • Stampin’ TRIMMER / Scoring Tool
  • Multi-Purpose Glue (TOMBOW / Fine Tip Glue) / Tear Tape
  • Mini & Regular Dimensional(s)
  • Stampin’ Cut & Emboss Machine
  • Heat Gun

Video Tutorial


Featured Products & ON-LINE STORE:

Here are some of the featured products that are featured in the new catalog and available on my ONLINE store…so convenient — just click and it will ADD TO YOUR CART below:


Spread the love!

Simple Holiday Card featuring the HORSE & SLEIGH Bundle

Spread the love!

A great card for beginners!

This holiday spread joy and warmth with a simple yet enchanting holiday card featuring the Horse and Sleigh stamp set and dies. Embrace the timeless appeal of Currier and Ives as you create a scene that captures the essence of the holiday spirit.

Begin with the Horse and Sleigh stamp set and coordinating dies, along with the exquisite Designer Series Paper Traditions of St. Nick, and get ready to create magic.

Start by stamping the horse and sleigh image onto Cherry Cobbler cardstock using Versamark ink and embossing it with WHITE embossing powder. Consider adding elegance by embossing the image with metallic or glittery embossing powder. This will give your card a touch of shimmer that will surely delight the recipient.

Once the image is stamped and embossed, carefully die-cut it using the coordinating dies. The precision of the dies ensures clean and crisp edges, adding a professional touch to your card.

Now it’s time to create a picturesque scene reminiscent of Currier and Ives. Choose a beautiful sheet of Designer Series Paper from the Traditions of St. Nick collection. Look for patterns that evoke a sense of nostalgia and charm. Trim the paper to fit the front of your card, leaving a small border for a polished look.

Next, layer the horse and sleigh image on top of the Designer Series Paper, positioning it in a way that creates a visually pleasing composition. Adhere securely using your preferred adhesive, ensuring it stays in place.

To complete the card, consider adding some finishing touches. Add the sentiment stamped on Basic Black card stock. You can embellish the scene with a sprinkle of glitter, or perhaps attach a small holiday sentiment to convey your warm wishes. Be brave and experiment with different textures, such as ribbons or twine, to add even more depth and character to your creation.

Remember, this card is a timeless beauty that will capture the hearts of your loved ones. Share it with those who appreciate the magic of the holiday season, and watch as smiles light up their faces in delight.

Wishing you a joyful and creative holiday season!


Supply List & Measurements Used for this Project

  • STAMPS / DIES:
    • HORSE & SLEIGH BUNDLE
      -DECKLED RECTANGLES
  • CARDSTOCK:
    • CHERRY COBBLER (card base)
    • TRADITIONS OF ST. NICK 12″ X 12″ DSP
    • BASIC WHITE CARD STOCK
    • BASIC BLACK (for sentiment)
  • INK:
    • CHERRY COBBLER
    • VersaMark to emboss with WHITE embossing powder on CHERRY COBBLER card stock
  • MISC:
    • SIMPLY ELEGANT TRIM
  • CARD FRONT:
    • LAYER Basic White – 5.25″ x 4″
    • DSP – 5″ x 3.75″
  • Stampin’ TRIMMER
  • Multi-Purpose Glue (TOMBOW) / Tear Tape / Adhesive Sheets
  • Mini & Regular Dimensional(s)
  • Stampin’ Cut & Emboss Machine
  • Heat Gun

Video Tutorial


Featured Products & ON-LINE STORE:

Here are some of the featured products that are featured in the new catalog and available on my ONLINE store…so convenient — just click and it will ADD TO YOUR CART below:


Spread the love!

Spooky Crypt Robber Card featuring the Bag of Bones Bundle

Spread the love!

This card project features the BAG OF BONES Bundle, THEM BONES DSP, GLOW-IN-THE-DARK Specialty Paper, and some other exciting products that come together to create a whimsical visual storytelling experience. Get ready to embark on a Halloween-themed adventure as we dive into this creative project!

THEM BONES SUITE COLLECTION

Let’s start with the star of the show, the BAG OF BONES Bundle. This versatile bundle includes a unique collection of bone-themed stamps and coordinating dies. With these, you’ll be able to create endless possibilities for your spooky creations. Whether it’s skeletons, skulls, or other bone designs, you’ll have all the tools you need to bring your vision to life.

To add an extra touch of intrigue, we’ll incorporate the THEM BONES Designer Series Paper. This stunning paper is a Halloween lover’s dream, with its variety of spooky designs and patterns. From hauntingly beautiful skulls to eerie graveyard scenes, this paper provides the perfect background to complement and enhance our card fronts. The rich colors and intricate details will captivate anyone who receives your handcrafted masterpiece.

Now, let’s talk about the element that will truly elevate this project: the GLOW-IN-THE-DARK Specialty Paper. Can you imagine the excitement when your recipients see their cards glowing in the dark? This paper adds a magical touch to our Halloween-themed creation and takes it to a whole new level of spookiness. Whether it’s ghostly dog shapes or glowing skeletons, the possibilities are endless with this specialty paper.

Mummy Wrappings

But let’s not forget our “crypt robber” and their precious loot – the bones! We’ll create a skeleton mummy using Basic Black cardstock embossed with WHITE EMBOSSING Powder. The mummy’s loosely desheveled mummy wraps reveal the bones falling out! The mummy wrappings are made with the Idea-ology Mummy Cloth, adding an authentic touch to our spooky character. And to complete the look, we’ll use Distress GRIT-PASTE in “CRYPT” to provide a tinted, translucent surface with black flecks. This will create a textured effect around our “stone” crypt, making it look like it’s been standing for centuries.

Where to Get Products

If you’re itching to get your hands on these incredible products and start crafting right away, you’ll want to explore the December 2023 MINI CATALOG. Inside, you’ll find not only the items we’ve mentioned but also a treasure trove of other crafting supplies that will inspire your creativity throughout the year.

If you want a copy of the catalog or have any questions about the process, feel free to reach out to me. I’d be more than happy to assist you and provide you with all the information you need to bring your Halloween crafting dreams to life.

Remember, the secret to a successful project is to have fun and let your imagination run wild. So grab your supplies, put on your favorite spooky playlist, and get ready to create something truly enchanting!

Don’t forget to hit the “LIKE” button and leave a comment to let me know what you think! I’m excited to see your own unique twist on this delightful Halloween project. Happy crafting!

Happy crafting!

The crypt robber — the dog — is stamped with WHITE EMBOSSING POWDER on Basic Black Card Stock and holding a glow-in-the-dark bone.
Here the dog is stamped on Glow-in-the-Dark Specialty Paper with STAZON Ink.
Close-up detail of the “crypt robber”!
Don’t be afraid to let the mummy wrapping look disheveled — it adds to the whimsy of bone falling from the crypt to the dog’s benefit!
Close up detail of mummy with Googly Eyes.

Video Tutorial


Supply List & Measurements Used for this Project

  • BASE CARD: Basic Black Card Stock – 6″ x 10″ and scored at 5″ to create a 5″x 6″ card size
  • LAYERS:
    • Basic White Card Stock – cut TWO for 4.75″ x 5.75″ for a layer and one for inside sentiment
    • Them Bones DSP Card Front Layers cut 5.5″ x 4.25″
  • STAMP & DIE CUT:
    • Using the BAG OF BONES Bundle of DIES
      • Cut two Crypts in Smokey Slate card stock with with die
      • Use tombstone die to cut one of the crypts for an opening
        • Use Sponge Dauber to sponge edges with Smokey Slate & Basic Grey Inks
        • Sponge the inside background of the crypt with DISTRESS BLACK SOOT ink and then (using a blending brush) splatter with water for a cool effect.
      • Using DISTRESS GRIT PASTE in “Crypt” and with a palate knife gently add paste around the edges (refer to the video)
        • Use FOAM ADHESIVE STRIPS to assemble the crypt.
        • TIP: I used BLACK “SHARPIE” pen to color strips along the edge.
      • Stamp the Skeleton Dog with STAZON INK on the GLOW-IN-THE-DARK 6″ x 6″ SPECIALTY PAPER and cut with the coordinating die
      • Stamp the Mummy skeleton with VERSAMARK and emboss with WHITE EMBOSSING Powder on Basic Black cardstock and cut with dies
        • Follow the video to wrap the skeleton with IDEA-OLOGY Mummy Cloth in a 3.75″ strip, cut it in half, and color with SMOKEY SLATE STAMPN’ BLENDS markers to age the wrappings! Refer to the video.
      • Cut three fences with Basic Black CS and cut a BAT for the front of the crypt
      • Cut “bones” out of GLOW-IN-THE-DARK 6″ x 6″ cardstock
  • INKS:
    • Basic Grey
    • Memento Black Ink
  • EMBELLISH:
    • Use DECO ART “Galaxy Glitter” in CLEAR ICE COMET to paint clouds and moon
  • Stampin’ TRIMMER
  • Heat Tool
  • Multi-Purpose Glue (TOMBOW) / Fine Tip Glue
  • Glue Dots
  • Mini & Regular Dimensional(s)
  • Stampin’ Cut & Emboss Machine

Featured Products & ON-LINE STORE:

Here are some of the featured products available in the Annual Catalog and available on my ONLINE store…so convenient — just click and it will ADD TO YOUR CART below:


Spread the love!

Tricks & Treats Spinner & Wobble Card

Spread the love!

This card project is perfect for Halloween enthusiasts who love adding a touch of spookiness and interactive elements to their crafting. I’m featuring two exciting techniques: a Spinner and a Wobble Card. By combining the TRICKS & TREATS and BAG OF BONES Bundles, you can create eye-catching and memorable cards that are sure to impress.

I’ll be utilizing the CURVED LABEL PUNCH. This punch allows us to create tracks for our Frankenstein and Dracula spinners, making them glide and spin effortlessly across the card. It adds a whimsical and playful touch that will delight both kids and adults alike.

Now, let’s talk about the card fronts. One of the options we have is the THEM BONES Designer Series Paper which offers several patterns for the card fronts. With its variety of spooky designs, you can choose the perfect background to complement and enhance your Halloween-themed creation. You can also refer to my previous Frankenstein SHAKER CARD project and use the OLD WORLD PAPER 3D Embossing Folder.

For those who love a touch of magic, I have an exciting twist. You can choose between two fantastic materials to stamp your scary faces. The first option is to use Granny Apple Green, Starry Sky, and Highland Heather Inks, creating vibrant and eye-catching images that pop off the page–especially after adding your GOOGLY EYES!!! Alternatively, you can select the GLOW-IN-THE-DARK 6″x 6″ Specialty Paper to either stamp with STAZON ink or VERSAMARK and emboss with BLACK EMBOSSING POWDER. This adds an extra element of surprise and mystery, as your cards will glow in the dark, creating an eerie and captivating effect.

Want to create a foolproof spinner mechanism? I will demonstrate how to master the art of designing and building a reliable spinner mechanism for this project by using two acetate 1″ circles, foam circle “dots”, and a penny. Refer to my Video Tutorial for the step-by-step process!

To get your hands on these incredible products and start crafting right away, you’ll want to explore the December 2023 MINI CATALOG. Bursting with inspiration and innovative crafting supplies, this catalog is a valuable resource for crafters of all levels. From beginners to experienced card makers, everyone will find something exciting to try. Dive into its pages and prepare to be amazed by the endless possibilities that await you.

If you’re interested in obtaining a copy of the catalog, feel free to reach out to me. I’d be more than happy to provide you with one.

Don’t forget to hit the “LIKE” button and leave a comment to let me know what you think!

Happy crafting!

Use the Glow-in-the-Dark Specialty paper for Dracula’s spinner embossed with Black embossing powder, coordinate THEM BONES DSP, and embellish with Ghost & Bats..then….
…Light’s Out!
Stamp Frankie on Granny Apple Green Inks, use the THEM BONES DSP and Googly Eyes. Spinner track is cut with the CURVED LABEL PUNCH.
Dracula stamped with STARRY SKY ink. Ghost cut out of Glow-in-the-Dark Specialty Paper.
Glow-in-the-Dark BOO with 3D Old World Paper Embossed background on Smokey Slate.

Video Tutorial


Supply List & Measurements Used for this Project

  • BASE CARD: Basic Black Card Stock – 5.5″ x 4.25″ size
  • LAYERS:
    • Basic White Card Stock – cut TWO for 5.25″ x 4/25″ for lay and one for inside sentiment
    • Smokey Slate Card Stock – cut 5.25″ x 4″ (Refer to Shaker Card Video)
      • Emboss with an inked (see video) Old World Paper Embossing Folder to create a background
    • Them Bones DSP Layers cut 5″ x 3.75″
    • Cut spinner track with the CURVED LABEL PUNCH
  • STAMP & DIE CUT:
    • Using the BAG OF BONES Bundle
      • Cut Tombstone (Basic Grey) with die and stamp with VERSA MARK and heat emboss with WHITE Embossing Powder
        • Use Sponge Dauber to sponge edges with Smokey Slate Ink
      • Skeleton Cat is stamped with STAZON INK on the GLOW-IN-THE-DARK 6″ x 6″ SPECIALTY PAPER and cut with coordinating die
      • Cut fence with Basic Black CS
    • Using TRICKS & TREATS Bundle
      • Stamp Dracula with stamp with VERSA MARK and heat emboss with BLACK Embossing Powder and cut with coordinating die
      • Stamp Dracula with either Starry Sky or Highland Heather Ink and cut with coordinating die
      • Stamp Frankenstein with Granny Apple Green Ink and cut with coordinating die
    • SPINNER MECHANISM:
      • Cut TWO 1″ diameter circles from WINDOW SHEET (acetate)
      • 1 Penny (per spinner)
      • ROUND Foam Dots (approx. .75″ wide / 7 cm)
      • Glue Dots
  • EMBELLISH:
    • Glow-in-the-Dark Bats & Ghosts
  • Stampin’ TRIMMER
  • Heat Tool
  • Multi-Purpose Glue (TOMBOW)
  • Mini & Regular Dimensional(s)
  • Stampin’ Cut & Emboss Machine

Featured Products & ON-LINE STORE:

Here are some of the featured products available in the Annual Catalog and available on my ONLINE store…so convenient — just click and it will ADD TO YOUR CART below:


Spread the love!

Tricks & Treats Shaker Card

Spread the love!

This shaker card project brings to the forefront a sensational collection that will not only ignite your imagination but also add a touch of mystique to your creative endeavors. Introducing the mesmerizing TRICKS & TREATS and BAG OF BONES Bundles, two spellbinding assemblages that will bewitch both seasoned crafters and enthusiastic beginners alike.

But that’s not all! Complementing these hauntingly beautiful bundles is the remarkable THEM BONES Designer Series Paper. Immerse yourself in its intricate patterns and hauntingly specter-inspired motifs, created with meticulous attention to detail. From skeletal silhouettes to ornate houndstooth cats, this paper evokes an atmosphere of eerie elegance that will add a touch of allure to any project.

To further elevate your creations, give them a hauntingly realistic texture with the OLD WORLD PAPER 3D Embossing Folder. Watch in awe as your cardstock transforms, bringing to life an aged and weathered appearance reminiscent of ancient manuscripts and a perfect background.

For this creative shaker card project, you have the option to choose between two fantastic materials to stamp your Frankenstein: Granny Apple Green Card stock or the GLOW IN THE DARK 6″x 6″ Specialty Paper. Both choices yield charming outcomes, so it ultimately depends on the look and feel you want to achieve.

If you decide to go with Granny Apple Green Card stock, you can expect a vibrant and eye-catching base for your Frankenstein shaker card. The vibrant green color adds a playful and fun element to your design and pairs well with other Halloween-themed embellishments. The Frankenstein stamp and die will stand out beautifully against the green backdrop, allowing you to create a card that captures the spooky essence of Halloween.

On the other hand, if you opt for the GLOW IN THE DARK 6″x 6″ Specialty Paper, you’ll add an extra touch of magic and the WOW factor to your shaker card. Imagine the excitement when the lights go out, and your Frankenstein creation starts to glow! Stamp the images with STAZON INK and the glow-in-the-dark effect adds a unique and captivating element to your project, making it a real showstopper. Kids and adults alike will be delighted by the enchanting surprise when the lights dim. Add the GLOW-IN-THE-DARK BAT & GHOSTS as embellishments for added fun!

Whichever material you decide to use, the TRICKS & TREAT bundle provides you with a quality stamp and die set that ensures precise and detailed results. The Frankenstein design is iconic and instantly recognizable, making it a fantastic choice for Halloween-themed crafts.

You can find all these incredible products showcased in the December 2023 MINI CATALOG that is LIVE now. Bursting with inspiration and innovative crafting supplies, this catalog is a valuable resource for crafters of all levels. Dive into its pages and explore the endless possibilities that await you. Contact me if you need a catalog.

Don’t forget to hit the “LIKE” button and leave a comment to let me know what you think!

Happy crafting!

Use any coordinating shaker elements from your stash. I use the FOR EVERYTHING FANCY SEQUINS in green.
Lights out will reveal the glowing bats and skeleton dog!
Stamp Frankie on Glow-in-the-Dark paper and use the THEM BONES DSP to reveal a surprise in the dark! TIP: The adhesive strips don’t adhere as well on this paper — recommend gluing the strips down with TOMBOW.

Video Tutorial


Supply List & Measurements Used for this Project

  • BASE CARD: Basic Black Card Stock – 5.5″ x 4.25″ size
    • Layer with background
  • LAYERS:
    • Basic White Card Stock – cut 5.25″ x 4/25″ for inside sentiment
    • Granny Apple Green Card Stock – cut 3.5″ X 4″ for Shaker background
      • Stamp Frankenstein with Memento Black ink from the TRICKS & TREAT BUNDLE
    • Smokey Slate Card Stock – cut 5.25″ x 4″
      • Cut with Frankenstein DIE from the TRICKS & TREAT Die set before embossing
      • Emboss with an inked (see video) Old World Paper Embossing Folder to create a background
  • STAMP & DIE CUT:
    • Using the BAG OF BONES Bundle
      • Cut Tombstone (Basic White CS) with die and stamp with sentiment in Memento Black Ink
        • Use Sponge Dauber to sponge edges with Smokey Slate Ink
      • Skeleton Dog is stamped with STAZON INK on the GLOW-IN-THE-DARK 6″ x 6″ SPECIALTY PAPER cut with coordinating die
      • Cut fence with Basic Black CS
  • Stampin’ TRIMMER
  • Multi-Purpose Glue (TOMBOW)
  • Mini & Regular Dimensional(s)
  • Stampin’ Cut & Emboss Machine

Featured Products & ON-LINE STORE:

Here are some of the featured products available in the Annual Catalog and available on my ONLINE store…so convenient — just click and it will ADD TO YOUR CART below:


Spread the love!

CANDY CORN Tricks & Treats Card

Spread the love!

This exciting project highlights the captivating and bewitching TRICKS & TREATS and BAG OF BONES Bundles, THEM BONES Designer Series Paper, and the charming SKETCHED PLAID stamp sets. These delightful bundles, filled with an assortment of spooky and whimsical designs, are sure to add an enchanting touch to your creative projects.

Excitingly, you can find all these incredible products showcased in the highly anticipated December 2023 MINI CATALOG that goes LIVE on 6 September. Bursting with inspiration and innovative crafting supplies, this catalog is a valuable resource for crafters of all levels. Dive into its pages and explore the endless possibilities that await you. Contact me if you need a catalog.

For added depth and texture, you have the option to choose either the timeless BASICS 3D EMBOSSING FOLDER (DOTS) or the intricate DOTS & SPOTS die as a background element. Both are available now on my ONLINE store (links below). The embossing folder is perfect for adding a subtle dotted pattern to your paper, while the die set allows you to overlay an eye-catching arrangement of dots and spots.

With these captivating bundles, gorgeous stamp sets, and versatile background options, your creative endeavors are bound to flourish. So, don’t wait any longer – embrace the magic of this project and let your creativity run wild!

I discovered a fun and creative way to add some extra charm to my candy corn card. Instead of simply arranging them in a traditional manner, I decided to take them up a notch by stacking and embellishing them with “Googly Eyes.” The result was absolutely delightful!

To achieve this quirky look, I carefully selected my candy corn pieces and started by stacking them one on top of the other, creating a visually appealing tower of sugary goodness. Then, using FINE TIP GLUE, I attached small “Googly Eyes” to each candy corn. These wiggly eyes added a touch of whimsy and brought my candy corn creations to life!

I must admit, that the process was both enjoyable and satisfying. The combination of vibrant candy corn and playful eyes is sure to bring a smile to anyone’s face. Whether you’re hosting a Halloween party, decorating your home, or simply looking for a fun craft activity, this candy corn idea is something you should definitely try!

By the way, if you’d like to see a step-by-step tutorial on how I created these adorable candy corn with “Googly Eyes,” you can check out my latest video on my YouTube channel. It’s packed with helpful tips and tricks to make your own candy corn card. And, if you’re interested in purchasing the materials I used, they’re conveniently available for sale on my online store.

Thanks for taking the time to read about my candy corn adventures. I hope this idea inspires you to get creative and explore new ways to add a touch of whimsy to your own holiday decorations. If you have any questions or need further assistance, feel free to reach out.

Don’t forget to hit the “LIKE” button and leave a comment to let me know what you think!

Happy crafting!

Used PEARLIZED ENAMEL EFFECTS Basics in BLACK as an embellishment.
Two Ink stamping techniques using Pumpkin Pie and Mememto Black Ink.
Side-long view shows the texture from the 3D Embossing folder. I used clear glitter as embellishment.
Simple Candy Corn is just as striking! I shaped and lightly sponged the edges with Pumpkin Pie and Daff. Delight.
As shown in the video…I used CLEAR ICE COMET Acrylic paint to add some sugary goodness!

Video Tutorial


Supply List & Measurements Used for this Project

  • BASE CARD: Basic Black Card Stock – 5.5″ x 4.25″ size
    • Layer with background
      • Basic White cut 5.25″ x 4″ using either:
        • Die cut with the DOTS & SPOTS die
        • Emboss with a dot pattern from the BASICS ED EMBOSSING FOLDERS
  • LAYERS:
    • Cut houndstooth black & white pattern from the THEM BONES 12″ X 12″ DSP Cut – 4.75″ X 1.5″ (basically in half)
    • Cut a piece of GREY GRANITE at least 5.25″ x 4″
      • Stamp using Memento Black Ink stamp using the SKETCHED PLAID background stamp
      • Cut to 4.5″ x 2.25″
    • Layer both pieces using TOMBOW Glue
  • CANDY CORN:
    • Basic White
    • Daffodil Delight
    • Pumpkin Pie
    • Use a shaping tool to gently shape the cardstock (if you press too hard you with create creases)
    • Assemble and add Googly Eyes if desired
  • Stampin’ TRIMMER
  • Multi-Purpose Glue (TOMBOW)
  • Mini & Regular Dimensional(s)
  • Stampin’ Cut & Emboss Machine

Featured Products & ON-LINE STORE:

Here are some of the featured products available in the Annual Catalog and available on my ONLINE store…so convenient — just click and it will ADD TO YOUR CART below:


Spread the love!

Create a Shadow Box Frame Shops Scene Card using the Les Shoppes Collection

Spread the love!

Here is another project that builds on previous shadow box projects — this project features the LET’S GO SHOPPING & TRUCKING ALONG BUNDLES and demonstrates how this set of 18 dies, truck punch, and stamps creates a variety of storefronts for this shadow box project.

Additionally, the new September – December 2023 MINI CATALOG will feature a coordinating stamp set — SHOP THE TOWN that has Christmas magic in the air!

My video tutorial features all the steps for building the card in four parts: (1) Cut and color town store fronts, (2) Cut and assemble the Box Frame and adhere background, (3) Assemble the town inside the box frame, (4) build stand and stamp sentiment.

Refer to a previous tutorial for the technical aspects of building the shadow box frame if you missed them.

And, once you watch my tutorial the products are available on my ONLINE store.

Thanks for stopping by…and as always…. please hit LIKE and leave a comment!!

Shop Fronts created by the LET’S GO SHOPPING bundle are perfect for this 6″ x 8″ Shadow Box Frame card. The key color theme is Smokey Slate, Balmy Blue, Calypso Coral, Daffodil Delight, Pool Party, and Granny Apple Green. The foilage is cut out of Mossy Meadow and Granny Apple Green cardstock.
Side-long view shows 3D depth.
Plenty of room for a sentiment (using the DECKLED RECTANGLES frame lits) accented with a background using the DSP LES SHOPPES 12×12 paper pack.

Video Tutorial


Supply List & Measurements Used for this Project

  • BASE CARD: Basic White Card Stock – THICK (6″x 8″)
    • Layer with backgrounds
      • Cut SKY – 3″ x 6 5/8″ (using the BLUE pattern from the FRESH AS A DAISY DSP
      • Cut GROUND from LES SHOPPES DSP using the cobblestone pattern – 2″ x 6 5/8″
  • FRAME:
    • Cut two at 3.5″ x 8″
      • Score: .5″, 1.5″, 2″, 3″
    • Cut two at 3.5″ x 6″
      • Score: .5″, 1.5″, 2″, 3″
      • Turn along the 3.5″ side and score to the second Score Line: at .5″, 3″
      • Follow video tutorials (posted previously) — this creates the notches that will form perfectly mitered corners.
  • MECHANISMs for propping up Storefront:
    • Cut from Basic White 3.5″ x 5″
    • Score: .5″, 1.5″, 2″ and 3″
    • Trim to the desired thickness
  • Back Stand & Panel:
    • 9.5″ x 8″
      • Score along the 9.5″ side at 3″, 6″, 7.5″, 9″
    • The placard is cut 7.75″ x 2.75″ in Balmy Blue and then layered with Basic White at 6.5 x 2.5″ and stamped with sentiment.
    • Deckled Rectangles used to cut out sentiment
  • SIDES (OPTIONAL): Cut from any coordinating DSP from your stash for sides of frames:
    • 2 @ 7.75″ x .75″ (sides)
    • 2 @ 5.75″ x .75″ (top/bottom)
  • Stamp Store Fronts with MEMENTO BLACK ink (careful that when using VERSAMARK the ink could bleed) otherwise use STAZON Black ink.
  • COLORING:
    • Smokey Slate (SB)
    • Balmy Blue (SB, Ink)
    • Calypso Coral (SB, Ink)
    • Daffodil Delight (SB)
    • Pool Party (SB)
    • Granny Apple Green (SB / Cardstock)
    • Mossy Meadow (Cardstock)
  • Clear Emboss the windows: Versamark / Clear Embossing Powder
  • Stampin’ TRIMMER
  • Multi-Purpose Glue (TOMBOW) / Tear Tape
  • Mini & Regular Dimensional(s)
  • Stampin’ Cut & Emboss Machine
  • Heat Tool

Featured Products & ON-LINE STORE:

Here are some of the featured products that are featured in the new catalog and available on my ONLINE store…so convenient — just click and it will ADD TO YOUR CART below:


Spread the love!

Bridge Fold Card using the REACH FOR THE STARS Bundle

Spread the love!

A great card for all ages!

Additionally, as a FANCY FOLDS project — this is an all-occasion card that folds flat and fits in a 5″ x 7″ envelope. It showcases the stunning beauty of the REACH FOR THE STARS Bundle and products from the STARGAZING Suite Collection including the HOLOGRAPHIC TRIO SPECIALITY PAPER.

The combination of these artistic elements adds depth and dimension to the card, creating a truly eye-catching and delightful design. The intricate details of the dies, coupled with the texture of the STARGAZING DSP make this card a true masterpiece!

Add WOBBLES and it becomes not only FUN but entertaining!

Whether it’s for a birthday, anniversary, or just to brighten someone’s day, this card is sure to bring joy and appreciation to the recipient.

My video tutorials feature all the steps for coloring the elements and building the card. a

All products are available on my ONLINE store.

Thanks for stopping by…and as always…. please hit LIKE and leave a comment!!

Take a Spacewalk among the stars with Holographic Paper accents.
A back-view of this card where more exciting elements and sentiments can be added to suit the occasion.
Swap the elements for another view.

Video Tutorial


Supply List & Measurements Used for this Project

  • STAMPS / DIES:
    • REACH FOR THE STARS BUNDLE
      -DECKLED RECTANGLES
  • CARDSTOCK:
    • Basic White (card base)
    • STARGAZING DSP
    • HOLOGRAPHIC TRIO Speciality Paper
  • INK:
    • Night Of Navy
    • VersaMark to emboss with SILVER & CLEAR embossing powder
  • MISC:
    • SIMPLY ELEGANT TRIM
  • Basic White (card base)
    • 7″ X 7″ square
      SCORE:
      • 1″, 6″
      • FLIP and score: 2″ x 5″
  • BRIDGE:
    • 5″ x 1″ (Basic White)
    • DSP Layer @ 5″ x 7/8″
  • FRONT / BACK PANEL:
    • 2 7/8″ x 6 7/8″ Holographic Paper
    • 2 3/4″ x 6 3/4″ DSP Layer
  • SIDES:
    • Cut four @ 7/8″ x 6 7/8″ Holographic Paper
    • Cut four @ 3/4″ x 6 3/4″ DSP Layer
  • Stampin’ TRIMMER
  • Multi-Purpose Glue (TOMBOW) / Tear Tape / Adhesive Sheets
  • Mini & Regular Dimensional(s)
  • Stampin’ Cut & Emboss Machine
  • Heat Gun

Featured Products & ON-LINE STORE:

Here are some of the featured products that are featured in the new catalog and available on my ONLINE store…so convenient — just click and it will ADD TO YOUR CART below:


Spread the love!

3D Pillar Card using the PAPER FLORIST Dies

Spread the love!

Another project of opportunity featuring the PAPER FLORIST DIES...proving again how this set of 14 dies is not only beautiful but versatile!

Additionally, as a FANCY FOLDS project — this is another all-occasion feminine card and features the WANTED TO SAY, CHEERFUL DAISIES dies, and the PAINTED POSIES 3D embossing folder for the background.

My video tutorials feature all the steps for building the card as well as building the larger blooms. Refer to my previous tutorials for more information on building the various shadow box frames if you missed them.

All products are available on my ONLINE store.

Thanks for stopping by…and as always…. please hit LIKE and leave a comment!!

Bold large florals created by the PAPER FLORIST Dies are perfect for this 6″ x 6″ 3D Pillar card. Note the subtle embossed background. The key color theme for the floral arrangement is Moody Mauve, Boho Blue, Lemon Lolly, Blackberry Bliss, So Saffron with Mossy Meadow, and Holographic Paper accents.
A side-long view of this Thank You card using the WANTED TO SAY Dies and WINDOW SHEET front panel.
This design features a back STAND (Back Panel covered with 3D Embossed BW Cardstock) and an inside placard…to stamp an additional sentiment and pen a personal note.
Inside view…Basic White layered with some coordinating DSP.

Happy Birthday Card — using the Wanted to Say dies.

Using the LOVE FOR YOU dies — this is a sympathy card I made for a friend.

PAPER FLORIST 14 versatile and dynamic Dies

All fourteen of the Paper Florist Dies
IF YOU MISSED IT — Refer to my previous Video Tutorials that feature a review of all 14 PAPER FLORIST Dies with ideas and tips for creating your floral experience!
BE BOLD and GO BIG PAPER FLORIST Dies not only creates dainty blooms but can create large bold blooms as featured in this project. Definitely, a product that proves its value and versatility! BUY NOW ON MY ONLINE STORE!

Video Tutorial


Past Video Tutorial


Supply List & Measurements Used for this Project

  • Please refer to my VIDEO “Do This to Create Fantastic Florals” for directions, tips and color combinations for die cutting and assembly.
  • COLOR COMBINATION FEATURED FOR FLORALS:
    • Moody Mauve, BoHo Blue, Lemon Lolly, Blackberry Bliss, Basic Black (flower centers), Mossy Meadow, and the HOLOGRAPHIC TRIO SPECIALTY PAPER.
  • DIES:
    • PAPER FLORIST DIES
    • WANTED TO SAY DIES
    • CHEERFUL DAISIES DIES
    • LOVE FOR YOU DIES
  • GOOD FEELINGS Stamp Set
  • BASE CARD: Basic White Card Stock (6″x 12″ — score at 6″)
    • Layers: 2 pieces cut 6″ x 6″
    • Emboss both using the 3D PAINTED POISES Embossing Folder
      • INSIDE FRONT PANEL: cut after embossing 4″ x 5 7/8″
      • Apply to the inside after the 3D Pillars have been added
      • BACK PANEL: apply to the back of the card FLAP.
  • 3D PILLARS:
    • Cut two at 4.5″ x 6″
      • Score: along the 4.5″ side:
        • 1″, 2″, 3″, 4″
    • Turn the 6″ side SEAM facing outward when gluing to the CARD BASE. This hides the seam when looking at the top of the card.
    • Follow video tutorials for assembly steps.
      • Adhere Pillars
      • Paste Embossed Back Panel
      • Arrange flowers
      • Adhere Acetate front panel
  • ACETATE Front Panel: 5 7/8″ x 5 7/8″ square
    • Clean the back surface with Alcohol Wipes to remove any smudges before gluing with TEAR TAPE to the 3D Pillar front.
  • 3D PILLAR Layers:
    • Need TWO pieces – BLACKBERRY BLISS card stock cut @ 7/8″ x 5 7/8″
    • Need TWO pieces – BASIC WHITE card stock:
      • As I demonstrate in my video — I use a piece about 4″ x 6″ that has been embossed in advance.
      • Then cut both down to .75″ x 5.75″
  • Inside BACK PANEL:
    • DSP accent is cut 5.75″ x 5.75″ and layered with BASIC WHITE 5.5″ x 5.5″ and stamped with an additional sentiment from the GOOD FEELINGS stamp set.
  • Embellish flower centers with Iridescent Rhinestone Gems
    • Recommend a spot of FINE TIP GLUE just to ensure the gems are securely fastened. I have found they may POP OFF.
  • Stampin’ TRIMMER
  • Multi-Purpose Glue (TOMBOW) / Tear Tape
  • Mini & Regular Dimensional(s)
  • Stampin’ Cut & Emboss Machine

Featured Products & ON-LINE STORE:

Here are some of the featured products that are featured in the new catalog and available on my ONLINE store…so convenient — just click and it will ADD TO YOUR CART below:


OTHER PRODUCTS (ON AMAZON)


Spread the love!

Create a Large Shadow Box Frame Card using the PAPER FLORIST Dies

Spread the love!

Here is another project that builds on the previous shadow box projects posted — this project features the LARGER blooms from the PAPER FLORIST DIES...and demonstrates how this set of 14 dies is not only beautiful but versatile — it can create both large and small blooms for this shadow box project.

Additionally, as a FANCY FOLDS project — this is a great all-occasion feminine card. It features some great STAMPIN’ UP! products — PAPER FLORIST, WANTED TO SAY, CHEERFUL DAISIES dies, and a 3D embossing folder for the background.

My video tutorial features all the steps for building the card as well as building the larger blooms. Refer to the previous tutorial for the technical aspects of building the shadow box frame if you missed them.

And, once you watch my tutorial the products are available on my ONLINE store.

Thanks for stopping by…and as always…. please hit LIKE and leave a comment! !

Bold large florals created by the PAPER FLORIST Dies are perfect for this 6″ x 8″ Shadow Box Frame card. Note the subtle embossed background. The key color theme for the floral arrangement is Moody Mauve, Boho Blue, Lemon Lolly, Blackberry Bliss, So Saffron with Mossy Meadow, Garden Green and Holographic Paper accents.
A side-long view that features the side DSP accesnts and the shadow box STAND to allow the Shadow Box to stand up independently.
Mood Mauve is the accent color here for the back STAND that creates a nice placard…the Moody Mauve is layered with Basic White for you to stamp an additional sentiment and pen a personal note.
Another VERSION of this project without the shelf/divider that leaves plenty of space for more flowers using the same color theme.

Paper Florist 14 versatile and dynamic Dies

All fourteen of the Paper Florist Dies
IF YOU MISSED IT — Refer to my previous Video Tutorial that features a review of all 14 PAPER FLORIST Dies with ideas and tips for creating your floral experience!
BE BOLD and GO BIG — PAPER FLORIST Dies not only creates dainty blooms but can create large bold blooms as featured in this project. Definitely a products that proves their value and versatility! BUY NOW ON MY ONLINE STORE!

Video Tutorial


Past Video Tutorial


Supply List & Measurements Used for this Project

  • BASE CARD: Basic White Card Stock (6″x 8″)
    • Layer with an embossed background cut at 4.75″ x 6.75″
    • Emboss using the 3D Embossing Folder– I used the retired PARISAIN FLOURISH folder but recomment the QUATREFOIL TILE (158655) available in the AC.
  • FRAME:
    • Cut two at 3.5″ x 8″
      • Score: .5″, 1.5″, 2″, 3″
    • Cut two at 3.5″ x 6″
      • Score: .5″, 1.5″, 2″, 3″
      • Turn along the 3.5″ side and score to the second Score Line : at .5″ , 3″
      • Follow video tutorials (posted previously) — this creates the notches that will form perfectly mitered corners.
  • SHELF/DIVIDER:
    • Cut from Basic White 3.5″ x 5″
    • Score: .5″, 1.5″, 2″ and 3″
  • Back Stand & Panel:
    • 9.5″ x 6″
      • Score along the 9.5″ side at: 3″, 6″, 7.5″, 9″
    • Placard is cut 5.75″ x 2.75″ in Mood Mauve and then layered with Basic White at 5.5″ x2.5″ and stamp with additional sentiment.
  • SIDES: Cut from any coordinating DSP from your stash for sides of frames:
    • 2 @ 7.75″ x .75″ (sides)
    • 2 @ 5.75″ x .75″ (top/bottom)
  • Embellish with Irridescent Rhinestone Gems
  • Stampin’ TRIMMER
  • Multi-Purpose Glue (TOMBOW) / Tear Tape
  • Mini & Regular Dimensional(s)
  • Stampin’ Cut & Emboss Machine

Featured Products & ON-LINE STORE:

Here are some of the featured products that are featured in the new catalog and available on my ONLINE store…so convenient — just click and it will ADD TO YOUR CART below:


OTHER PRODUCTS (ON AMAZON)


Spread the love!

Shadow Box Frame Card featuring the PAPER FLORIST Dies

Spread the love!

Here is another project that builds on the previous shadow box projects posted — this project highlights a floral theme and is perfect for both beginner and avid stampers.

I really have fallen in love with the PAPER FLORIST DIES...and will demonstrate how this set of 14 dies is not only beautiful but versatile — it can create both large and small blooms for lots of project applications!

Additionally, as a FANCY FOLDS project — this is a great all-occasion feminine card. It features some great STAMPIN’ UP! products — PAPER FLORIST, WANTED TO SAY, CHEERFUL DAISIES dies, and the PAINTED POSIES 3D embossing folder.

Most importantly, my video tutorial will not only walk you through all the steps for building the card — but I also feature a portion dedicated to exploring some ideas on what the PAPER FLORIST dies can create. As a BONUS, I present my “formula” for how to arrange blooms, suggest color combinations and provide TIPS on both spacing and balancing your floral composition.

Refer to the previous tutorial for the technical aspects of building the shadow box frame if you missed them.

And, once you watch my tutorial the products are available on my ONLINE store.

Thanks for stopping by…and as always…. please hit LIKE and leave a comment! !

Paper Florist Dies
Dainty florals created by the PAPER FLORIST Dies are perfect for this 5″ x 5.5″ Shadow Box Frame card. The key color theme is Blackberry Bliss, Boho Blue, Lemon Lolly and Basic White with Mossy Meadow and Holographic Paper accents.
Paper Florist Dies
Fresh Freesia is the accent color here…still using Boho Blue and Lemon Lolly as your “neutrals” to create this arrangement. Note the Iridescent Rhinestone Basic Jewel centers! Lots of sparkle & glimmer!
Side view of project using the Paper Florist Dies
A side-long view that features the PAINTED POSIES 3D Embossed background and Iridescent Rhinestones.
Another card using BOHO BLUE as the accent color with Blackberry Bliss and Lemon Lolly.

Paper Florist — 14 versatile and dynamic Dies

All fourteen of the Paper Florist Dies
My Video Tutorial features a review of all 14 PAPER FLORIST Dies with ideas and tips for creating your floral experience!
BE BOLD and GO BIG — PAPER FLORIST Dies not only create dainty blooms as featured in this project; but can create large blooms for all kinds of projects. Definitely a products that proves their value and versatility! BUY NOW ON MY ONLINE STORE!

Video Tutorial


Supply List & Measurements Used for this Project

  • BASE CARD: Basic White Card Stock (10″ x 5.5″)
    • Score at 5″ along the 10″ edge
    • Layer with FRESH FREESIA cut at 4.75″ x 5.25″
  • FRAME:
    • Cut two at 2.5″ x 4.5″
      • Score: .5″, 1″, 1.5″, 2″
    • Cut two at 2.5″ x 4″
      • Score: .5″, 1″, 1.5″, 2″
      • Turn along the 3.5″ side and score to the first Score Line : at .5″ , 3″
      • Follow video tutorials (posted previously) to create notches that will form perfectly mitered corners.
  • Back Panel:
    • 4″ x 4.5″
    • Emboss using the 3D PAINTED POSIES Embossing Folder
  • Stampin’ TRIMMER
  • Multi-Purpose Glue (TOMBOW) / Tear Tape
  • Mini & Regular Dimensional(s)
  • Stampin’ Cut & Emboss Machine

Featured Products & ON-LINE STORE:

Here are some of the featured products that are featured in the new catalog and available on my ONLINE store…so convenient — just click and it will ADD TO YOUR CART below:


OTHER PRODUCTS (ON AMAZON)


Spread the love!

Shadow Box Frame Card with Florals

Spread the love!

This is another project that is builds on the previous alternative PP project posted earlier and is perfect for both beginner and avid stampers.

As a FANCY FOLDS project — this is a great all-occasion feminine card. It requires no dies and can be tailored to use other products. There is a video tutorial to walk you through all the steps for building the flowers. Refer to the previous tutorial for building the shadow box frame. Please hit LIKE and leave a comment! !

Once you watch my tutorial the products are available on my ONLINE store (link below). Thanks for stopping by…leave a comment!

Close up view of the Shadow Box Frame.

Video Tutorial


Supplies Used for this Project

  • BASE CARD: Basic White Card Stock
    • Card Stock cut 10′ x 7″
    • Layer with BOHO BLUE cut at 4.75″ x 6.75″
      • Emboss using the 3D TIME WORN TYPE Embossing Folder
  • FRAME:
    • Cut two at 2.5″ x 5.5″
      • Score: .5″, 1″, 1.5″, 2″
    • Cut two at 2.5″ x 3.5″
      • Score: .5″, 1″, 1.5″, 2″
      • Turn along the 3.5″ side and score to the first Score Line : at .5″ , 3″
  • Back Panel:
    • 3.5″ 5.5″ 3.25″ x 7.75″
    • Front Panel: 3.25″ square
  • Stampin’ TRIMMER
  • Multi-Purpose Glue (TOMBOW) / Tear Tape
  • Mini & Regular Dimensional(s)
  • Stampin’ Cut & Emboss Machine

Featured Products

Here are some of the featured products that are featured in the new catalog and available on my ONLINE store…just click the link below:


OTHER PRODUCTS (ON AMAZON)


Spread the love!

Shadow Box Frame Card

Spread the love!

This alternative PP project features the May Paper Pumpkin Kit “Exploring IN COLOR” and the 3D Embossing folder and is perfect for both beginner and avid stampers.

As a FANCY FOLDS project — this is a great all-occasion masculine card. It requires no dies and can be tailored to use other products. There is a video tutorial to walk you through all the steps! Enjoy!

This card was inspired by Sam Calcott, Mixed Up Crafts UK.

Once you watch my tutorial the products are available on my ONLINE store (link below). Thanks for stopping by…leave a comment!

Three-quarter view of the final card showing the Shadow Box Frame.

Featured Projects Using PP Products

Card blanks from PP that is used for Shadow Box Background.

Video Tutorial


Supplies Used for this Project

  • BASE CARD: Basic White Card Stock
    • Card Stock cut 10′ x 7″
    • Layer with COPPER CLAY cut at 4.75″ x 6.75″
      • Emboss using the 3D Embossing Folder
  • FRAME:
    • Cut two at 2.5″ x 5.5″
      • Score: .5″, 1″, 1.5″, 2″
    • Cut two at 2.5″ x 3.5″
      • Score: .5″, 1″, 1.5″, 2″
      • Turn along the 3.5″ side and score to the first Score Line : at .5″ , 3″
  • Back Panel:
    • 3.5″ 5.5″ 3.25″ x 7.75″
    • Front Panel: 3.25″ square
  • Stampin’ TRIMMER
  • All Purpose Glue (TOMBOW) / Tear Tape
  • Mini & Regular Dimensional(s)
  • Stampin’ Cut & Emboss Machine

Featured Products

Here are some of the featured products that are featured in the new catalog and available on my ONLINE store…just click the link below:


Spread the love!