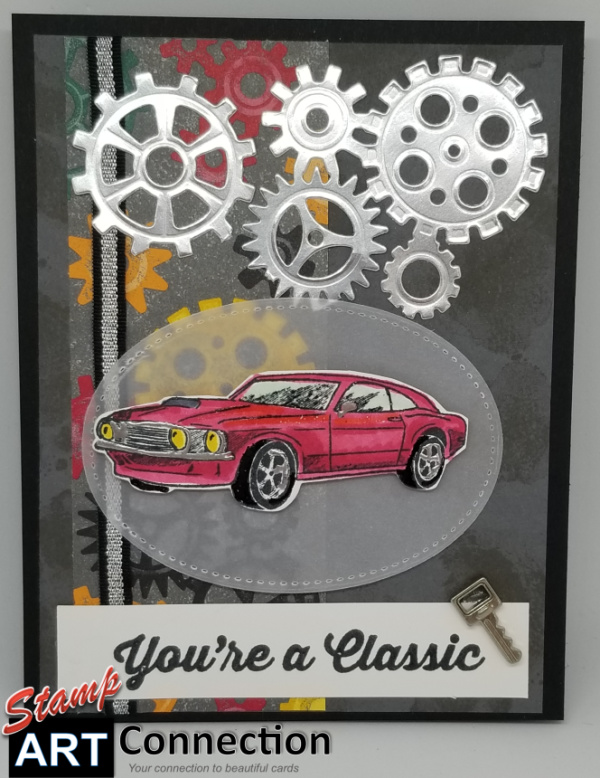
Fast and easy baby card using the simple stamping technique!
#simplestamping is all about INK to PAPER to fabulous! I was inspired by page 10 of the Occassions Catalog’s FIRST STEPS stamp set. But I wanted to create a project that could be accomplished by a beginner using the simple stamping precepts…INK, PAPER, STAMP.
Focused on simplicity, this project offers the best of both worlds!
First Steps Baby Card
Products Featured:
STAMP SETS:
FIRST STEPS
MEANT TO BE
SWIRLY FRAMES
CARD STOCK:
Whisper White (5.5″ X 4.25″)
Stamping piece (5″ X 3.73″)
INK:
Memento Black
Balmy Blue
Paper Snips, Dimensionals and Snail Adhesive
Video Tutorial:
Card Inspiration:
If you want to take this project to the next level; page 51 of the Occasions Catalog inspires the next step for the avid stamper!
Products featured:
First Steps Stamp Set
Gingham Gala 6×6 Designer Series Paper in BALMY BLUE
Floral Romance DSP
Recommend “Whisper White” 5/8″ Flax Ribbon or the Petal Pink Variegated Ribbon
Available 1 March a special offering of coordinating Framelits to add more versatility to select Sale-A-bration items!
Coordinating Products
Rather than just offer additional products…SU is offering limited-time products to coordinate perfectly with select Sale-A-Bration products which are available to purchase on 1 March!
Scroll to view some of the projects created using the Sale-A-bration stamp sets and the coordinating products….
If you are a pet lover or have friends and family with pets; you are going to love two stamps set from the new Occasions catalog that touch the heart!…. NINE LIVES and HAPPY TAILS.
What I love about these sets are the sentiments (keep calm and wag on!) that capture the love and joy of true friendship. But it doesn’t end there! Add the Sitting Pretty bundle of products and you have even more options to create fun and easy cards for all occasions; Friendship, Missing You, the loss of a pet, gift tags, and love.
One of my favorite things is to peruse the new catalog and try to figure out how some of the cards and projects were created. My downline, Kathryn M. and I will get on the phone and chat about how we think the card was assembled, what stamp sets, embellishments and details were used. When I hang up the phone, I’m totally inspired to sit down and try my hand at recreating a Stampin’ Up! masterpiece!
The next couple of cards featured are exactly that! Look at page 10 of the 2019 Occasion’s Catalog and see where I recreated two of my favorite cards using the Floral Romance Suite.
Scroll further and I will provide you all the products featured as well as a Video Tutorial for how to recreate these lovely cards! You will find them perfect for weddings, birthdays, sympathy, anniversaries and more. You will just fall in love with these products.
Make this purchase AFFORDABLE
When you are ready to purchase; take a few minutes to check out the “Ultimate Bundle”! For $99 you can get $175 worth of products without obligation if you sign up with me!
Petal Pink Confection
Products Featured:
Petal Pink Card Stock (base card) cut at 5.5″ x 4.25″
Products from the ALL MY LOVE suite are all hearts and flowers with this love-themed grouping! Coordinating ALL MY LOVE Ribbon (a combo pack) with Lovely Lipstick 1/2″ ribbon stitched with white thread is perfect. Add Red Rhinestones (from your Christmas stash) and you are DONE! Send to friends and family and share a little love!
A Pillow Box for LOVELY Goodies!
I couldn’t resist creating this great project which is featured in the Sale-a-bration Brochure. Products featured are the
My New Year Card creation featured some YEAR OF CHEER (retired) DSP using the Silver Foil Edged cards and envelops!
I found myself too late to send out Christmas cards so I opted to send out New Year greetings to all my friends and family. They were easy to make and it was less stress since they would surely arrive before the new year. What made it even easier were the Gold and Silver card and envelop bundle — something every crafter should keep on hand — all I had to do was add some pretty DSP, coordinating GOLD embossing and thread!
I used the HOSTESS SET “Seasons of Whimsy” (retired) for the sentiment; but would recommend the TIMELESS TIDINGS set which is available until midnight 2 January.
Take the “SO SANTA” Clear mount stamp set and add some tropical colors to create a fun and witty Christmas card!
Begin with the TROPICAL ESCAPE 6″x6″ Designer Series Paper featured GRANNY APPLE GREEN, SHADED SPRUCE and add some LEMON LIME TWIST cardstock and ribbon.
PRODUCTS FEATURED:
Have you ever wondered what Santa is doing in his spare time? Well, here are some snapshots! Happy crafting! Our clear-mount stamps * Are made of the same premium rubber as our wood-mount stamps. * Have deeply etched images so you get a superior stamped impression each time. * Are precut so you don’t have to trim. * Are repositionable; temporarily mount them on clear blocks for stamping, then remove them for storage. * Save space—you need only one set of blocks for all your clear-mount stamps (blocks sold separately). * Come packaged in cases with images on the spine for easy storage and quick reference. Quantity: 10 rubber stamps Suggested clear blocks (sold separately): a, c, d, g
Whatever your inspiration (Jungle Book, your best vacation ever), the projects you create with this set will be eye-catching!
CARDSTOCK, INKS and MARKERS:
–SHADED SPRUCE (base card) and INK
— LEMON LIME TWIST (layering) and INK
— WHISPER WHITE (layering)
— BERMUDA BAY (base card)
— Memento Black Ink (Santa figure)
— Stampin’ Blends Alcohol Based Markers (see color chart below)
Introducing the SNOW IS GLISTENING, HAPPINESS SURROUNDS and the SNOWFALL THINLITS Dies…Let it snow! Or at least, create a snowy wonderland using this incredible assortment of products. With two stamp sets, paper, accessories, and dies, the only limit is your creativity!
I really fell in love with the Christmas tree…so classic!
Products available while supplies last until November 30, 2018. This means products will only be available until November 30 or while supplies last, whichever comes first. If a product’s supply is depleted before November 30, it will no longer be available for purchase.
Here are some samples:
More Ideas:
There are so many possibilities! This set allows for Holiday and everyday stamping which is a real VALUE!
This may be one of the most underestimated bundles offered in the Holiday Catalog. It is very simple at first glance but the hidden bonus is that it coordinates with the Painted Glass Bundle from the Annual Catalog. When I first saw this set, I couldn’t help but imagine in my mind’s eye, a great cathedral rose window of brilliant glass as the background with beams of golden light streaming down. Since the Graceful Glass vellum was offered as part of this suite — I couldn’t resist putting together what I think is a classic Christmas card.
I started by taking some very neutral colors (Night of Navy, Smoky Slate) as a background for the stained glass effect I wanted to achieve. Using the GRACEFUL GLASS Vellum and colored with the Stampin’ Blends markers to create a “stained glass” effect. I cut a “window” with the Layering Squares framelits. The structures that hold stained glass are called “cames” and are made of lead or copper. On the DSP the cames are the black outlines. The FRAMELITS used frame the DSP is cut out of Basic Black card stock. Gold thread and a star from the Star of Light framelits in Gold FOIL make the perfect embellishments.
Stained Glass Thinlits Dies COORDINATES with the Illuminated Christmas Stamp Set Create stunning die-cut stained glass windows and window frames in record time with Thinlits dies and the Big Shot.
Video Tutorial:
BASIC STEPS FOR MAKING THIS CARD (consult tutorial for tips and details) :
CARDSTOCK:
Night of Navy,
Smoky Slate,
Whisper White,
Basic Black (with Multi-purpose adhesive sheet on the back)
Graceful Glass Vellum Designer Series Paper
SIZES:
Base Card is: Night of Navy = 5.5″ x 4.25
Whisper White Matting = 5.25″x4″
Smoky Slate for Window = 5″x 3.75″ (window is cut with layering Square)
DIRECTIONS:
CUT square opening on the Smoky Slate piece using the LAYERING SQUARES (consult video for exact dimensions)
Take both Basic Black Card Stock and Gold Foil and apply the back-side with a piece of the MULTI-PURPOSE ADHESIVE Sheet.
Cut with the BIG SHOT both the BLACK window frames and the GOLD star.
Select a piece of Graceful Glass 6″x6″ Designer Vellum and color with Stampin’ Blends Markers
STAMPIN’ BLENDS MARKERS:
Recommended Colors for Coloring Vellum are:
Real Red,
Night of Navy,
Shaded Spruce,
and Daffodil Delight
Stamp the “three kings” image with MOMENTO BLACK Ink and color using the same Stampin’ Blends Colors
Apply Vegas Gold Shimmer Paint to the headwear, garments, and vessels with a fine tipped paint brush. The video tutorial provides steps and further details.
Embellish the finished colored VELLUM “stained glass” with gold “accents” for added sparkle (watch video for details)
Use GOLD THREAD tied around dimensionals (see the video for demonstration) to create “beams” from the GOLD Star which is cut from a STAR shape from the Starlight Thinlit Dies set.
Here are some Batty TREAT projects that I put together for my October Workshop.
The card below was CASed from the talented Mary Fish; I loved the fresh take on the batty images with the vibrant colors using the SPOOKY SWEET Bundle. The card is easy to make and with the help of the BAT PUNCH to make colorful bats; you can’t help but have extras to make a few coordinating tags. Embellish with Black Rhinestones (use CLEAR Rhinestones and color with BLACK Stampin’ Blend marker).
But I couldn’t stop there!
So I punched a piece of WINDOW SHEET with the BAT PUNCH to create a stencil that I used with White SHIMMER Embossing Paste to stencil BATs on Black card stock layered on Batty DSP and Pumpkin Pie Card Stock. So easy to make.
It isn’t hard to love the same bright colors from the Toil and Trouble DSP to pull out your GIFT BAG PUNCH BOARD and make some TREAT BAGS that look just GORGEOUS with the GLITTERED Organza Ribbon. I am going to have to stock up on this ribbon because it is so pretty!
These projects were a pleasure to put together and I hope to inspire my workshop and get everyone’s creative “Halloween” mojo flowing!!!
Pretty & Batty
Stamping Pretty CASED Card by Mary Fish
SPOOKY BATS PUNCH Quickly punch out spooky bats for your projects. *Largest punched image: 2″ x 5/8″ (5.1 x 1.6 cm) * Sleek body style * Large surface area offers precise cutting and leverage * Locks to store * Slim and stackable
Here are CARDSTOCK and Dimensions:
Basic Black (5.25″ .x4″) Whisper White (Base Card, to stamp 4.75″ x 3.5″) , Lemon Lime Twist (5″ x 3.75″)
TAG: Whisper White (2″ x 4″), Basic Black (1.25″ x 3″) and Lemon Lime Twist (1″ x 3.5″
INKS:
Poppy Parade, Bermuda Bay, Gorgeous Grape, Lemon Lime Twist, Momento Black, and Whisper White
EMBOSSING POWDER: White
EMBELLISHMENTS: Glittered Organza Ribbon
GONE BATTY
Stencil Bats on Black with “Toil and Trouble” DSP and the Black FOIL Sheets
Some more CARDSTOCK and Dimensions:
Pumpkin Pie (Base Card), Basic Black (2.25″ .x4.75″) , DSP (4 ” x 2.75″) , Whisper White and BLACK FOIL
INK: Pumpkin Pie
EMBOSSING PASTE: White Shimmer
EMBELLISHMENTS: Black Thread
TOIL and TROUBLE Designer Series Paper
Coordinating colors: Basic Black, Cajun Craze, Crushed Curry, Early Espresso, Gorgeous Grape, Granny Apple Green, Highland Heather, Lemon Lime Twist, Mango Melody, Petal Pink, Pumpkin Pie, Whisper White
Batty and Catty TREAT BAGS
Here are the Dimensions for Making Bags:
GIFT BAG PUNCH BOARD
DSP cut 6″ x 12″ to make a LARGE bag
BLACK FOIL Paper for Bats and Cat (Punch)
Tag dimensions are similar to the first tag (above)
The Many Blessings Stamp Set has become a favorite. Yes, I may live in Florida, but the fall season has always been a favorite time of year. Having spent my middle school and high school years in the mid-west, and then living a year in the northeast while I was in the Navy; it doesn’t take much to remind me of the colors, textures, aromas, and flavors. To that, I love the images created by SU and inspired by Ruth Snyder (Million Dollar Sales Achiever). You know this set will be around for a while and is a great value since it offers so many options over the year. Since my favorite fall image has always been a pumpkin patch or cornucopia brimming with the fall harvest; I had to stamp and color the Pumpkin image!
This is an easy project; especially if you enjoy coloring. Needless to say, I just love to “zone out” and color for hours. Coloring with Stamping Blends has become a stress reducer after a long day at the office! With the light/dark pens….you really can’t go wrong! So, besides demonstrating how easy it is to color these great images; I want to introduce you the joys of a BROTHER Scan N Cut machine. It is an investment…I have owned mine for nearly 3 years and I use it instead of fussy cutting images that don’t come with framelits. I also like to produce enough to create plenty of cards and tags. Certainly, let me know if you are interested in learning more and I can provide some tips.
Here are all the products and dimensions used to make three projects and a LINK to the Video Tutorial. Please leave a comment! Thanks for stopping by!
INSTRUCTIONS for PROJECTS:
Using standard card sizes:
The base card is cut at 5.5″x4.25″ in EARLY ESPRESSO, WHISPER WHITE cut at 5.25″x4″ and PUMPKIN PIE cut at 5″x3.75″.
Use a complementary pattern in any Designer Series Paper you like; I choose a piece from the TUTTI-FRUITI DSP (retired) in GARDEN GREEN cut at 2″x6″ and cut with the TRIPLE BANNER Punch.
WOOD TEXTURES DSP paper is used to cut the diamond shape using the TAILORED TAG punch.
The image is stamped with MOMENTO BLACK ink and colored using the STAMPING BLENDS markers in PUMPKIN PIE, DAFFODIL DELIGHT, CRUMB CAKE, SHADED SPRUCE, CALYPSO CORAL, AND REAL RED.
Use the GOLD THREAD as an accent.
Paint images with VEGAS GOLD All Purpose Ink featured in the Holiday Catalog.
STITCHED FRAMELITS (oval) is used to cut out the sentiment which is stamped with Early Espresso ink.
The sentiment is stamped from the ITTY BITTY Sentiments
The Pumpkin Pie piece is embossed using the BASKETWEAVE 3D Dynamic Embossing Folder and your BIG SHOT.
I used the “Brother Scan N’ Cut” machine to cut out multiple images for cards and tags.
Cut 5″x3.75 Whisper White for the inside of the card.
Making Tags:
Tag base is 2″x6″ in EARLY ESPRESSO card stock.
Use the SCALLOPED TAG TOPPER Punch to cut the top of the tags and the TRIPLE BANNER Punch to cut the bottom.
Cut 1.5″x 4″(depending on the length of tag) from coordinating DSP
Trim corners with the DETAILED TRIO Punch (new from AC) and the bottom with the TRIPLE BANNER punch.
Cut BURLAP RIBBON (to fit tag) and trim with “V” notch at the bottom.
Use GLUE DOTS to adhere the image and Twine for the top.
CHRISTMAS CARD:
Base card cut 5.5″x4.25″ in SHADED SPRUCE card stock.
Stamp “Merry Christmas” from the Many Blessings set in Shaded Spruce to cover card front. Utilize the “stamp – stamp off” technique to create the pattern.
Cut WHISPER WHITE card stock 3.5″ x 3.25″ and REAL RED cut 2″x5″
Stamp WW with leaf “arch” in Shaded Spruce and color with Stamping Blends (same color). Use CRUMB CAKE (light) to outline the image.
Use the SUBTLE Embossing Folder to emboss the Real Red card stock and then trim the bottom with the TRIPLE BANNER Punch.
Center and adhere Red banner with a strip SUITE SEASON SPECIALTY WASHI TAPE from the Holiday Catalog.
Stamp candy cane image with MOMENTO BLACK and color with Stamping Blends colors REAL RED, SHADED SPRUCE, DAFFODIL DELIGHT, NIGHT OF NAVY (light) and CRUMB CAKE. Stamp “Merry Christmas” with REAL RED ink.
Embellish candy cane image with FROST WHITE and stars with VEGAS GOLD SHIMMER PAINT available in the Holiday Catalog.
Either fussy cut or use the “Scan N Cut” to cut out the image and adhere with DIMENSIONALs on WW piece.
Embellish with RED RHINESTONE BASIC JEWELS from the Holiday Catalog.
Cut a 6 ” piece to create a small bow with SILVER BAKER’S TWINE.
Many Blessings Video Tutorial:
Let me demonstrate coloring techniques, production tips, and project ideas!
These are cards I loved putting together using the yummy Designer Series Paper GARDEN IMPRESSIONS — a 6″ X 6″ Paper Pack from the Annual Catalog. Sometimes it’s the DSP that can inspire a card…and this is certainly the case!
I was also looking to create a bright and cheerful GET WELL greeting! Click below for my YOUTUBE Video and get all the steps for making this card featuring the DANDELION WISHES Clear-mount stamp set. This is also a great video for anyone interested in seeing more steps and tips for creating great cards!
There you can find all the steps and tips for putting this project together. It is a great masculine card for any occasion or for anyone that loves the sea. Below are listed all the featured products to include the brand NEW Stamparatus “must have” stamping tool that gives you flawless alignment for multiple images and all perfectly inked!
During the month of August, you can start earning Bonus Days coupon codes to use in September!
There is no limit to how many coupons you can earn, so now’s the perfect time to get items on your wish list or purchase limited-time bundles during the Color Your Season promotion.
Here’s the deal:
For every $50 you spend August 1–31 (before shipping and tax), you’ll get a $5 Bonus Days coupon code that can be used September 1–30, 2018.