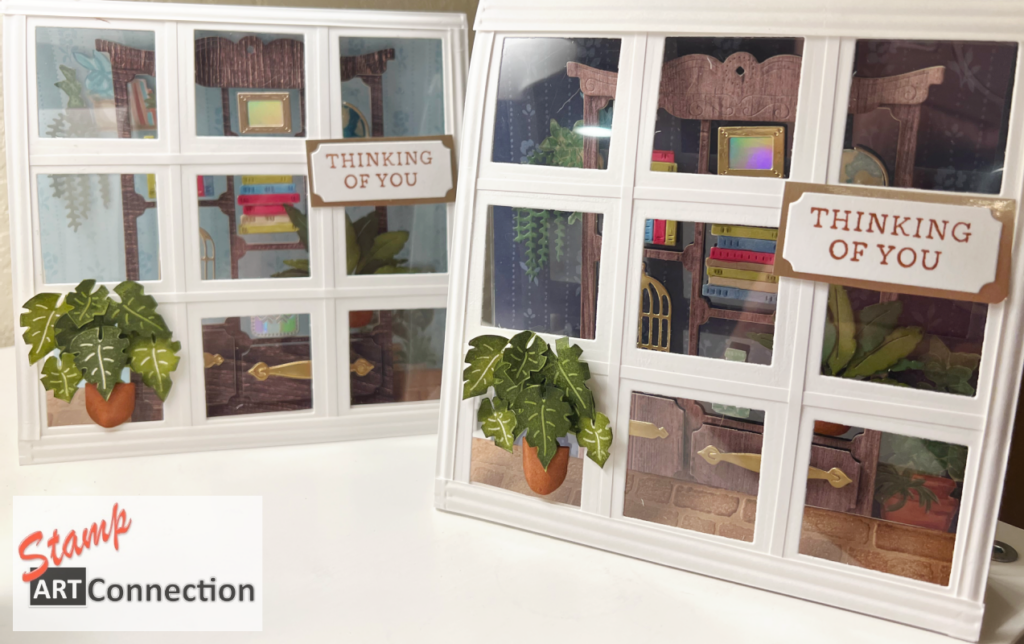
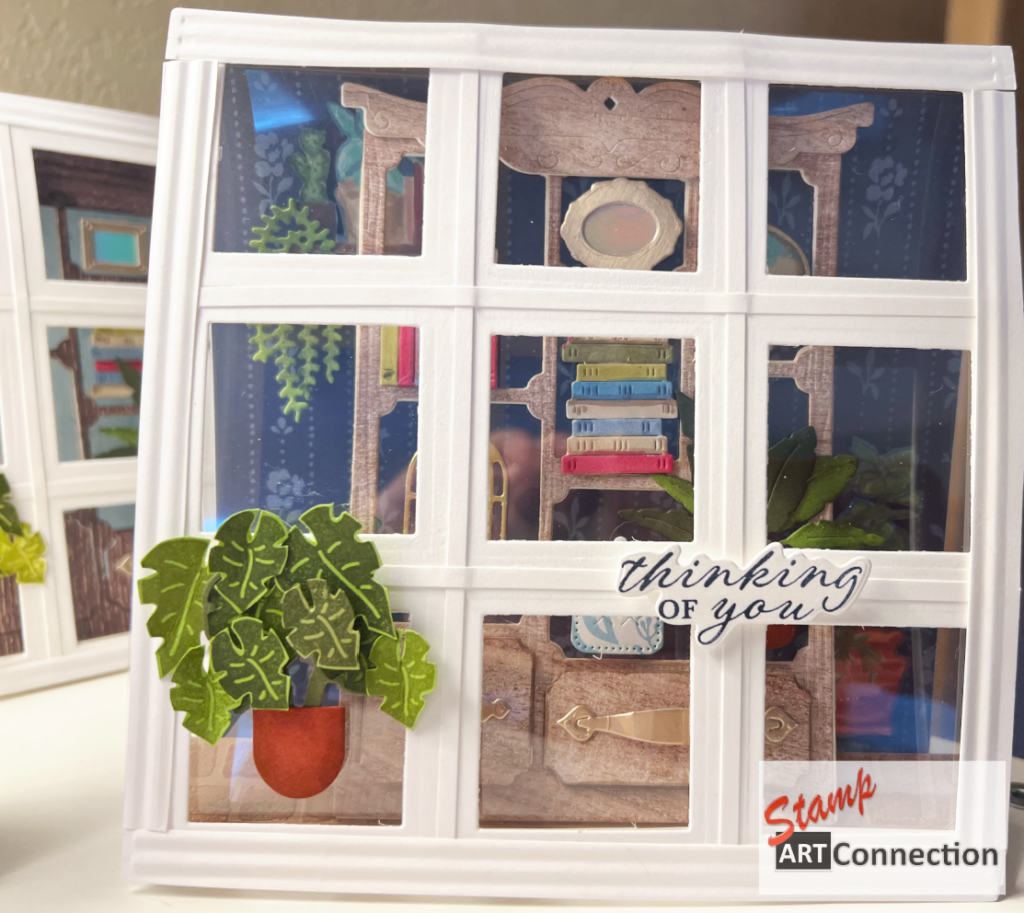
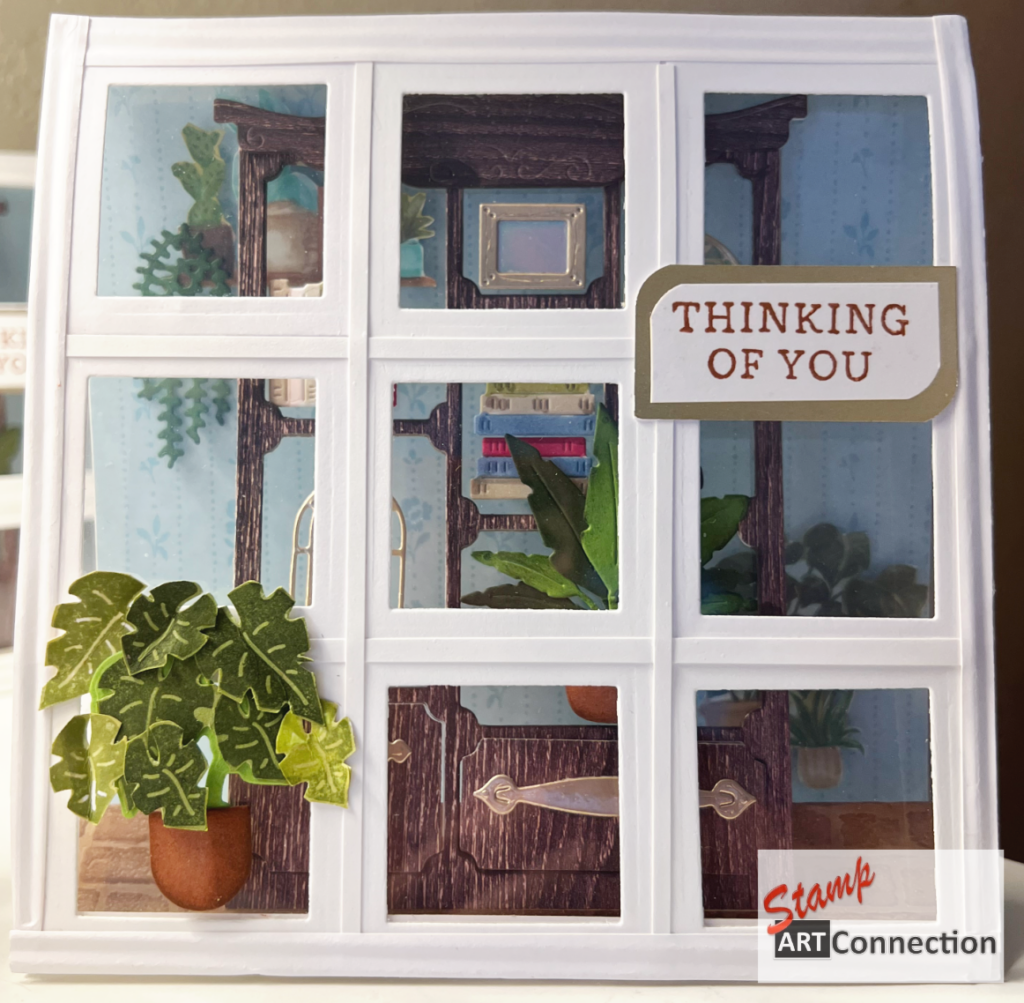
If you love dimension and you love a card that makes people go, “WAIT—how did you do that?!”… this one’s for you. 💛
Today’s project is a 6″ x 6″ tent card with transparent layers using Acetate Window Sheets to create a dreamy conservatory window effect—inspired by the brilliant Sam Calcott (Mixed Up Craft). The layered “windows” give you that airy greenhouse vibe, while the patterned papers and texture bring all the cozy detail.
Featured Products
- Stampin’ Up! On Display Bundle
- Layering Squares Dies (for the conservatory windows)
- Mini-Corrugated 3D Embossing Folder
- Brick & Mortar 3D Embossing Folder
- DSP: Hobby Haven, True Blue Florals, In Good Taste
- Acetate Window Sheets
Colors + Extras Used
- Cardstock & Ink colors: Old Olive, Mossy Meadow, Copper Clay, Crumb Cake, Basic White, Blueberry Bushel, Boho Blue, Granny Apple Green
- Stampin’ Blends (coordinate with your florals/foliage accents)
The “Conservatory” Concept
The magic of this card is the structure: you’re building a sturdy tent base, then adding acetate layers so the eye looks through the card—like peeking into a conservatory filled with patterned panels, texture, and pretty details.
Think: window panes + garden room + layered depth. ✨
Cutting & Scoring Guide
Card Base (Basic White Cardstock)
Start with: 8.75″ x 6″ Basic White
Score on the 8.75″ side at:
- 0.25″
- 6.25″
- 7.25″
- 8.25″
Fold using valley & mountain folds to create the tent structure.
Tip: When you burnish, go gently at first—this is one of those fold patterns that behaves best when you “train” the paper in stages.
Acetate Window Sheets (2 pieces)
- 6″ x 6.25″
- Score at 0.25″ along the 6.25″ side
- 6″ x 5.75″
(No score needed)
These acetate layers are what give the card its “airy” conservatory window look.
Background Panel (True Blue Florals DSP)
Cut: 6″ x 5 7/8″
This sits behind the acetate and becomes the gorgeous backdrop that shows through the “window wall.”
Building the Conservatory Windows
Window Pane Cuts (Layering Squares Dies)
Using the 2″ and 1.75″ Layering Squares Dies nested, cut:
- 9 window frames/panes
(These are the repeating “window units” that make your conservatory wall.)
Window Assembly Strips (Thick Basic White Cardstock)
Cut strips to assemble the window grid:
- Three strips at 0.25″ x no shorter than 6″
- Six strips at 1/8″ x no shorter than 6″
Tip: Cut the strips long, assemble, then trim flush for the cleanest finished edges.
Assembly Steps
1) Form the Tent Base
Using your score lines, fold the base into a 6″ x 6″ tent using alternating valley/mountain folds. Burnish carefully so the structure stands crisp and square.
2) Add the DSP Background
Adhere the True Blue Florals DSP (6″ x 5 7/8″) to the inside/back panel so it becomes the view through your windows.
3) Attach the Acetate Layers
- Use the scored acetate (6″ x 6.25″) to create a small tab (the 0.25″ scored area).
- Adhere that tab neatly to the tent base so the acetate “stands” as a transparent front layer.
- Add the second acetate piece (6″ x 5.75″) as your additional transparent layer where it best enhances depth (this is where you can decide: closer to the front for crisp window emphasis, or slightly behind for a softer layered look).
Adhesive tip: Use strong tear & tape / red line tape or a clear adhesive that grips acetate well. Hide adhesive behind your window strips and sentiment pieces.
4) Build the Window Grid
Assemble your 9 window units using the die-cut squares and the strip pieces. Arrange them in a neat grid to create the conservatory wall.
Once you like the layout, adhere the grid over the acetate so the background DSP shows through the “panes.”
5) Add Texture
This is where your card goes from “pretty” to “WOW.”
Use:
- Brick & Mortar 3D Embossing Folder for architectural texture (think conservatory walls!)
- Mini-Corrugated 3D Embossing Folder for extra structure/detail panels (perfect for grounding the design)
Add panels of In Good Taste (hello, subtle neutrals!) and/or Hobby Haven for contrast and theme support.
6) Decorate with the On Display Bundle
Now bring in the star: On Display. Add your focal images and sentiment—layered on the front window area and/or inside, depending on the look you want.
Color with Stampin’ Blends using your palette:
- Greens: Old Olive, Mossy Meadow, Granny Apple Green
- Neutrals/Warmth: Copper Clay, Crumb Cake
- Blues: Boho Blue, Blueberry Bushel
Customization Ideas (Because You’ll Want to Make More Than One)
- Swap the background DSP to match the season—this structure is made for florals, holiday scenes, or cozy neutrals.
- Add a soft vellum curtain layer behind the acetate for a dreamy “sunroom” vibe.
- Turn the windows into a 3×3 grid with tiny stamped accents in each pane (little leaves, tiny blooms, mini sentiments… so cute).
Final Thought
This conservatory-style tent card is one of those projects that looks impressive, but once you’ve made one, you’ll be hooked—because the acetate layers do the heavy lifting and the window grid makes it feel like an actual little room.
If you give this design a try, tag me or share your version—I’d love to see what DSP and colors you use for your “view through the windows!”
If you want, paste your sentiment(s) and what you used as the main On Display image (and where you placed the Brick & Mortar vs Mini-Corrugated panels), and I’ll tailor this post to match your exact finished card—plus I can add a tight “shopping list” section and a quick supply checklist you can reuse in newsletters.
GALLERY

VIDEO TUTORIAL
FEATURED PRODUCTS